














If an earring looks like it needs a stretched lobe, does that mean the chunky part goes through your ear? Not with a properly designed fake taper earring. The trick is separating the dramatic bit you see from the thin bit your piercing wears, because a convincing illusion shouldn't require you to push through pain.
What a Fake Taper Earring Really Is
You want the long black spike, the pointed silhouette, the slightly rebellious ear situation. You don't necessarily want to enlarge your piercing to get it. A fake taper gives you that styling option by putting the drama outside the hole.
A fake taper earring is a fashion piece that imitates stretched-ear jewelry while fitting an existing, healed conventional piercing. Depending on the design, a cone, spike, or spiral attaches to a thin post or bar, sometimes with decorative pieces on both sides of the lobe.
The decorative width describes the look; the wearable section determines the fit. Those measurements aren't interchangeable, even when a product photo makes the whole earring look like a continuous spike.
The illusion lives outside your ear
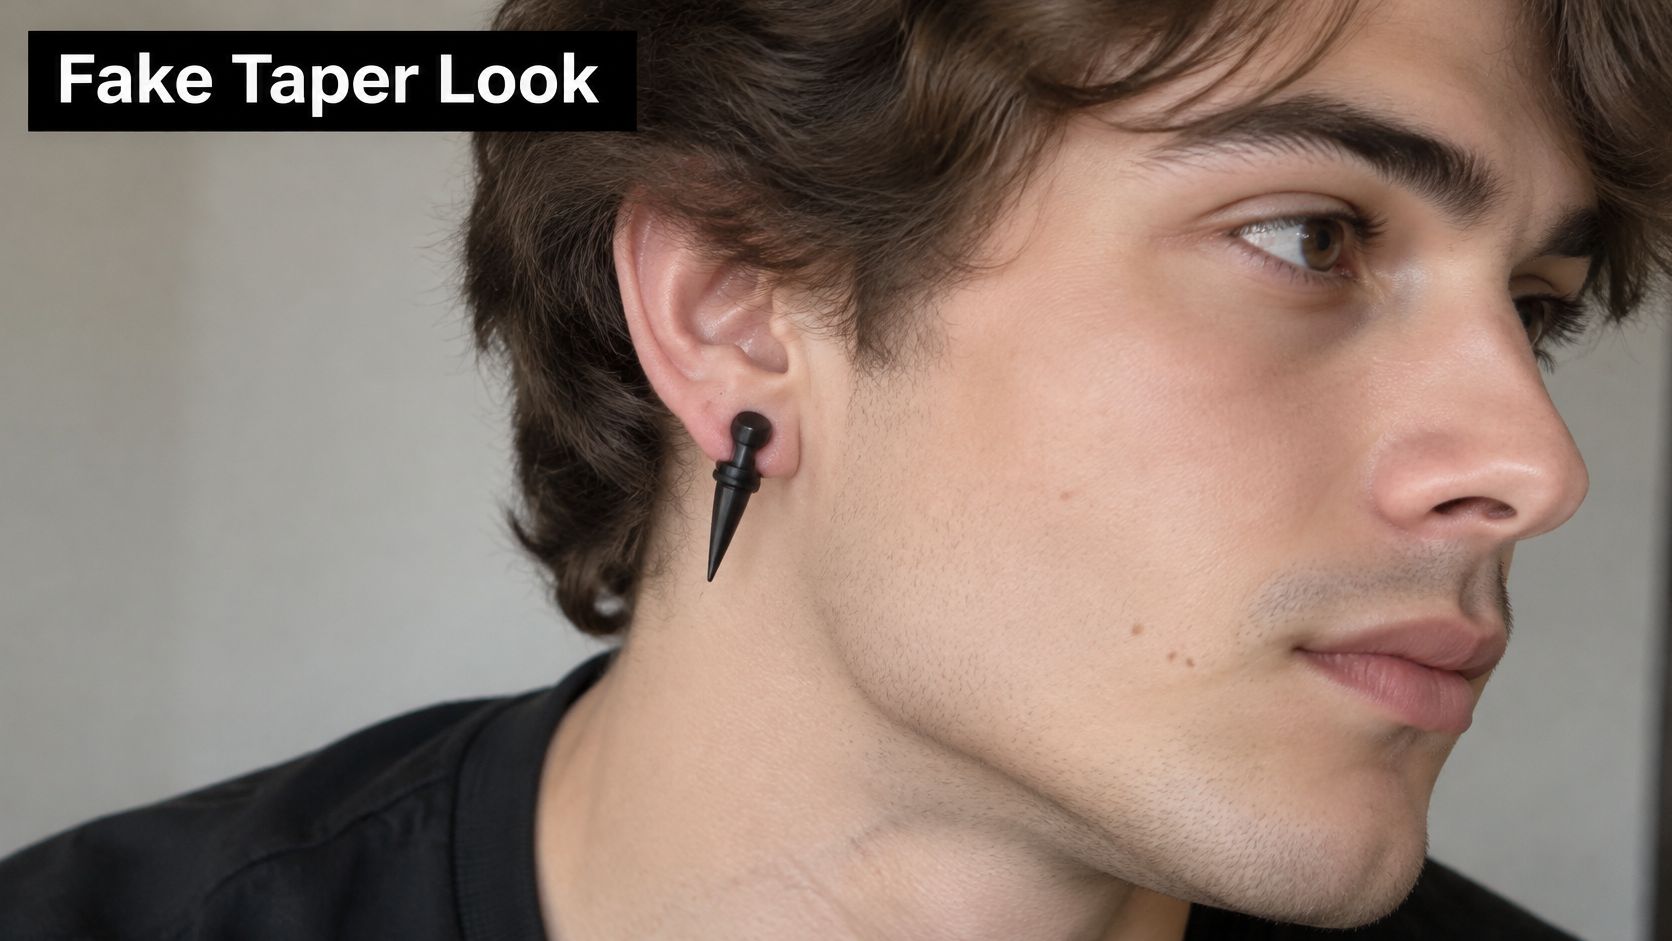
Say you're choosing a pointed black pair for a show. From the front, the broad end suggests stretched jewelry; behind the scenes, the narrow bar does the ordinary earring job. Check the closure photo rather than assuming the pointed end slides through.
This worn view shows the silhouette you're shopping for.
The visual language has deep roots across cultures: The Daily Iowan's history of body modification describes Ötzi, dated approximately 3,500–3,100 BCE, whose lobes appear to have held jewelry roughly 8–11 millimeters wide, and the increased visibility of stretched ears in Western body-art scenes during the 1980s and 1990s.
For teens exploring alternative style, gift buyers, and people who dress differently at work and on weekends, the appeal is flexibility. You can choose the aesthetic without choosing intentional tissue expansion. Gift shopping still requires a size check, though; your friend's style tells you nothing about their piercing diameter.
Shopping rule: If it only goes in by force, it isn't functioning as a non-stretch accessory.
Fake Tapers Versus Real Stretching Tools
Fake taper earrings versus real tapers
| Question | Fake taper earring | Real taper |
|---|---|---|
| Job | Costume stretched-lobe look on a normal piercing | Guide jewelry into a piercing that already fits |
| Part in the hole | Thin post or bar sized to the existing piercing | Gradually widening shaft |
| Does it change your gauge | No, if it fits without pressure | Can enlarge tissue if forced or left in |
| Everyday wear | Only if light, balanced, and painless on a healed piercing | Not jewelry; not for continuous wear |
| Sleep and workouts | Skip heavy or poorly balanced pieces | Don't wear while sleeping or exercising |
| If it resists or hurts | Take it out immediately | Stop; forcing causes tears, blowouts, and scarring |
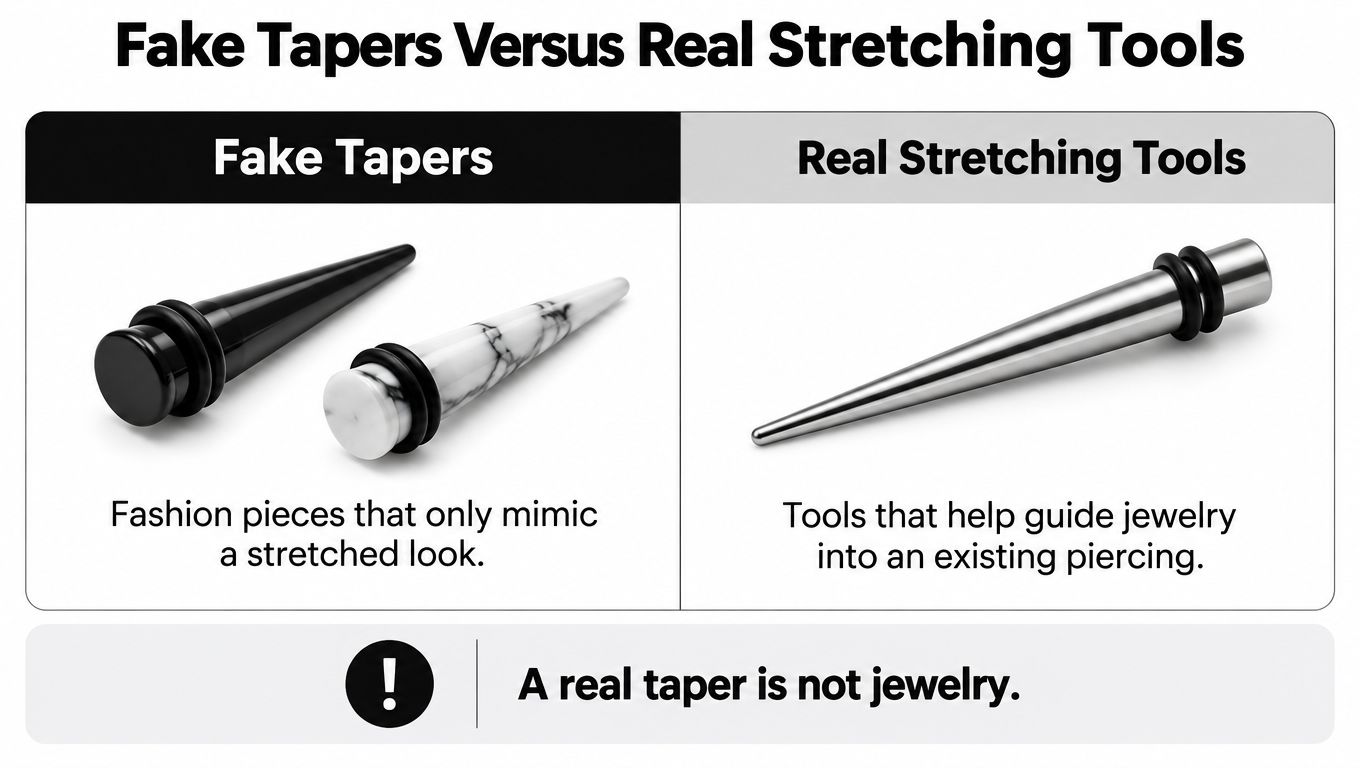
The names sound similar, but the jobs aren't. The Association of Professional Piercers' stretching brochure describes actual tapers as professional instruments for guiding jewelry into an existing piercing, not tools for forcing a larger size through tissue. It also advises against stretching with tapered jewelry such as taper pins, talons, and spirals.
Use this visual comparison to separate the fashion piece from the insertion instrument.
Why a widening shaft changes the job
A real taper gets progressively thicker along its length. Advancing it pushes a wider section against the piercing channel, also called the fistula. Leaving it in can create uneven pressure rather than the stable wearable surface you'd expect from a properly fitted plug or tunnel.
That's why a pointed tool isn't a clever shortcut to a larger piercing. Forcing it, skipping sizes, or treating it as hanging jewelry can lead to tearing, inflammation, scarring, migration, or a blowout, where tissue is displaced around the opening. Nation Tattoo's explanation of tapers and blowouts reinforces the distinction between an insertion instrument and jewelry intended for ongoing wear.
Want to explore actual stretching? Treat that as a separate decision, starting with ear stretching basics and how to properly stretch your lobes, rather than experimenting with a decorative accessory.
The video below accompanies that separate topic.
Daily wear isn't decided by the silhouette
A genuine taper doesn't become everyday jewelry because it looks cool. Healthline's ear-stretching guidance warns against wearing tapers during sleep or exercise and against prolonged wear.
For a decorative fake version, assess the construction instead. Does it hang evenly? Does the back pinch? Does turning your head make the cone tug downward? A lightweight accessory may work for daytime wear on a healed lobe, but a long or poorly balanced piece is a poor choice against a pillow or during movement-heavy exercise.
Resistance, pinching, throbbing, bleeding, or swelling means stop and remove the accessory if it comes away easily. Don't push it farther, and don't force stuck jewelry out.
The Millimeter That Actually Fits Your Hole
What part of a fake taper has to fit? The narrow post that passes through your lobe, not the wide cone that gives the earring its stretched look. Measure the bar, not the cone. Compare the post's diameter with jewelry you already wear comfortably. The decorative end sets the style; it does not tell you what size your piercing needs.
Gauge numbers run backward: the smaller the number, the thicker the jewelry. The approximate conversions below follow the Accurate Online Ruler ear gauge chart. Check the seller's millimeter dimensions too, since manufacturer conventions can differ.
Gauge sizes and what they mean for a fake taper
| Gauge | Approx. thickness | Role on a fake taper |
|---|---|---|
| 20 gauge | About 0.8 mm | Common conventional lobe post; typical wearable section |
| 18 gauge | About 1.0 mm | Common lobe post; still a standard piercing |
| 16 gauge | About 1.2 mm | Thicker lobe jewelry; confirm your hole before buying |
| 14 gauge | About 1.6 mm | Start of many intentional stretches; too thick for most unstretched lobes |
| 12 gauge | About 2.0 mm | Stretched size; costume-tip territory only for a standard lobe |
| 10 gauge | About 2.5 mm | Stretched size; not a wearable post for a standard lobe |
| 8 gauge | About 3.2 mm | Clearly enlarged; visual reference for the wide end |
| 6 gauge | About 4.0 mm | Large stretch look; decorative scale only |
| 4 gauge | About 5.0 mm | Large stretch look; decorative scale only |
| 2 gauge | About 6.0 mm | Large stretch look; decorative scale only |
| 0 gauge | About 8.0 mm | Classic plug size people picture; not the standard post |
| 00 gauge | About 10.0 mm | Even larger classic plug size; not the standard post |
Check the diameter and the usable length
Digital calipers can help you check a narrow post. Close the jaws gently around the smooth wearable section without squeezing it. A millimeter ruler is useful for an initial comparison, though tiny differences are harder to judge by eye. Keep the measurement focused on the post, not a screw-on end, decorative shoulder, or exposed thread.
Length matters as well. The post may have the right thickness but leave too little room between the decorative front and the back. Your lobe should not be flattened to make the closure engage.
Before buying, check three details:
- Identify the wearable measurement. Look for a separate post diameter rather than relying on the overall size.
- Inspect the closure. Confirm which end detaches and how much room the lobe has.
- Resolve missing details. If a listing is unclear, don't assume its narrow section matches your current earrings.
The plug and taper sizing guide explains jewelry dimensions that can be confusing in product listings. A taper-shaped look is costume styling, not permission to stretch a piercing. The thin wearable post determines fit; the wide cone does not.
Don't use another piercing as a sizing experiment
A fresh or irritated piercing is not a test site for a new fashion piece. Keep healing jewelry in place unless your piercer or clinician advises a change, and don't assume an accessory made for a lobe belongs in cartilage.
A heavy dangling cone can catch hair and put pressure on a helix or another cartilage placement. For a healed lobe, the fit should be secure without pinching, with no increasing tightness as you wear it. Remove the piece if it starts to feel tight or uncomfortable.
Materials That Stay Kind to Sensitive Ears
Once the size is right, material is your next comfort decision. A smooth, well-fitted post can still irritate you if its alloy triggers a skin reaction. Color doesn't identify that alloy, and hypoallergenic isn't a substitute for material documentation.
Nickel reactions can appear after a delay as itching, redness, blistering, dryness, or thickened skin. A pediatric dermatology review of nickel allergy reports positive nickel-sulfate patch tests in 18.5% of tested patients and cites European EN 1811 guidance using a maximum nickel release of 0.2 micrograms per square centimeter per week for articles such as children's earrings.
Those patch-test results describe tested patients, not the likelihood that your particular earrings will cause a reaction. Your own allergy history and the actual metal touching your ear are more useful shopping clues.
Compare materials for healed ears
Fake taper materials for sensitive ears
| Material | Best use | Limit |
|---|---|---|
| Implant-grade titanium, including F136 | Daily wear on sensitive, healed lobes | Still remove if the fit pinches or the piece is too heavy |
| Documented implant or 316L surgical steel | Healed piercings when nickel release is known | Nickel allergy can still react; don't trust the word hypoallergenic alone |
| Acrylic or similar plastic | Short, light costume wear on a fully healed lobe | Scratches, hard to sterilize, wrong for fresh or just-stretched tissue |
| Plated finishes | Color only, on a verified base metal | Worn plating, sweat, and scratches expose the alloy underneath |
Documented implant-grade titanium is a sensible starting point for sensitive ears. Check the post and the backing, not just the decorative front. If different components use different metals, your skin may still touch the material you're trying to avoid.
Steel needs a more individual decision. A surgical-steel description doesn't automatically make a piece appropriate for someone with nickel allergy. Request composition or nickel-release information, and use the hypoallergenic jewelry guide for sensitive skin to decode the terms you'll encounter.
Lightweight doesn't mean suitable for healing
Acrylic can deliver a colorful, low-weight costume look, but its surface deserves scrutiny. HB Magazine's ear-stretching and aftercare guide discusses concerns including scratching, difficulty sterilizing acrylic, and bacteria collecting on damaged surfaces. Those limitations make it inappropriate for fresh or freshly stretched tissue.
Plated jewelry has a different weak point: the coating. Check the edges and the wearable bar for chips, scratches, rough patches, or worn color. Don't keep using a damaged piece just because the front still looks good.
Skin check: Persistent itching or a rash is a reason to stop wearing the accessory, not a challenge to build tolerance.
For simple irritation on a healed lobe, remove the piece gently and avoid repeatedly testing it. Heat, worsening pain, significant swelling, discharge, or fever needs medical advice, with urgent assessment for fever or rapidly worsening symptoms. If infection is possible, don't force removal or let the opening close without a clinician's guidance.
Put On and Take Off a Fake Taper Safely
Start with a fully healed, comfortable lobe, clean hands, and a clear view of the closure. Set a small tray or clean towel on the counter so a loose back doesn't disappear down the drain. Good lighting beats trying to assemble tiny jewelry by feel.
Insert it without turning it into a stretching tool
- Wash and dry your hands. Clean the wearable post with a material-compatible method, then rinse and dry it as appropriate. For a washable, uncoated piece, mild soap and water can remove surface debris; don't assume coatings or decorative inserts tolerate soaking. Avoid alcohol on irritated skin.
- Compare the post with your current jewelry. Check the smooth section that sits in the piercing, using calipers if needed. Also inspect it for burrs, bent metal, damaged threads, or a rough coating. A suspicious edge is enough reason to choose another piece.
- Open the closure before approaching your ear. Identify whether the back unscrews, pulls off, or releases another way. Supporting both components prevents you from twisting the whole earring against your lobe while trying to undo it.
- Guide the thin section straight through. Keep the post aligned with the existing channel. Don't rotate or angle the cone so that its widening decorative section starts entering the hole.
- Stop at resistance. Don't add lubricant and push harder to make an incompatible post fit. If you can't find the channel easily, put the accessory down and have a piercer assess the situation rather than probing repeatedly.
- Set the back without clamping your lobe. Secure the closure while leaving the tissue uncompressed. Turn your head gently and check in a mirror: the cone shouldn't drag the opening downward or make the skin bunch around the post.
Make the first wear an easy test
- Keep the first session short. Try it while you're awake and able to notice discomfort, rather than debuting it during a long event. Check for pressure marks, increasing redness, or an urge to keep adjusting the back. You don't need to finish an outfit's planned wear time.
- Support the lobe to remove it. Hold the decorative section steady, release the closure, and withdraw the thin post along the channel. Never pull a broad decorative tip through the piercing, and don't yank a stuck back.
- Clean, inspect, and store the jewelry. Look for residue or new surface damage before putting it away. If the lobe is comfortable, a clean, properly fitted plain stud can be your low-profile replacement; if changing jewelry hurts, stop handling it and get advice.
Fresh piercings, openings that still crust, and ears with a history of problematic scarring deserve a piercer's assessment before fashion swaps. Don't remove healing jewelry to try this look, and don't repeatedly insert a stud into tissue you've just irritated.
After removal, your lobe shouldn't bleed, feel hot, or throb. Persistent symptoms need attention, not another attempt with the same accessory.
Style the Look and Shop Your Fit
A tapered silhouette can add a little edge without turning your whole outfit into a costume. The cone is the visual statement; the narrow post is the part that goes through your piercing and determines fit. Choose the look around your clothes and plans, then check that the piece won't snag or get in the way.
Give the cone a supporting cast
Plain tee, asymmetric ears. Pair one black or steel-colored cone with a tiny stud in the opposite ear. The pointed shape gets attention without making both ears match. Keep other jewelry simple if you want the cone to lead.
Leather jacket, short spikes. Pick a compact spike that clears the collar instead of brushing it when you look down. That gives you an angular look without a long piece catching on fabric. Try the jacket on with the jewelry before heading out.
Night-out metallics, a helix stud nearby. A subtle metallic cone in your lobe can sit beside a separately fitted helix stud. Match the finishes for a coordinated stack, or mix them on purpose. Take the decorative piece out before bed; it isn't sleeping jewelry.
Festival color, simple return-to-work studs. A colorful acrylic pair can suit a playful outfit on fully healed lobes. Check that the surfaces are smooth and undamaged, and consider whether hats, headphones, or costume pieces might catch the points. Bring familiar studs as an easy alternative if the accessories become uncomfortable.
Temporary can be the whole point
Choosing a removable look is a style choice in itself. A case series of 53 stretched-lobe repair patients treated between 2012 and 2019 describes surgery as part of repairing stretched lobes. It cannot predict an individual outcome, but it's a reminder that trying a style and choosing to stretch are different decisions.
For everyday wear, consider properly fitted flat-back studs. Their low-profile shape can take over when you want the statement piece to stay in the jewelry box.
BodyCandy's ear jewelry is available in F136 titanium, 14k gold, 316L surgical steel, and nickel-free materials. Flat backs come in 16G for cartilage and 18G or 20G for lobes. Options are listed for lobe, helix, tragus, conch, daith, rook, and industrial piercings, so choose jewelry for the actual placement rather than assuming a lobe fit works in cartilage.
Before buying, check the wearable diameter, usable post length, material, and closure. The wide cone is costume; only the thin wearable section decides fit. A taper-shaped look is never a reason to stretch your piercing.
Get the stretched look minus the stretch with BodyCandy's ear jewelry, and keep a properly fitted flat-back stud ready for everyday wear. Visit BodyCandy to compare styles for the piercing you already have. If the piercing is still healing or feels unhappy, leave the new look out and ask a professional piercer to assess it first.