So you did it—you got that awesome new nose piercing and you're officially part of the club! The initial thrill is amazing, but now the real journey begins: the nose piercing healing process. That new stud or hoop is going to take a bit of commitment, with most nostril piercings needing a solid 4 to 6 months to fully heal up.
Your Nose Piercing Healing Journey Starts Now
Welcome to the most important part of rocking your new look—making sure it heals perfectly. You're probably buzzing with questions like, "How long until I can show off a cute new hoop?" or "Is this little bit of redness normal?" Don't worry, we've got you. Think of us as your piercing BFF, here to walk you through every single step.
Patience is your new best friend on this journey. While your piercing might look healed on the outside after a couple of months, the tissue on the inside is still busy rebuilding and getting strong. Sticking to a consistent and gentle aftercare routine is the secret to avoiding those pesky irritation bumps and ensuring a smooth, stress-free heal.
What to Expect From Your Healing Timeline
Everyone's body is different, so your healing journey might not look exactly like your friend's. That's totally normal! However, there are some key factors that play a huge role in how quickly and smoothly things go.
Here's what will shape your personal healing schedule:
- Your Piercing Placement: A standard nostril piercing has a different healing path than a more complex septum or high nostril piercing.
- Your Aftercare Habits: This is non-negotiable. Sticking to a twice-daily saline rinse is the number one rule for a happy piercing.
- Your Choice of Jewelry: The material and style of your starter jewelry play a massive role. There's a reason piercers love implant-grade titanium studs!
- Your Overall Health: A healthy immune system is your best asset, helping your body heal faster and more effectively.
Here's a quick summary of what to expect for different types of nose piercings. Use this scannable chart to get a fast overview of your healing timeline.
Quick Guide to Nose Piercing Healing Times
| Piercing Type | Average Healing Time | Best Starter Jewelry |
|---|---|---|
| Nostril | 4-6 Months | Stud, L-Shape, or Nose Screw in implant-grade titanium |
| High Nostril | 6-9 Months | Stud or L-Shape in implant-grade titanium |
| Septum | 2-3 Months | Circular Barbell (Horseshoe) or Captive Bead Ring |
| Bridge | 2-3 Months | Straight Barbell in implant-grade titanium |
| Nasallang | 4-9 Months | Straight Barbell in implant-grade titanium |
Remember, these are just averages. The jewelry you start with can definitely affect your healing. For instance, a snug ring might look cool, but it can move around more and cause irritation, while a stud offers more stability during that crucial initial period. You can learn more about the factors influencing how long a nose piercing takes to heal on Healthline.com.
The key takeaway? Your piercing is a wound that needs time and care. Rushing the process or getting lazy with aftercare is the fastest way to run into problems.
Ready to dive deeper? Let's break down exactly what you can expect, week by week, so you can feel confident and in control of your healing from day one.
Navigating the Week-By-Week Healing Stages
Getting a new piercing is a thrill, but the real journey is in the healing. Think of your nose piercing’s healing timeline as a marathon, not a sprint. Knowing what to expect week-by-week will make the whole process less stressful and way more exciting. Let's map it out so you feel confident every step of the way.
Week 1: The Don't Touch Phase
Welcome to the beginning! Your body's first job is to react to the new piercing. It's totally normal to see some redness, swelling, and feel some tenderness right around the piercing site. That’s just your body’s way of saying, "Hey, something new is here!"
Consider this first week the ultimate hands-off period. Your only job is to clean the area with a sterile saline solution twice a day and fight every urge to touch, twist, or fiddle with your new jewelry. Your body is already hard at work, and leaving it alone is the best help you can give.
To give you a bird's-eye view of the major milestones, here's a quick look at the nose piercing healing journey.
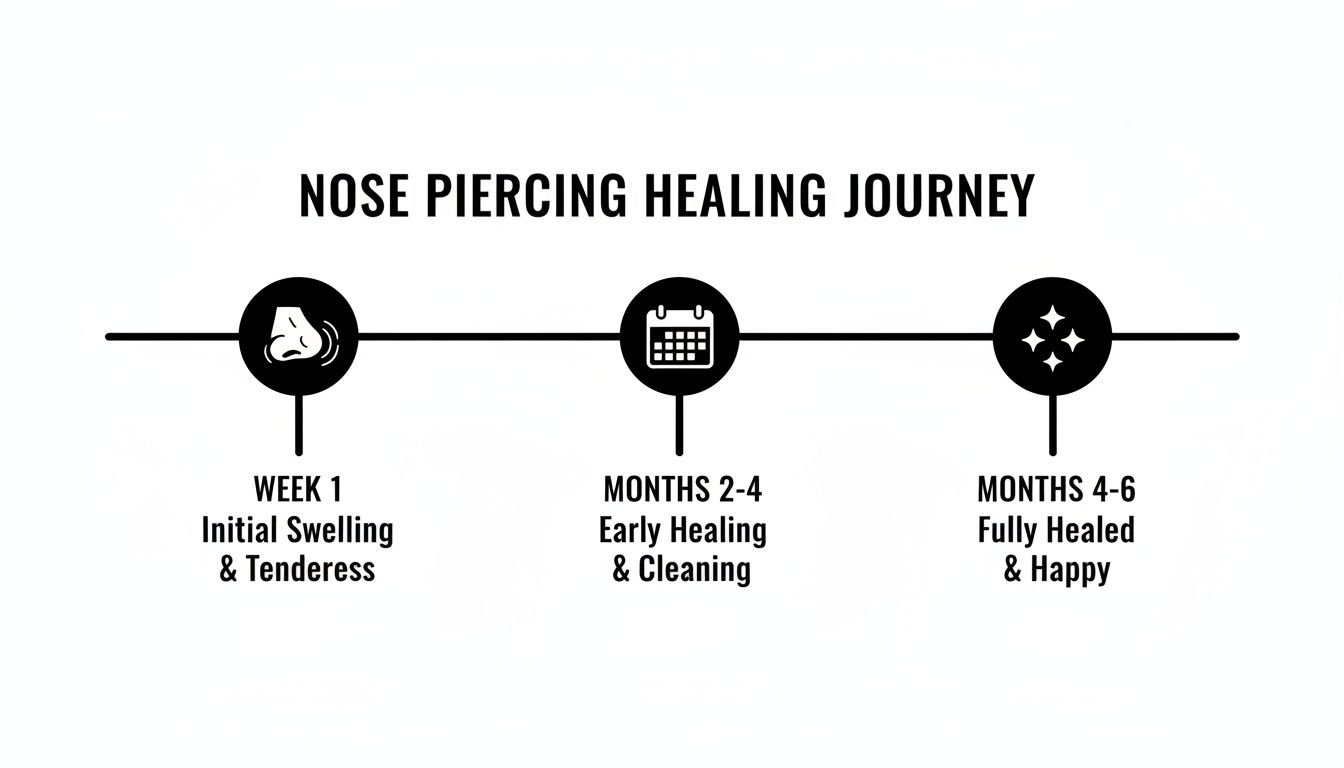
This graphic is a great reminder that while the initial intensity dies down pretty fast, true healing takes several months of consistent, patient care.
Weeks 2 to 4: Settling In
During this stage, you'll notice the initial swelling and soreness start to fade away. Your piercing is beginning to "settle in," but don't be fooled—it’s still incredibly delicate. This is also when you'll probably start seeing some "crusties."
Don't panic! Those crusties are a completely normal and healthy part of the healing process. It's just dried lymph fluid, which is your body's natural method of cleaning the wound from the inside out.
- What to do: Gently soften the crusties with your saline spray before you clean.
- What not to do: Never, ever pick them off with your fingers! That’s a fast track to introducing bacteria and irritating the fragile new tissue.
Let the saline do its magic, then gently pat the area dry with a fresh piece of non-woven gauze. Consistent, gentle cleaning is your absolute best friend right now. For a deeper dive, check out our guide on the healing times for popular piercings.
Months 2 to 4: The Deceptive Phase
This is, without a doubt, the most critical part of the entire healing process. Why? Because on the outside, your piercing might look and feel almost completely healed. The redness is probably long gone, it doesn't hurt anymore, and you're feeling pretty good about it.
But on the inside, the tissue is still working overtime to rebuild and strengthen. This internal channel, called a fistula, takes way longer to mature than the skin on the surface.
It's so easy to get lazy during this phase, but this is when you have to be most diligent with your aftercare. Skipping cleanings or trying to change your jewelry too early can set your healing back by weeks, or even months.
Stick with your routine! Keep up with the twice-daily saline soaks and continue to protect your piercing from snags, bumps, and harsh skincare products. Your future, beautifully healed piercing will thank you for it.
Months 4 to 6: And Beyond
You’re in the home stretch! By now, your piercing should feel comfortable and look great. That internal fistula is getting stronger and more resilient every day. For most people, this is the point where a piercing is considered fully healed.
So how do you know for sure that you've crossed the finish line? A truly healed piercing will have all these signs:
- No More Crusties: The piercing has stopped producing any kind of discharge.
- No Pain or Tenderness: You can gently touch the area without any discomfort.
- Normal Tissue: The skin around the piercing looks and feels just like the rest of your nose—no redness, swelling, or bumps.
- Jewelry Moves Freely: The post can be moved gently during cleaning without any pain or tightness.
Once you can check off every single one of those boxes, you can finally—and safely—start exploring the amazing world of new nose jewelry! This is your reward for months of patience and great care.
Mastering Your Daily Aftercare Routine
A perfect heal all comes down to a consistent, simple aftercare routine. Forget the myths, harsh soaps, and mystery concoctions you might have heard about—let's walk through the professional, piercer-approved method for a flawless healing journey.
Honestly, your new piercing only needs one thing: a sterile saline solution. It’s incredibly gentle and effective because it mimics your body's own natural fluids, making it the perfect sidekick for cleaning. Your goal is simple: clean your new piercing twice a day, every day, without fail.
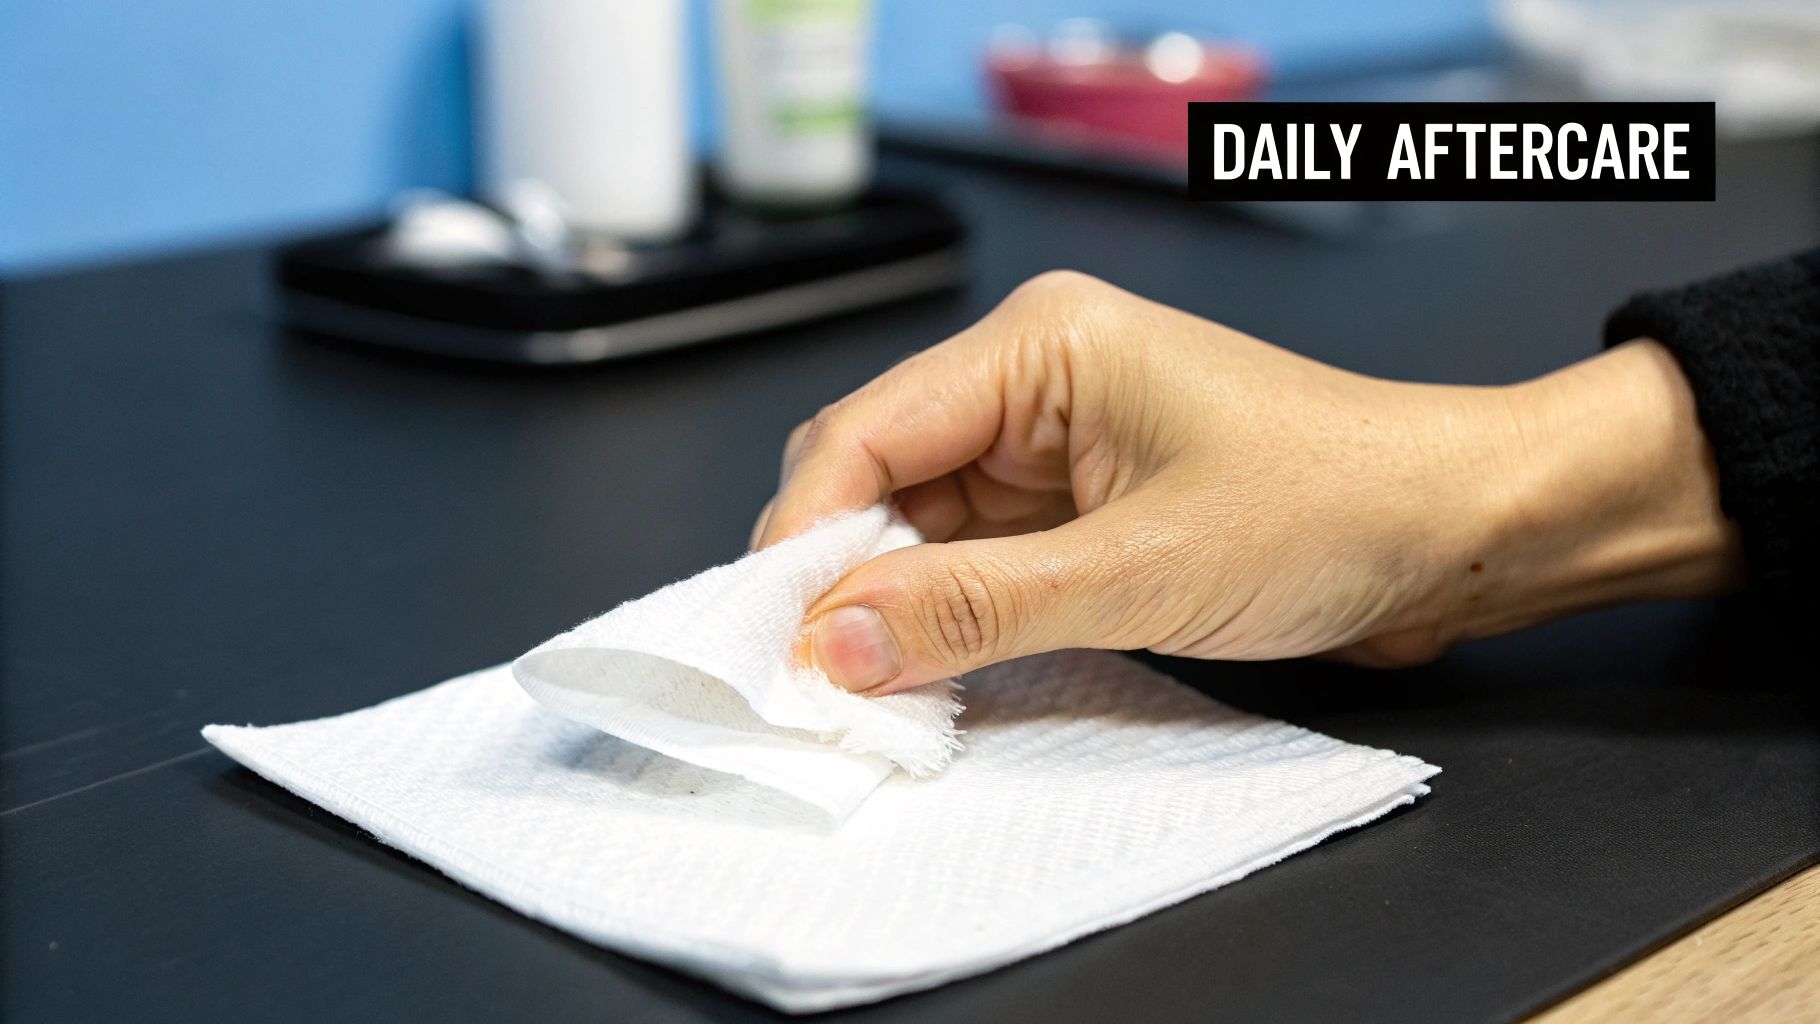
Your Step-by-Step Cleaning Guide
Ready to get this down to a science? It’s super easy. Just follow these steps in the morning and before bed to keep your piercing clean, happy, and on the fast track to healing.
-
Wash Your Hands: First things first, always wash your hands thoroughly with soap and water before you even think about touching your piercing. This is the single most important step to prevent introducing bacteria.
-
Spray or Soak: Generously spray the front and back of your piercing with a sterile saline wound wash. You really want the solution to flush away any debris or "crusties." Alternatively, you can soak a piece of clean, non-woven gauze in saline and hold it against the piercing for a few minutes to soften things up.
-
Pat It Dry: After cleaning, gently pat the area completely dry with a fresh piece of non-woven gauze or a paper towel. A damp environment is a playground for bacteria, so don't skip this!
And that's it! No twisting, turning, or fiddling. Just a simple, gentle clean twice a day is all it takes to support your body's amazing natural healing process.
Let's bust a huge myth right now: the old advice to twist your jewelry is a total no-go! Twisting just tears up the delicate new tissue trying to form inside your piercing. This can lead to irritation bumps, scarring, and a much, much longer healing time. Just let it be!
The Ultimate Dos and Don'ts
Keeping your new nose piercing happy goes beyond just cleaning. Your daily habits play a huge role in a smooth heal. To make it easy, we've put together a simple list of rules to live by while you're healing.
The Golden Rules DOs
- DO wash your hands every single time before touching your piercing. We really can't stress this enough!
- DO clean your piercing twice a day with a sterile saline solution. Consistency is your best friend here.
- DO sleep on the opposite side of your piercing, or try using a travel pillow to keep pressure off of it.
- DO drink plenty of water and maintain a healthy lifestyle. A happy, healthy body heals faster.
- DO change your pillowcase regularly to keep sneaky bacteria away from your face while you sleep.
The Big No-Nos DON'Ts
- DON'T touch, twist, or play with your jewelry. This is the number one cause of those dreaded irritation bumps.
- DON'T use harsh chemicals like alcohol, hydrogen peroxide, or antibacterial soaps. They are way too aggressive for a healing wound.
- DON'T submerge your piercing in pools, hot tubs, lakes, or oceans until it's fully healed.
- DON'T apply makeup, lotions, or sprays directly on or around the piercing site. Clogging it is a recipe for trouble.
- DON'T change your jewelry too soon. You need to wait the full 4-6 months. For more tips on aftercare products, you can learn more about H2Ocean aftercare and its benefits.
Sticking to these guidelines is your best bet for a quick, complication-free healing process. It might seem like a lot to remember at first, but soon it’ll become second nature. When your piercing is finally healed, you'll be so glad you put in the effort!
Troubleshooting Bumps and Other Common Issues
So you’ve followed your aftercare routine to the letter, but your new piercing is still having a little tantrum. First off, don't sweat it—it happens to the best of us! Healing isn't always a straight line, and hitting a small bump in the road (sometimes literally) is super common. This is your go-to guide for figuring out what's up and getting your healing journey right back on track.
Let's talk about the most common healing hiccup: the dreaded piercing bump. The moment you see one pop up, it’s easy to spiral into a full-blown panic, but take a deep breath. The vast majority of these are simply irritation bumps, which are just your body's way of screaming, "Hey, something is bothering me!"
What Is This Bump on My Piercing?
An irritation bump usually looks like a small, reddish pimple right next to the piercing site. The good news? These are totally treatable, and the solution is almost always to find and get rid of whatever's causing the irritation.
Think of yourself as a piercing detective. What could be bothering your new friend?
- Movement: Are you accidentally snagging your jewelry on your towel or T-shirt? Do you find yourself fiddling with it out of habit? Stop that!
- Pressure: Have you been sleeping on your piercing? That constant pressure can really make it angry.
- Aftercare Issues: Are you over-cleaning it? Under-cleaning? Using something harsh like alcohol or peroxide instead of a simple sterile saline solution?
- Jewelry Problems: Is your stud the right size? A post that's too long moves around too much, while one that's too short puts pressure on the piercing. Low-quality metals are also a major culprit.
Once you figure out the cause and fix it, the bump should disappear within a few weeks. Just get back to basics: stick to your twice-daily saline soaks, be extra careful not to touch it, and make sure you’re wearing high-quality, implant-grade jewelry.
Is It an Irritation Bump or a Keloid?
Now, let's clear up a major source of anxiety. So many people mistake a simple irritation bump for a keloid. A keloid is a type of raised scar that's much more serious and, thankfully, far less common. They're caused by an overproduction of collagen and are usually linked to a genetic predisposition.
Here's the key difference: Irritation bumps are small, localized, and go away once the source of irritation is removed. Keloids are firm, rubbery scars that grow well beyond the original wound site and do not go away on their own.
If you aren't already prone to keloid scarring from other cuts or scrapes, the chances of you developing one from a piercing are incredibly slim. If you genuinely suspect you have one, you'll need to see a dermatologist for professional treatment options. But odds are, what you're dealing with is a totally manageable irritation bump!
How to Spot a Real Infection
Another big worry is infection. It’s easy to confuse normal healing signs—like some redness and the clear or whitish fluid that forms "crusties"—with something way more sinister. A true infection, however, has some very distinct, hard-to-miss symptoms.
Be on the lookout for these major red flags:
- Thick, colored pus: Instead of clearish fluid, you'll see yellow, green, or dark-colored discharge.
- A foul smell: Infections often come with an unpleasant odor.
- Spreading redness and heat: The skin around the piercing will feel hot to the touch, and the redness will expand outwards.
- Fever or chills: If you start feeling unwell all over, it could mean the infection is spreading.
It’s important to know that complications can happen. In fact, many people run into some sort of issue during the long nose piercing healing window. A study found that problems like pain, swelling, and bumps were relatively common, but most cases resolved with proper care—often just by leaving the piercing alone to calm down. For more details, you can read the full research about piercing complications.
If you have any of these serious symptoms, do not remove the jewelry. Taking it out can trap the infection inside the piercing channel, making things much worse. Your next move should be to see a doctor immediately for proper medical advice. By knowing the difference between normal irritation and a real infection, you can save yourself a lot of unnecessary panic and take the right action when it really counts.
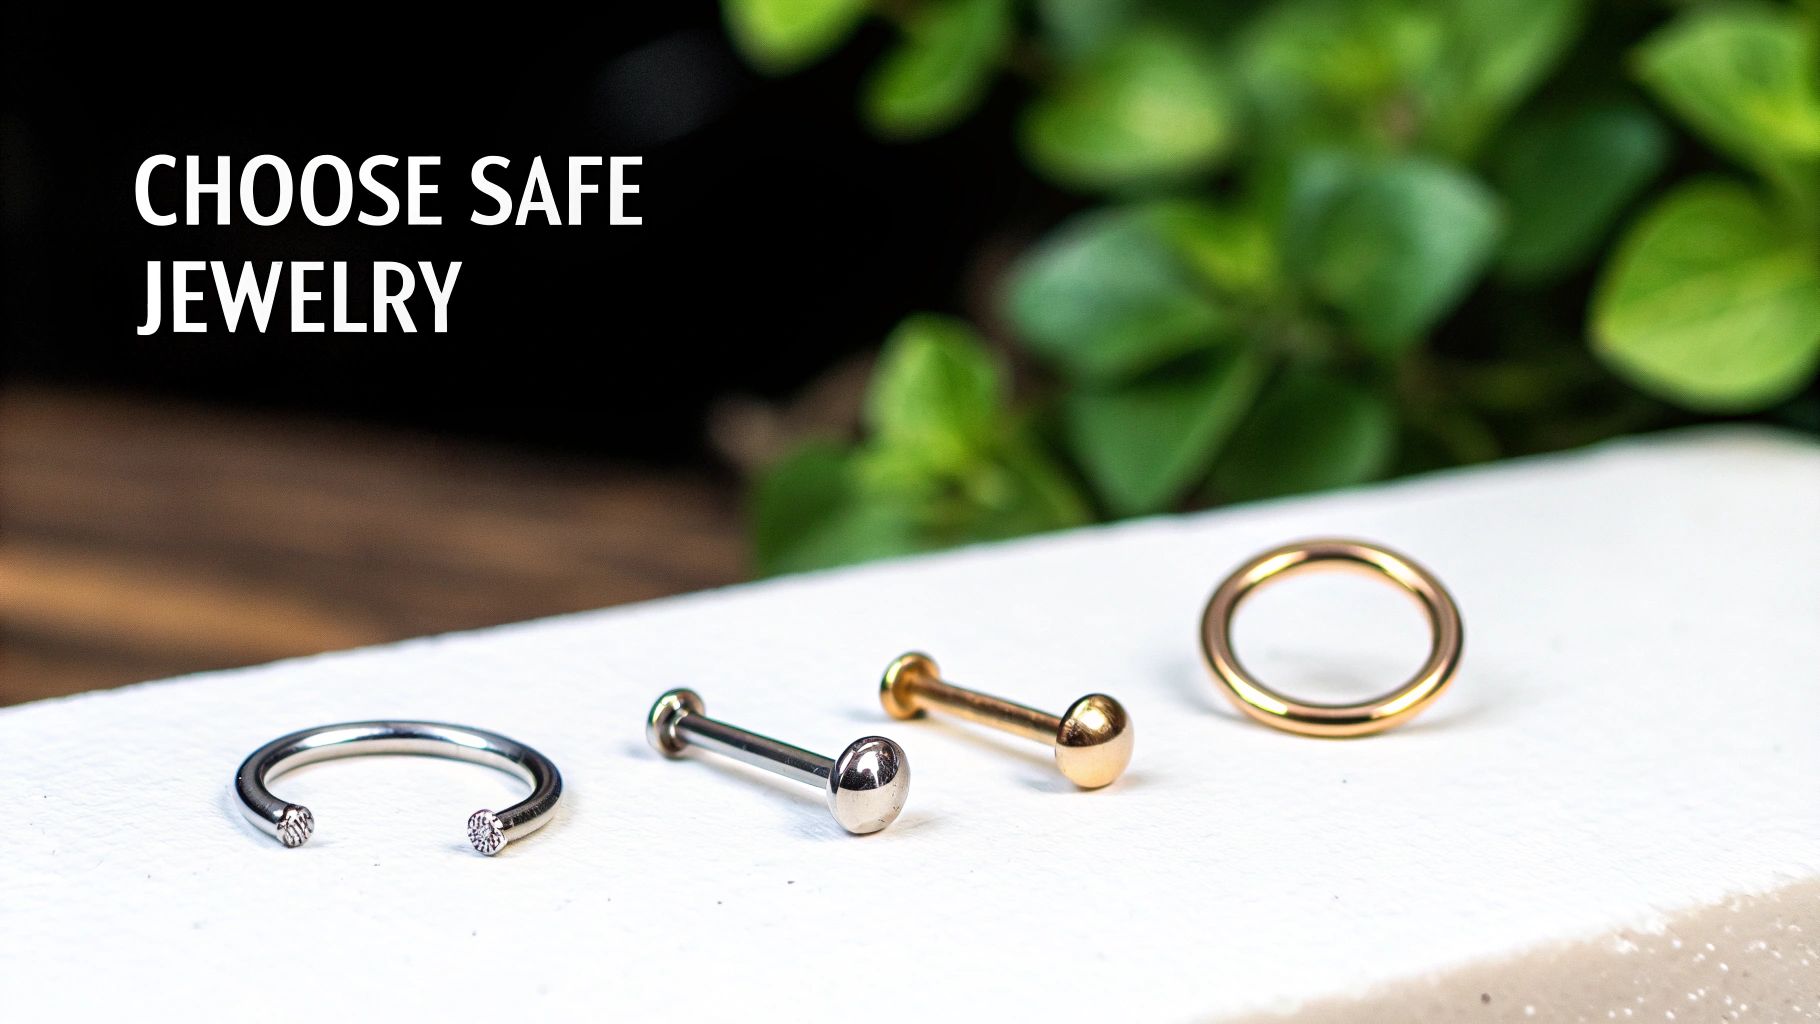
Choosing the Best Jewelry for a Happy Piercing
Think of your starter jewelry like the foundation of a house—if you use cheap, weak materials, the whole thing is going to have problems. What you put in your fresh piercing matters. A lot. The right material can make your healing journey an absolute breeze, while the wrong one can kickstart a whole saga of irritation, allergic reactions, and those dreaded piercing bumps.
Let's get right into the best materials for a new piercing. These aren't just casual suggestions; they're the professional standard for a reason. We're talking about biocompatible metals, which is just a fancy way of saying your body doesn't see them as a threat. It welcomes them, dramatically reducing the chances of a bad reaction.
The Gold Standard Materials
When you first get pierced, you want to start with the best of the best. This is absolutely not the time to fish a cute, mystery-metal ring out of a bargain bin. Your body deserves quality!
-
Implant-Grade Titanium (ASTM F-136): This is the undisputed champion of piercing materials. It’s the same stuff surgeons use for implants, which tells you everything you need to know. It's incredibly body-safe, super lightweight, and completely nickel-free. If you've got sensitive skin, titanium is your new best friend.
-
14k-18k Solid Gold: If you're looking for something with a bit more warmth or sparkle, solid gold (and we mean solid, not plated) is a fantastic choice. The key is to make sure it’s nickel-free and specifically alloyed to be biocompatible. You'll want to stick with 14k or 18k. Anything higher, like 24k, is actually too soft and can get easily scratched, creating tiny nooks for bacteria to hide in.
So, what's the big deal with nickel? It’s one of the most common metal allergies out there. A fresh piercing can even trigger a sensitivity you never knew you had. Sticking with high-quality titanium or solid gold takes that risk right off the table.
Your piercer chose your starter jewelry for a very specific reason—it’s made from a safe material and is the right size to allow for that initial swelling. Trust their expertise! Resist the temptation to swap it out for something "cuter" until you're fully healed.
Knowing what to avoid is just as crucial as knowing what to pick. For a more detailed breakdown, you can learn more about picking the right material for your nose piercing in our complete guide.
To make it even clearer, let's put these materials head-to-head.
Nose Piercing Jewelry Material Showdown
This quick-glance table breaks down the best and worst materials for a healing nose piercing, helping you make the smartest choice for your body.
| Material | Why It's Great (or Not) | Best For |
|---|---|---|
| Implant-Grade Titanium | The absolute best. Hypoallergenic, nickel-free, lightweight, and non-reactive. The professional standard. | Initial piercings and anyone with sensitive skin. |
| 14k-18k Solid Gold | Excellent biocompatible option. Luxurious look, but must be nickel-free. Avoid gold-plating at all costs. | Initial piercings and healed piercings for a high-end look. |
| Surgical Steel | It's a mixed bag. "Implant grade" is okay, but many alloys contain nickel, a common allergen. | Healed piercings, but only if you know you don't have a nickel sensitivity. Risky for new piercings. |
| Sterling Silver | Big no. It oxidizes (tarnishes) when exposed to body fluids, which can stain your skin and cause major irritation. | Not recommended for any piercing, healing or healed. Save it for your fingers. |
| Acrylic/Plastic | Can degrade over time and harbor bacteria in microscopic pores. Not suitable for long-term wear or healing. | Temporary wear in fully healed piercings only. Never for a fresh piercing. |
The takeaway is simple: start with the good stuff—titanium or solid gold—and you set yourself up for a much smoother healing process.
Why Studs Beat Hoops for Healing
Okay, so we've nailed down materials. But what about the style? You’ve probably seen people get pierced with a cute little hoop, but almost every reputable piercer on the planet will recommend starting with a stud.
There's a really good reason for this. Hoops and rings move. A lot. They can spin and twist in the piercing, dragging bacteria from the outside right into that delicate healing channel. This constant movement is a major source of irritation and can seriously set back your healing time.
A high-quality stud, especially a flat-back labret, is the perfect starter piece. It sits flush, minimizes movement, and is way less likely to get snagged on your clothes, pillow, or towel. Less movement means less irritation, and less irritation means a faster, happier heal.
Once you've made it past that crucial 4-6 month healing window, you can go wild and switch to all the gorgeous hoops you've been dreaming of!
When Can You Finally Change Your Nose Ring?
We get it—you’ve been patiently cleaning your piercing for months, scrolling through endless pages of gorgeous nose rings, and you are so ready to finally swap out that starter stud.
That first jewelry change feels like a major milestone! But before you make the switch, let’s talk timing, because it is absolutely everything.
Changing your jewelry too soon is one of the fastest ways to undo all your hard work. Even if your piercing looks fine on the outside, the new tunnel of tissue on the inside (called a fistula) is still incredibly delicate. Pushing new jewelry through before it's strong enough can cause irritation, bumps, swelling, and even send you right back to square one of the nose piercing healing process.
Trust us, a little extra patience now is worth it. So, what’s the magic number? You absolutely must wait until your piercing is 100% fully healed. For a standard nostril piercing, this means waiting the full 4 to 6 months, and sometimes even longer. There's no rushing this!
The Healed Piercing Checklist
So how do you know for sure that you've crossed the finish line? Your body will give you some very clear signals. Before you even think about changing your jewelry, you should be able to say "yes" to every single item on this list:
- It’s been at least 4-6 months. This is the non-negotiable minimum.
- There is zero pain or tenderness. You should be able to gently touch the area without any discomfort.
- No discharge or "crusties." A fully healed piercing has stopped producing any fluid.
- The tissue feels normal. The skin around the piercing should feel soft and look the same as the rest of your nose—no redness, swelling, or hard spots.
If you’re experiencing any lingering sensitivity or are still cleaning off crusties, your body is telling you it needs more time. Listen to it!
Your First Jewelry Swap Should Be a Pro Job
For your very first jewelry change, we strongly recommend booking an appointment with your professional piercer. It might be tempting to DIY it, but a piercer has the right tools and expertise to make the swap seamlessly without damaging that brand-new tissue.
A piercer can use a special tool called an insertion taper to guide the new jewelry in smoothly. This prevents any scraping or trauma to the inside of the piercing channel, which is super easy to do on your own.
They can also make sure your new jewelry is a perfect fit and help you put it in—something that can be surprisingly tricky the first time around. Think of it as the final, official step of your healing journey—a little victory lap with a pro to guide you!
Ready to start planning that first big change? Once your piercer gives you the green light, it's time for the fun part! Explore our amazing collection of sparkly nose rings at Bodycandy and find the perfect piece to celebrate your beautifully healed piercing.
Your Nose Piercing Healing Questions Answered
You've got questions, and we've all been there! Let's run through some of the most common worries that pop up during the nose piercing healing process. Getting some quick, solid answers means you can stop stressing and get back to healing up perfectly.
Can I Use a Q-tip to Clean My Nose Piercing?
As tempting as it is, you're going to want to skip the Q-tips! They might seem like the perfect tool for the job, but those tiny cotton fibers have a nasty habit of snagging on your jewelry. When they get tangled up, they can cause some serious irritation and might even be the culprit behind those dreaded piercing bumps.
Your best bet is to spray the area directly with a sterile saline solution. If you need to wipe away any "crusties," a clean piece of non-woven gauze is the way to go for gently cleaning and drying the spot. This way, no sneaky fibers get left behind to mess with your piercing.
My Piercing Bump Won't Go Away What Should I Do?
First off, take a deep breath—this is super common and usually not a reason to panic! Most of the time, a bump is just your piercing's way of telling you something is bugging it. Time to play detective: Have you been sleeping on it? Fiddling with the jewelry? Using cleansers that are too harsh?
Strip your routine back to the absolute basics. Stick to sterile saline soaks twice a day, adopt a strict hands-off policy (seriously, don't touch it!), and double-check that your jewelry is made from implant-grade titanium. If you've been doing all that for a couple of weeks and the bump isn't getting better—or seems to be getting worse—it's time to check in with your professional piercer for some personalized advice.
Is It Normal for My Piercing to Bleed a Little?
Yep, a tiny bit of bleeding in the first day or two is totally normal. Your body just went through a minor trauma, and this is just part of its initial reaction. It should stop pretty quickly.
That said, if you notice the bleeding is more than just a little, or if it keeps happening after the first few days, you should give your piercer a call. The same goes for any unexpected bleeding later on in the healing journey—it's always best to get a professional opinion to make sure everything's on track.
How Do I Know If It Is Infected or Just Irritated?
This is the big one, and it causes so much confusion! Here’s a simple way to tell them apart:
- Irritation: This usually looks like some redness, maybe a little bump, and clear or whitish fluid that dries into "crusties." It’s annoying and localized, but it isn't a medical emergency.
- Infection: This is a whole different ballgame. We're talking signs like thick, yellow or green pus, a funky smell, skin that feels hot to the touch, and some pretty intense swelling.
If you spike a fever or see red streaks spreading out from the piercing site, you're dealing with a legitimate infection. Do not take the jewelry out, as this can trap the infection inside and cause an abscess. Get yourself to a doctor right away for proper medical care.
Ready to show off that beautifully healed piercing? Over at Bodycandy, we've got a massive collection of high-quality nose jewelry just waiting for you. It's time to find your next favorite piece and celebrate all that patient healing!