Ever bought a killer piece of body jewelry online, only for your heart to sink when you realize it’s the wrong size? A good body jewelry size guide is your new best friend, helping you understand the difference between gauge (thickness), length (for straight bars), and diameter (for hoops). Getting these right is the secret to a perfect, comfy fit every time.
Welcome To Finding Your Perfect Fit
We've all been there. You spot the perfect belly ring or nostril hoop, hit "buy," and impatiently wait for it to show up. Then, the big moment arrives... and it's either painfully tight or so loose it looks silly. It’s a total letdown and can sour the whole experience.
Trying to figure out body jewelry sizes can feel like you're learning a secret code, but we promise, it's way simpler than it seems. It all boils down to three key measurements: gauge, length, and diameter. Nailing these isn't just about how your piercing looks; it’s super important for keeping it happy and healthy.
Think of this guide as your personal cheat sheet. We’re here to cut through the jargon so you can shop with the confidence of a pro.
A Quick Look At Common Sizes
To kick things off, here is a simple visual map of the most common standard sizes you'll see for popular piercings.
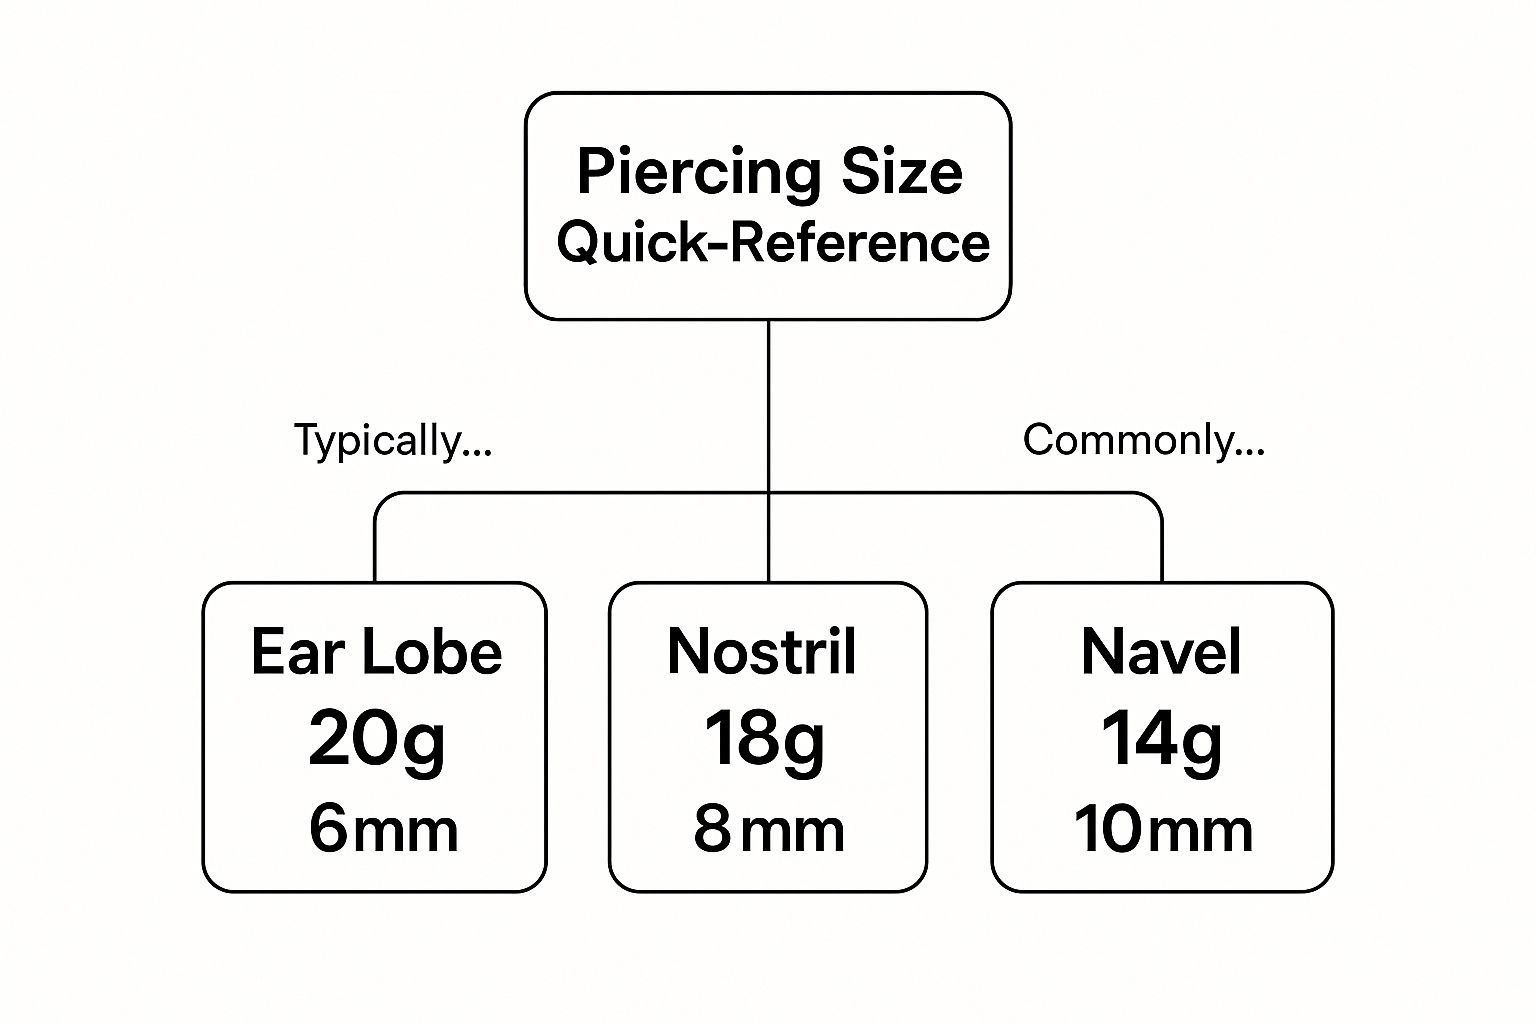
This handy reference shows how different spots need different jewelry specs for a safe and comfortable fit. For instance, a standard navel ring at 14 gauge is way thicker than a delicate 20 gauge nose stud. It’s all about matching the jewelry to the piercing.
Consider these standard sizes your starting point. Everyone's anatomy is a little different, so the specific placement of your piercing might mean you need something slightly unique.
Key Takeaway: While "standard" sizes are a great guide, your body is unique. The best fit is always the one that feels comfortable and sits just right, without pinching your skin or having way too much extra length.
Now, let's dive into what all these numbers actually mean and how to measure your own piercings. We’ll get you sized up and ready to find your next favorite piece from our collection of belly rings and so much more!
Decoding The Language Of Jewelry Sizing
Alright, let's talk about the "Big Three" of jewelry sizing so you can shop like a total pro. The main terms you'll see flying around are gauge, length, and diameter. They might sound a little technical, but once you get the hang of them, you’ll see they’re actually pretty simple.
Think of these three measurements as the DNA of your jewelry. Getting them right is the difference between a piece that feels like it was custom-made for you and one that's a constant, annoying source of irritation. Let's start with the one that trips most people up: gauge.
What Is Jewelry Gauge?
Simply put, gauge is the thickness of the barbell or post that actually goes through your piercing. It's hands-down the most crucial measurement for keeping your piercing healthy and happy.
Here’s the quirky part you need to burn into your memory: the numbering system is completely backward. A smaller number means a thicker piece of jewelry, while a bigger number means a thinner piece.
Gauge Analogy: Think of it like tunnels for trains. A 14 gauge tunnel is huge and can fit a big, heavy-duty train (thick jewelry). But a 20 gauge tunnel is tiny, only big enough for a small tram (thin jewelry). So, a 14g barbell is much, much thicker than a 20g stud.
Why is this so important? Wearing a gauge that's too thin (a higher number) for your piercing can lead to the dreaded "cheese-cutter effect," where the jewelry can slowly slice through the tissue over time. No thanks! On the flip side, trying to force in a gauge that's too thick can seriously damage your piercing.
Understanding Length And Diameter
Once you've got your gauge figured out, the next step is nailing down the size of the jewelry's shape. This is where length and diameter come into play, and thankfully, this part is super straightforward.
-
Length: This is your measurement for any straight or curved jewelry, like barbells for your industrial, navel, or tongue piercing. It measures the wearable part of the post—from the inside of one end to the inside of the other—without including the balls or decorative ends.
-
Diameter: This is the key measurement for any circular jewelry, like hoops and captive bead rings. It's the distance across the inside of the ring at its widest point.
Choosing the right length or diameter is all about finding that perfect, comfortable fit. A barbell that's too short can pinch your skin and even start to embed itself, which is a major problem. A hoop that’s too small will feel uncomfortably tight, while one that's too big will snag on everything.
Why The Perfect Fit Is Non-Negotiable
Listen, finding your perfect fit isn't just about looking good; it's a matter of piercing health. Jewelry that's too short or tight can cut off blood flow, make cleaning impossible, and lead to nasty irritation bumps or even infection. On the other hand, jewelry that's too long or has too large a diameter can get caught on your hair and clothes, causing trauma to the piercing site.
Your very first piece of jewelry from the piercer is almost always longer to make room for swelling. After a few weeks, your piercer will likely suggest "downsizing" to a shorter post for a snug, comfy fit that won't shift around. This is a critical step in the healing process, so don't skip it!
Mastering these basics gives you the power to build your collection with confidence. If you're curious to learn more, check out our deeper dive into the standards of gauge sizing for body jewelry. Now, you’re officially speaking the language of body jewelry!
How To Measure Your Piercings At Home
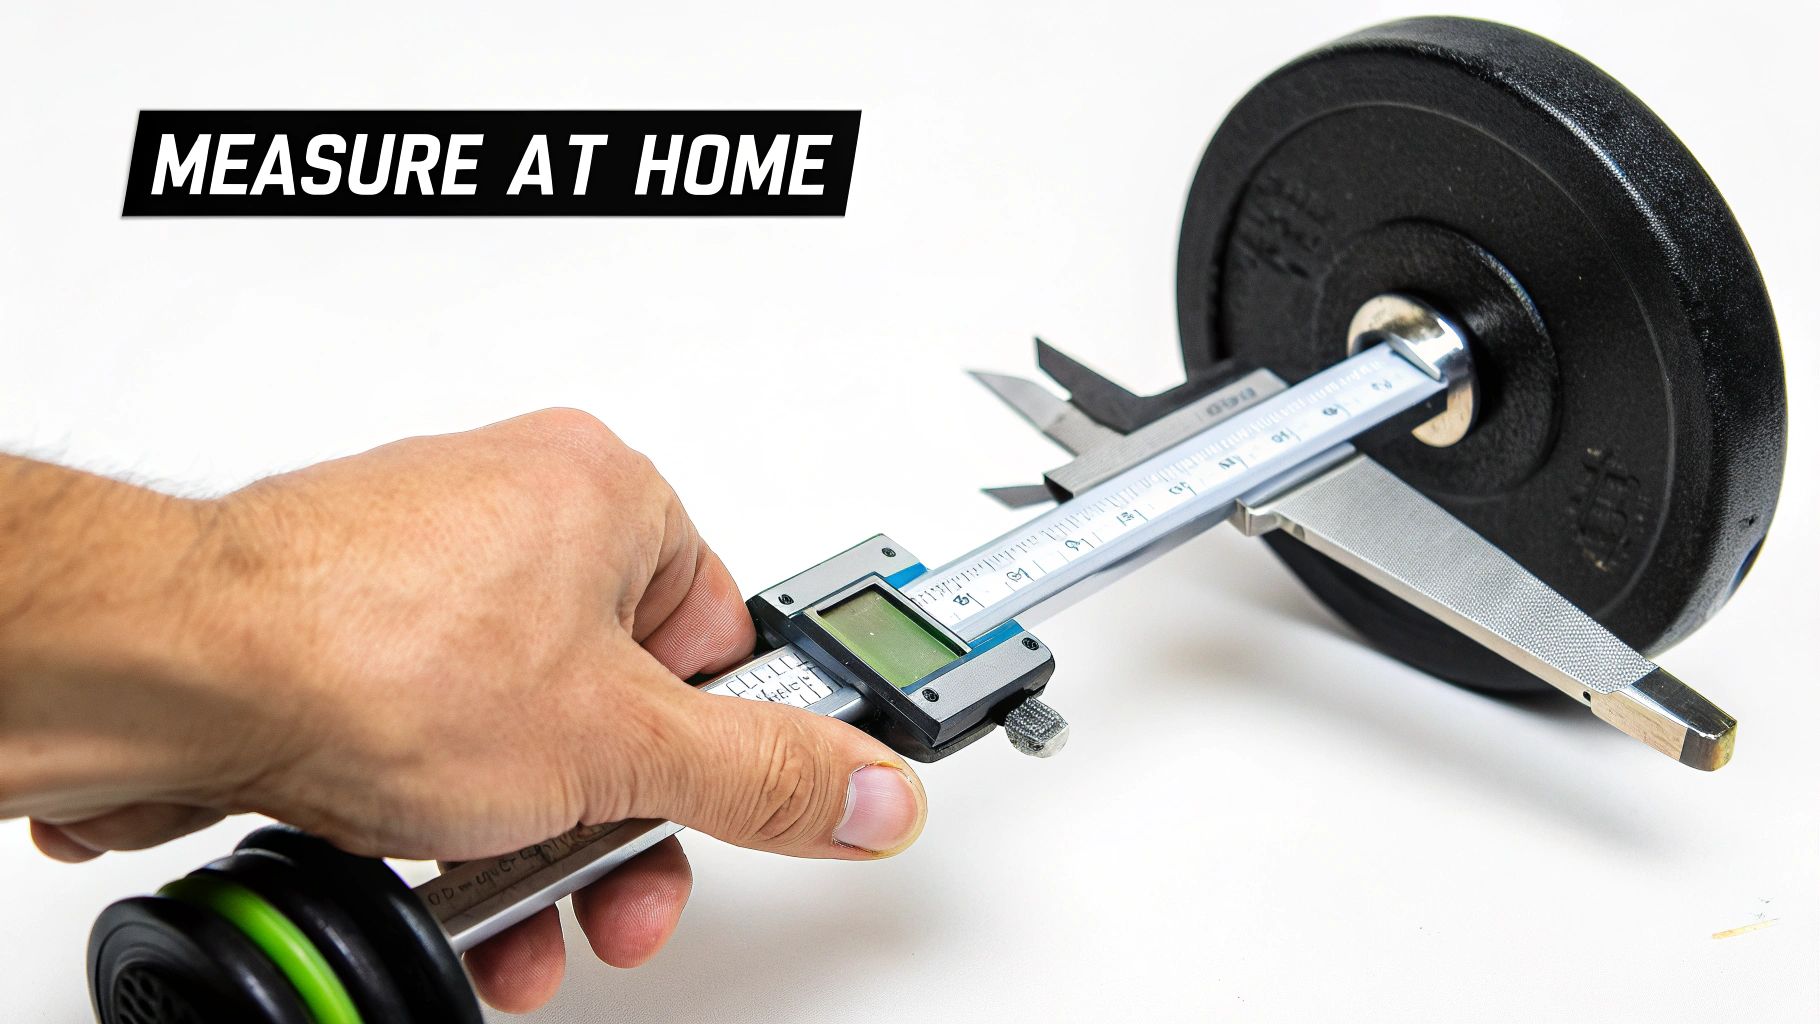
Ready to become your own sizing expert? You don’t need a bunch of fancy tools to figure out your jewelry size. Measuring your piercings at home is actually super easy, and it’s the best way to make sure you always order the perfect fit online.
Think of this as your own personal workshop. We'll show you how to use simple things you already have—like a ruler—to get the right measurements for your favorite pieces. Getting this right is about more than just comfort; it’s about keeping your piercing happy and healthy.
Poorly sized jewelry can lead to all sorts of issues like migration, rejection, or even infection. That’s why the standard gauge system exists, with sizes ranging from a delicate 22 gauge (0.6 mm) to a much larger 00 gauge (10 mm) for stretched piercings. It ensures you can find the right size for any piercing, at any stage.
Gearing Up Your Measurement Toolkit
Before we get started, let’s grab your supplies. You only need one or two simple items.
- A Ruler with Millimeters (mm): This is your most important tool! Millimeters give you the precision you need, since inches are way too broad for the tiny differences in body jewelry.
- A Piece of Paper & Pen: Super helpful if you're measuring a hoop and need to mark the diameter.
- Digital Calipers (Optional): If you're a serious jewelry collector, digital calipers are a total game-changer for getting hyper-accurate readings in seconds. They aren't a must-have, but they are incredibly handy!
Once you've got your gear, you’re ready to go. The trick is knowing exactly what part of the jewelry you need to measure.
Measuring Barbells: Curved Or Straight
For any kind of barbell—whether it’s for your tongue, industrial, nipple, or belly button—you're only measuring the wearable length of the post. This is key: you should not include the threaded ends or the decorative balls in your measurement.
Here’s how you do it:
- Unscrew one of the balls from your barbell.
- Lay the barbell post flat against your ruler.
- Measure the distance just between the bases of the balls. That number, in millimeters, is your length! A standard navel ring, for example, is usually 10mm long.
Pro Tip: Always measure your current jewelry when your piercing is calm and not irritated. If your piercing is new or swollen, the measurement won't reflect the size you'll need once it’s fully healed.
Nailing The Diameter Of Hoops And Rings
Measuring hoops, captive bead rings, or circular barbells is just as simple, but the method is a little different. For these, you’re looking for the internal diameter—that’s the distance across the widest part of the ring's inside.
- Place your hoop on a flat surface.
- Hold your ruler up to it and measure the space inside the ring from one edge to the other, at its widest point.
- Remember not to include the metal of the ring itself in your measurement!
If you find it hard to see the ruler through the hoop, try the paper and pen trick. Just place the ring on the paper, make two small marks on the inside edges at the widest point, and then measure the distance between your marks. Easy!
A Few Final Tips For Accuracy
Getting a perfect reading is all about paying attention to the little details. Keep these pointers in mind before you hit "add to cart."
- Wait Until You're Healed: Never measure a fresh, swollen, or irritated piercing. The jewelry you get pierced with is intentionally longer to allow for swelling, so it's not the right size for your long-term pieces.
- Double-Check Your Work: It never hurts to measure twice! A single millimeter can make a huge difference in how jewelry fits and feels.
- Your Piercer Is a Pro: If you're ever really stumped, your professional piercer is your best friend. They can measure you accurately and even give you a sizing card to keep for future shopping.
Now that you’re armed with this knowledge, you can browse any collection with confidence. For a more detailed breakdown, you can find a ton of helpful info by measuring up with Body Jewelry's sizing basics.
A Piercing-by-Piercing Size Breakdown
Alright, time to get specific! While knowing about gauge and length is half the battle, the real magic happens when you apply it to your piercing. Not all piercings are created equal, and their standard sizes can be totally different.
Think of your body as a map—each piercing location is a unique destination with its own set of rules. A delicate nostril piercing and a bold navel piercing need very different jewelry to thrive. This part of our guide is where we break it all down, location by location, so you know exactly what to look for.
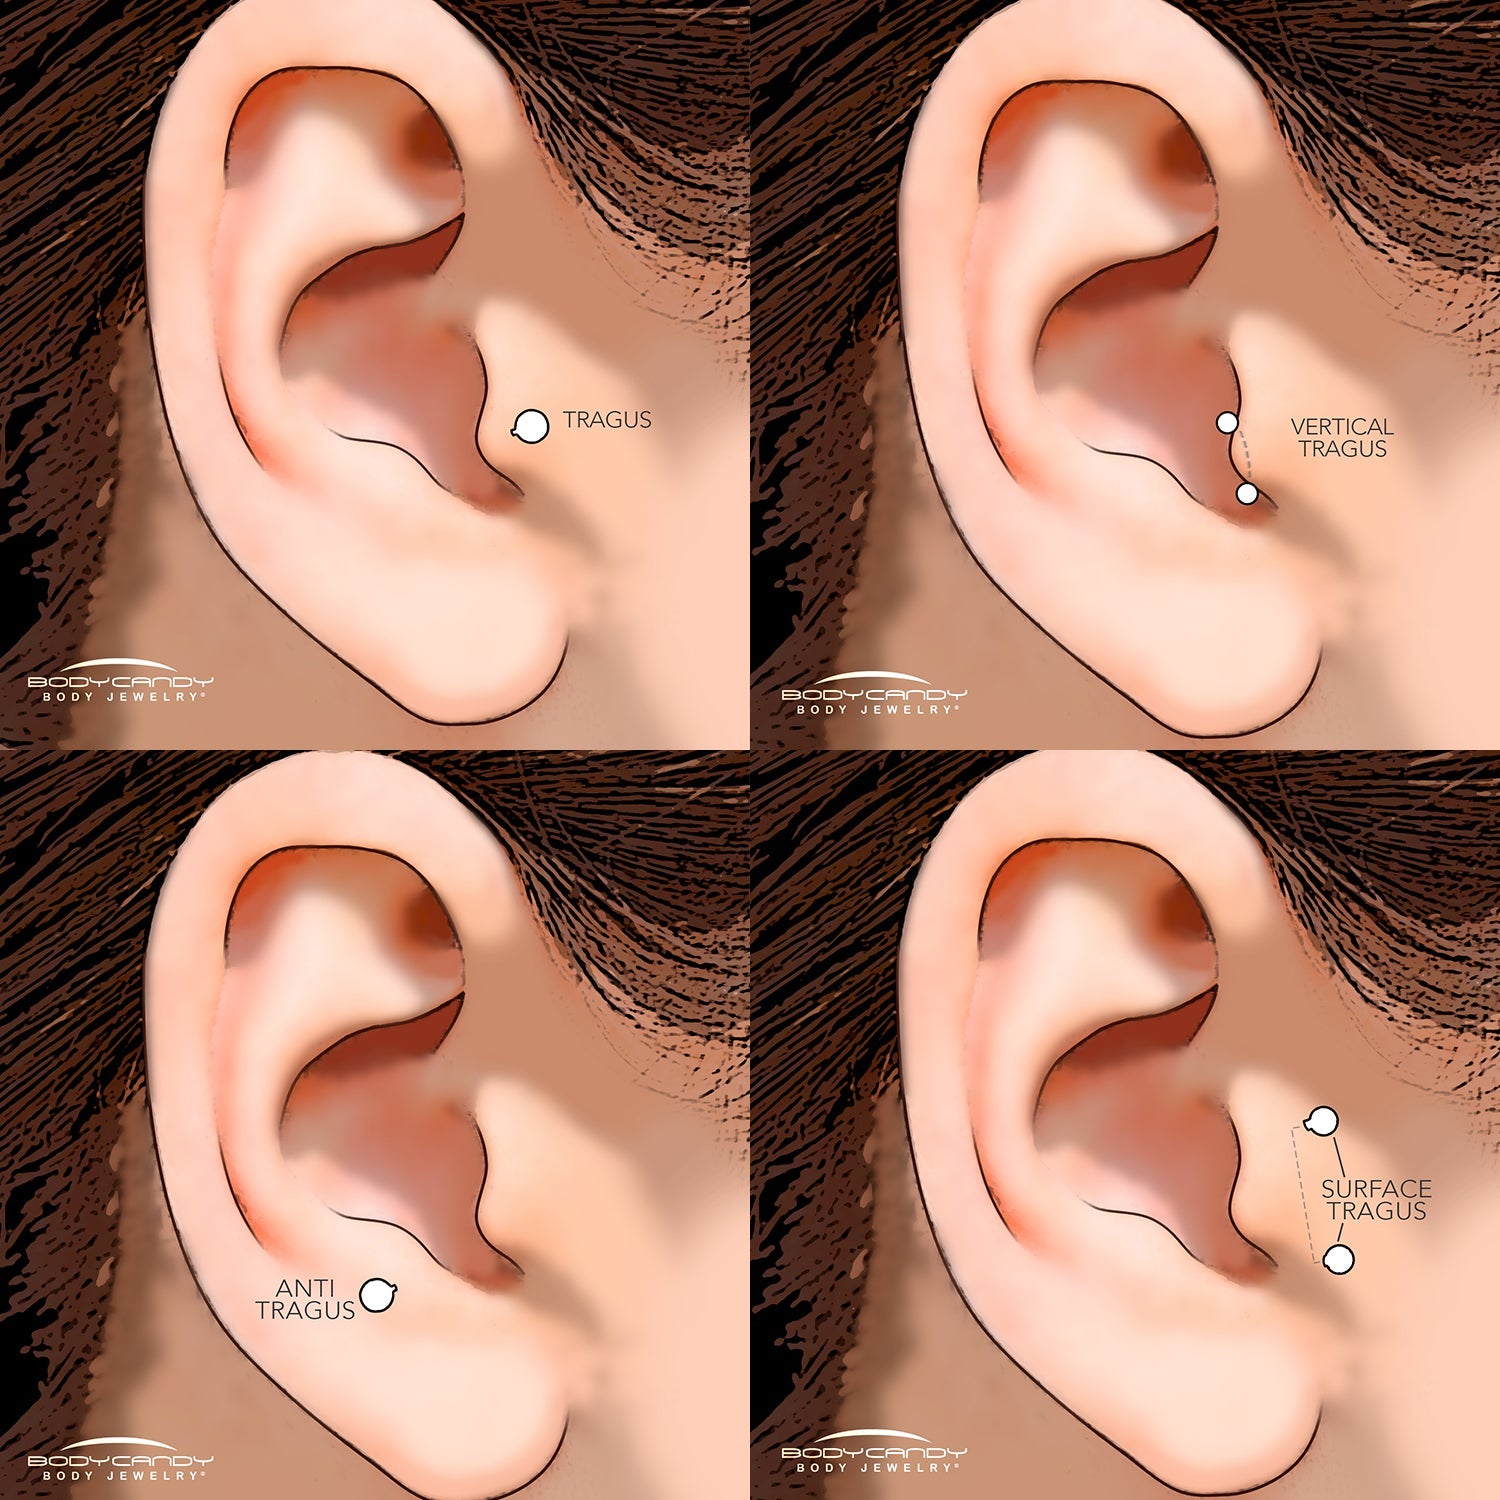
All About Ear Piercings
Your ears offer a whole playground for piercings, from the classic lobe to the trendy helix and snug tragus. Each spot has its own go-to size, mainly because the cartilage thickness varies so much across your ear.
-
Lobe Piercings: This is where most of us start! Standard lobes are typically pierced at 20g or 18g. The jewelry is so versatile here you can rock anything from tiny studs to dangly earrings.
-
Helix (Cartilage Rim): That cool piercing on the upper, outer rim of your ear? That’s the helix. It’s almost always pierced at 16g. For hoops, you'll often see diameters of 8mm or 10mm, depending on how snug you want the fit.
-
Tragus Piercings: The tragus is that little nub of cartilage covering your ear canal. It’s a super cute spot for a tiny stud, usually pierced at 16g. The go-to length for a flat back labret stud here is 6mm or 8mm.
-
Industrial Piercings: This one is a statement piece! An industrial piercing is a single straight barbell connecting two separate cartilage piercings. The standard gauge is a sturdy 14g, and the length varies a lot based on your ear's anatomy, but commonly falls between 32mm and 38mm.
Remember, especially with cartilage, your piercer will start you with a slightly longer bar to accommodate for that initial swelling. Don't rush to downsize!
Quick Tip: Your ear anatomy is totally unique to you. What works for your bestie’s helix might not be the perfect fit for yours. Always measure or consult your piercer if you’re unsure about hoop diameter.
Facial Piercing Favorites
Facial piercings are all about expressing your personal style, and getting the size right is key to making them look amazing. From subtle nose studs to bold lip rings, here’s the scoop on the most popular placements.
Nostril And Septum Sizing
Your nose is front and center, so a perfect fit is a must-have.
-
Nostril Piercings: The standard gauge for a nostril piercing is usually 18g, though some people prefer a daintier 20g. For hoops, an 8mm diameter is the most common size for a snug fit.
-
Septum Piercings: That piercing through the "sweet spot" at the front of your nose is almost always a 16g. Circular barbells (horseshoes) and captive bead rings are popular choices here, with 8mm or 10mm diameters being the most common.
Lip Piercing Lowdown
Lip piercings come in so many styles, from a simple labret to snake bites. Most are pierced with a slightly thicker gauge to ensure stability in such a high-movement area.
-
Labret and Monroe Piercings: Whether it's below your lip (Labret) or above it (Monroe), the standard gauge is 16g. The initial post will be longer (10mm or even 12mm), but once healed, most people downsize to a comfortable 8mm length.
-
Vertical Labret: This unique piercing goes vertically through the lip itself. It's pierced with a 16g curved barbell, typically 8mm or 10mm long.
Body Piercing Basics
Now, let's talk about some of the most popular body piercings. Since these are often in areas covered by clothing, a comfortable and accurate fit is extra important to prevent snagging and irritation.
-
Navel (Belly Button) Piercings: The undisputed classic! The standard size for a navel ring is a 14g curved barbell. The most common length is 10mm (which is 3/8"), but you can also find shorter (8mm) or longer (12mm) bars depending on your anatomy.
-
Nipple Piercings: These are almost always pierced at 14g. The length of the barbell really depends on your individual anatomy, but standard sizes often range from 12mm to 16mm. It's crucial to have a bar that's long enough to sit comfortably without pinching.
This breakdown should give you a solid starting point for almost any piercing you have or are dreaming of getting. Just remember these are "standard" sizes, and your body might need something a little different. The ultimate goal is to find jewelry that feels as good as it looks.
Comprehensive Body Jewelry Sizing Chart
| Piercing Location | Common Gauge Range | Common Length Range (Barbells) | Common Diameter Range (Hoops) |
|---|---|---|---|
| Earlobe | 20g, 18g | 6mm - 8mm | 8mm - 12mm |
| Helix (Cartilage) | 16g, 18g | 6mm - 10mm | 8mm - 10mm |
| Tragus | 16g | 6mm - 8mm | 6mm - 8mm |
| Daith | 16g | N/A | 8mm - 10mm |
| Rook | 16g | 6mm - 8mm (curved) | N/A |
| Conch | 16g | 6mm - 10mm | 10mm - 12mm |
| Industrial | 14g | 32mm - 38mm | N/A |
| Eyebrow | 16g | 8mm - 10mm (curved) | 8mm - 10mm |
| Nostril | 20g, 18g | 6mm - 8mm | 8mm - 10mm |
| Septum | 16g, 14g | N/A | 8mm - 10mm |
| Lip (Labret, Monroe) | 16g, 14g | 8mm - 12mm | 8mm - 10mm |
| Tongue | 14g | 14mm - 16mm | N/A |
| Navel (Belly Button) | 14g | 8mm - 12mm (curved) | N/A |
| Nipple | 14g, 12g | 12mm - 16mm | 10mm - 14mm |
Keep in mind that these are the most common sizes you’ll encounter. Your piercer might use a different size based on your specific anatomy, and that’s perfectly normal! The best fit is always the one that’s tailored to you.
How Jewelry Materials Affect Sizing And Comfort
Ever wonder why some jewelry feels amazing and other pieces... not so much? It turns out, the material your jewelry is made of has a huge say in how it fits and feels. When you're picking out a new piece, it's not just about finding a style you love—the material itself plays a starring role in the comfort and health of your piercing.
For a fresh piercing, sticking with biocompatible and hypoallergenic materials is an absolute must. We're talking about the good stuff: implant-grade titanium, surgical steel, or solid 14k gold. These options are incredibly body-safe, which helps minimize any irritation or allergic reactions that could make healing a nightmare.
These high-quality metals are super smooth and non-porous, creating the perfect environment for your piercing to heal cleanly. This is exactly why professional piercers use them for your initial jewelry, often with a slightly longer post to give any swelling some breathing room.
The Weight And Feel Of Different Materials
Once your piercing is totally healed, the door opens to a whole world of other materials like acrylic or plated metals. But here's something to keep in mind: the weight of the material can really change how comfortable a piece is, especially with larger gauge piercings or in sensitive spots like your navel or nipples.
-
Titanium: This is the undisputed lightweight champion. It's nearly 45% lighter than steel, making it a fantastic choice for large-gauge jewelry or for anyone who just can't stand the feeling of a heavy piece. That weightlessness means less stress on your piercing.
-
Surgical Steel: A bit heavier than titanium, surgical steel has a nice, solid feel to it. It’s a super durable and affordable option that works great for most healed piercings, but you might notice its heft in bigger sizes.
-
Acrylic: On the complete opposite end of the spectrum, acrylic is incredibly lightweight and comes in a rainbow of colors. It's perfect for making a bold statement without weighing you down, but since it's porous, it's best saved for fully healed, happy piercings.
The material you choose really does shape your entire piercing experience. It's a key detail that savvy jewelry shoppers consider right alongside the size. From gold and silver to titanium and even plastic, each material offers its own unique size and weight options perfect for different spots. For example, nose rings often fall between 20 gauge and 14 gauge, while an industrial piercing typically calls for 16 gauge jewelry—proving that a good body jewelry size guide is crucial for both safety and style.
Important Note: Heavier materials can sometimes cause a piercing to stretch or even "migrate" over time. This is especially true if the gauge is too thin to support the weight. That’s why matching the right material to your piercing's needs is just as important as getting the length and gauge right.
Picking the right material isn't a minor detail—it’s a core part of any good body jewelry size guide. When you understand how different materials feel and interact with your body, you can make a choice that not only looks amazing but keeps your piercing happy for years to come. If you're curious about different metals, you can learn more about what your body jewelry is made of in our detailed guide.
Common Sizing Mistakes And How To Avoid Them
Okay, let's have some real talk. We've all goofed on a jewelry size at some point. When it comes to body jewelry, though, those little oopsies can be a surprisingly big deal for your piercing's health. Think of this as your friendly, no-judgment guide to sidestepping the most common sizing traps.
One of the biggest blunders is buying jewelry that’s way too short or snug right from the start. A barbell that’s pressing into your skin can cause embedding, which is every bit as unpleasant as it sounds. It chokes off blood flow and makes cleaning nearly impossible, basically rolling out the red carpet for irritation and infection.
On the flip side, you've got the dreaded "cheese-cutter effect." This nasty situation happens when you wear a gauge that’s too thin for your piercing (that’s a higher number), especially in places like your navel. Over time, that tiny wire can slowly migrate through your skin or, yikes, even slice right through the tissue. It's a huge reason to always stick to the gauge your piercer originally used.
The Downsizing Dilemma
Another super common mistake? Completely forgetting to downsize your jewelry after the initial swelling goes down. Your piercer uses an extra-long barbell for a good reason—it gives your fresh piercing room to breathe while it’s healing.
But once that swelling chills out (usually after 4-8 weeks), that long post becomes a liability. It’s practically begging to snag on your clothes and hair, causing all sorts of unnecessary trauma to that delicate healing fistula.
Downsizing is a crucial step in the healing process. Switching to a snugger, perfectly fitted post prevents movement and irritation, allowing your piercing to heal beautifully without complications. Don't skip this appointment with your piercer!
Forgetting this step is often why so many people battle those stubborn irritation bumps that just refuse to leave.
Your Pre-Purchase Sizing Checklist
To keep your piercings happy and healthy, just run through this quick mental checklist before you hit that "buy" button. It's a simple habit that makes sure you're getting the right fit, every single time.
- Did I measure my current, well-fitting jewelry? Grab a ruler with millimeters for the best accuracy. Don't just eyeball it!
- Is this the right gauge for my piercing? Don’t guess on this one. If you aren’t 100% sure, stick to the standard size for that specific piercing type.
- Does my piercing need a longer bar or a snugger fit right now? Think about where you are in the healing process. Is it brand new, or is it fully healed and settled?
- Is this style right for my anatomy? A hoop that looks perfect in your friend's nostril might be way too tight for yours. Everyone's body is different.
By dodging these common mistakes, you’re not just buying a cool piece of jewelry; you’re investing in the long-term health of your piercings. A little bit of know-how from this body jewelry size guide will make all the difference.
Your Piercing Size Questions Answered
Even with all the charts and guides, you might still have a few questions floating around. That’s totally normal! Think of this as our final Q&A session to clear up any lingering doubts and make you feel like a true sizing expert.
Let's dive into some of the most common questions we hear. Nailing these little details can make a huge difference in keeping your piercings happy and your jewelry collection on point.
What Happens If I Wear The Wrong Gauge Jewelry?
This is a super important one! If you wear a gauge that's too small for your piercing (like putting an 18g stud in a 16g hole), a healed piercing can actually start to shrink down to the new size over time. When that happens, it can be really tough to get your original, thicker jewelry back in later.
On the flip side, trying to force in a gauge that's too large is basically stretching, and that can damage the delicate tissue inside your piercing if you're not doing it intentionally and safely. It's always best to stick with the gauge your piercing was done with, unless you're making a conscious decision to stretch up with the right tools and a whole lot of patience.
How Do I Know When To Downsize My Piercing Jewelry?
Downsizing is a total game-changer for a smooth healing process! You'll know it's time to swap to a shorter post when the initial, extra-long barbell starts to have some wiggle room. If it’s moving around a lot or constantly getting snagged on your hair and clothes, that’s your cue.
This usually happens around 4-8 weeks after you get pierced, but listen to your body—everyone heals differently. The goal is for the jewelry to sit perfectly flush against your skin without pressing into it. When in doubt, a quick check-up with your piercer is the best way to get the official green light.
Can I Use The Same Size Jewelry For Different Piercings?
You’d think so, but it’s usually not a great idea! While some of your piercings might share the same gauge—for instance, a tragus and a nostril piercing are both often 16g—the style of jewelry they need is completely different.
A nostril screw has a specific curve designed to keep it secure inside your nose, while a tragus stud needs a flat back so it doesn't irritate the inside of your ear. You definitely wouldn't want to mix those two up! For a safe and comfortable fit, always buy jewelry specifically designed for your piercing. Our handy charts in this body jewelry size guide are your best friend for double-checking what style works where.
Ready to put your newfound knowledge to the test? With this guide, you can shop with total confidence, knowing you'll find the perfect piece every time.
Ready to find your new look? Shop the full collection of body jewelry at Bodycandy.com today