So, you're eyeing a new lip piercing, but that one big question is looming: how bad is it actually going to hurt? Let's cut right to the chase. Most people put the pain somewhere around a 4 to 6 on a 10-point scale. Think of a quick, sharp pinch that’s over before you can really process it. It's less of a big, scary ordeal and more of a "whoa, that's it?" kind of moment.
Your Honest Guide To Lip Piercing Pain
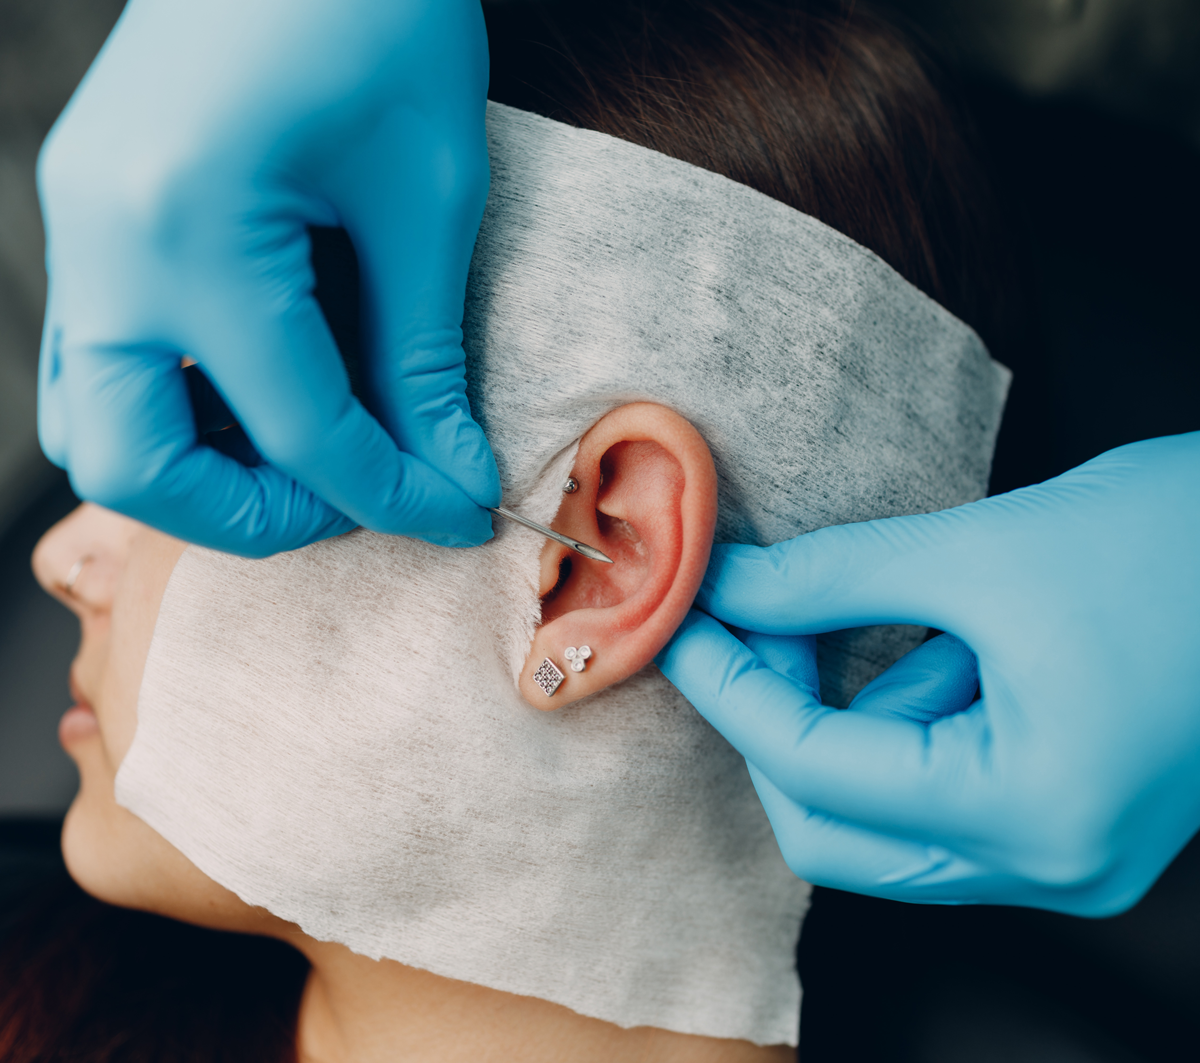
Alright, let's get real about what that "quick, sharp pinch" actually feels like. If you've ever had your eyebrows professionally waxed or even just gotten a flu shot, you're already in the ballpark. The needle part is incredibly fast—we're talking a second or two. A pro piercer is trained to be swift and precise, and trust us, that makes all the difference.

That initial sting vanishes almost instantly. What comes next is a dull, warm throbbing sensation, kind of like a mild sunburn focused right on your lip. That’s just your body kicking off the healing process, which is exactly what you want it to do. Honestly, the real test isn't the piercing itself; it’s sticking to the aftercare routine to make sure everything heals up perfectly.
The fleeting ouch of the piercing is a tiny price to pay for a new look you'll absolutely love. The confidence boost lasts way longer than the initial sting!
To give you a better idea of the whole experience, we've broken down what to expect from the moment you sit in the chair through the first few weeks of healing. Of course, everyone’s body is different, but this timeline is a pretty solid guide.
Lip Piercing Pain At A Glance
Here’s a quick play-by-play of the sensations you can expect during the piercing process. This table gives you the inside scoop on what you’ll feel from the needle to the first few days of healing.
| Stage | Pain Level (1-10) | What It Feels Like |
|---|---|---|
| The Needle | 4-6/10 | A quick, sharp pinch or sting that's over in a flash. |
| Immediately After | 3-5/10 | A warm, throbbing sensation. Hello, healing mode! |
| The First Week | 2-4/10 | A dull ache and general tenderness. Totally normal. |
| Long-Term Healing | 0-1/10 | Occasional sensitivity if you bump it. |
As you can see, that first bit of discomfort is totally manageable. The best thing you can do is focus on how amazing that new piercing is going to look. Next up, we’ll dive into how the pain can change depending on which specific lip piercing you decide to get.
How Different Lip Piercing Placements Compare On Pain
So, you’re trying to decide between a Monroe and a Vertical Labret, but you want to know which one is gonna make you wince more. When it comes to lip piercings, the answer isn't a simple one-size-fits-all.
Where you decide to put your new jewelry makes a huge difference. Some spots around your mouth have way more nerve endings and thicker tissue, while others are surprisingly quick and easy. Knowing why one piercing feels like a quick pinch and another feels more intense can help you choose the perfect look that also matches your personal pain tolerance.
Let's get right into it. We've put together a quick-glance chart that ranks the most popular lip piercing styles by their ouch factor. Think of this as your general guide—your own experience might be a little different based on your unique anatomy and pain threshold!
| Piercing Type | Average Pain Rating (1-10) | Why It Hurts (Or Doesn't) |
|---|---|---|
| Standard Labret | 4/10 | This classic goes through the thin skin below the lip, not the lip itself. It's one of the quickest and least painful options out there. |
| Snake Bites | 4/10 per piercing | These are just two standard labret piercings. The pain for each is low, but you do have to sit through it twice, so be ready for round two! |
| Monroe/Madonna | 5/10 | Placed on the upper lip, this spot is a bit fleshier and has more nerves than the area below the lip, so expect a little more of a sting. |
| Vertical Labret | 6/10 | This is where the intensity starts to climb. The needle passes vertically through your bottom lip, which is much more sensitive than the skin around it. |
| Jestrum | 7/10 | As the upper-lip version of the vertical labret, this one is often considered one of the more painful choices. It goes through two highly sensitive areas: the philtrum (cupid's bow) and the upper lip itself. |
At the end of the day, the biggest factor in lip piercing pain is simple: are you piercing through the actual lip (the vermilion border) or just the skin around it?
Piercings that go directly through the colored part of your lip, like the Vertical Labret and Jestrum, will almost always be more intense. They involve denser tissue packed with more nerve endings. On the other hand, piercings like the Standard Labret or Monroe are usually much more manageable because they only pass through the surrounding skin.
Key Factors That Influence Your Piercing Pain
Ever wonder why your bestie barely flinched getting their labret, but you've seen online forums full of 7/10 horror stories for the exact same piercing? The truth is, how much a lip piercing hurts isn't just about where it's placed—it’s incredibly personal.
A few key things can seriously turn up the dial on pain or make it a total breeze. Your experience is your own, but your mindset, your natural pain tolerance, and even your anatomy all play a part in the final ouch-factor. The good news? You have more control over the experience than you might think.
Your Piercer and Your Jewelry
The single biggest factor you can control is the skill of your piercer. An experienced professional is like a surgeon—quick, precise, and confident. They know the perfect angle and pressure to use, which means way less trauma to the tissue. A rookie piercer might be slower or less steady, and that can definitely translate into more discomfort for you.
Your initial jewelry choice is just as critical. Starting with a high-quality, implant-grade metal is non-negotiable for a smooth healing journey.
Pro Tip: Think of your initial jewelry as the foundation for your piercing. Using cheap, mystery metal is like building a house on sand—it's just asking for trouble in the form of irritation, allergic reactions, and prolonged pain.
This simple bar chart shows how the pain can vary by piercing type, with some being notoriously more intense than others.

As you can see, piercings that go directly through the super-sensitive lip tissue itself, like the Jestrum, tend to rank higher on the pain scale.
Your Body and Your Mindset
Finally, let's talk about you! Your personal pain threshold is a huge piece of the puzzle. If you generally handle pain pretty well, a lip piercing will likely just feel like a quick, sharp pinch.
A few other personal factors come into play, too:
- Anxiety and Stress: If you walk in tense and terrified, your body goes on high alert, making every sensation feel way more intense. Try some deep breathing exercises to stay calm! It really helps.
- Health and Hydration: Being well-rested, hydrated, and having a meal beforehand can stabilize your blood sugar and make you much less sensitive to pain. Don't go in on an empty stomach!
- Metal Sensitivities: An unknown allergy to materials like nickel can turn a healing piercing into an itchy, painful nightmare. If you're unsure, you can learn more about which piercing materials are right for you to avoid this super common issue.
By choosing a great piercer and top-tier jewelry, you’re setting yourself up for the best experience possible.
What To Expect In The First 48 Hours
The pinch is over in a flash, but now the real journey begins—healing! The first 48 hours after you leave the studio are the most critical for setting your new lip piercing up for success. Knowing what's normal (and what isn't) will help you cruise through this initial phase without any panic.

Right after your appointment, you'll probably feel some throbbing and tenderness. You'll also see some pretty noticeable swelling. This is your body's natural response to the new addition, and it's completely normal! The pain will likely be a dull ache, a big change from that sharp sting you felt during the actual piercing.
Your main job right now is to be gentle with yourself and your new piercing. Think of it as a delicate little sprout that needs the right conditions to grow strong.
Welcome to The Antenna Phase
You’ll definitely notice your piercer used an extra-long bar for your initial jewelry. No, that's not a mistake—it's a super important part of the process, often called the 'antenna phase'. This long post is there to give your lip plenty of room to swell up without the jewelry getting too tight.
It might feel a bit awkward at first, but this initial bar is your best friend. It prevents the jewelry from embedding into your skin, which can cause some serious complications down the road. Once the swelling chills out in a few weeks, you'll be able to swap it for a shorter, more comfortable labret stud.
Managing Swelling and Discomfort
So, how do you keep things calm and comfortable during these first two days? Keeping swelling down is your number one priority.
- Gentle Cool Compresses: Wrap a clean paper towel around an ice pack or even a bag of frozen peas. Gently apply it to the outside of your lip for 10-15 minutes at a time to help with the swelling. Just be sure to never put ice directly on your skin or the piercing itself.
- Stay Elevated: When you go to sleep, try using an extra pillow to keep your head propped up above your heart. It’s a simple trick, but it can make a big difference in minimizing overnight swelling.
- Avoid Irritants: For now, steer clear of spicy, acidic, or overly crunchy foods that could aggravate the fresh piercing. It's also a good idea to say no to alcohol and smoking, as they can slow down your healing and ramp up the swelling.
Of course, your aftercare routine is essential. For a great start, check out our guide on using H2Ocean piercing aftercare spray to keep your piercing clean and happy right from day one.
Your Essential Lip Piercing Aftercare And Healing Plan
Proper aftercare isn't just a suggestion—it's your secret weapon for a piercing that heals quickly with minimal pain. Once that initial pinch is over, how you care for your new lip piercing will totally determine how much discomfort you feel in the coming weeks. Think of this as your go-to playbook for a happy, healthy piercing.

The foundation of your routine should be super simple: a sterile saline solution. You'll want to clean the outside of your piercing 2-3 times a day and rinse your mouth with water or an alcohol-free mouthwash after every single meal. This is your best defense against irritating bacteria and leftover food debris.
Forget what you've heard about DIY salt soaks or harsh chemicals. Just stick to the basics to avoid making things worse.
The Dos and Don'ts of Lip Piercing Healing
Navigating the healing process can feel a bit tricky, but it's mostly about what you don't do. Your body is a pro at healing; your main job is to just stay out of its way. Follow these rules, and you’ll sidestep the common mistakes that lead to irritation and way more pain than necessary.
- DO stick to a consistent cleaning schedule. A simple routine with a quality aftercare product is your best friend.
- DON'T twist, turn, or play with your jewelry! This is the number one cause of those dreaded irritation bumps and healing delays. Hands off!
- DO eat soft, non-spicy foods for the first week or so. Think smoothies, yogurt, and lukewarm soup. Your piercing will thank you.
- DON'T use harsh products like alcohol, peroxide, or scented soaps. They are way too aggressive for delicate, healing tissue.
Following a solid aftercare plan isn't just about preventing infection; it's about actively reducing tenderness and swelling. Good care directly translates to a less painful healing experience, which answers the big question of "how bad do lip piercings hurt" during recovery—it hurts a lot less if you treat it right!
Your Aftercare Toolkit
Having the right supplies on hand from day one makes all the difference. You don't need a complicated setup, just a few key items to make life easier. We suggest starting with Bodycandy's own sterile piercing aftercare spray for a no-fuss, effective way to keep your piercing pristine.
Your initial jewelry is also a huge part of the equation. We can't stress this enough: start with high-quality jewelry! A comfortable, properly sized implant-grade titanium labret stud is hypoallergenic and perfect for a fresh piercing, as it won't cause the irritation that cheap metals are famous for. For even more info on oral piercing care, you can check out our guide on getting to the tooth of the matter.
Finally, if you're feeling a bit sore, an over-the-counter anti-inflammatory can help manage swelling and discomfort, but always check with your doctor first. With the right care and quality jewelry, you’re setting yourself up for an easy, stylish heal.
Frequently Asked Questions About Lip Piercing Pain
Alright, you've done the research, you've picked your placement, but there are still a few nagging questions rattling around in your head. It's totally normal. Getting a new piercing is exciting, but those last-minute "what ifs" can creep in.
We hear these questions all the time, so we've put together the straight-up answers you're looking for. Let's tackle those final worries about everything from numbing cream to what's for dinner, so you can walk into that piercing studio feeling confident and ready.
Can I Use Numbing Cream Before Getting My Lip Pierced?
This is a big one, and we get why you'd ask. But while it seems like a genius hack, pretty much any professional piercer is going to advise against it. Numbing creams can actually change the texture of your skin, making it feel kind of rubbery or stiff. That makes it much harder for your piercer to get a perfectly straight, clean needle pass.
Plus, that numbness wears off. When it does, you can get a sudden flood of feeling that's often more jarring than the piercing itself. A good piercer is so fast that the actual "ouch" is over in a blink. Seriously, trust your pro on this one—the process is quicker and more reliable without the cream.
The piercing itself is over in a second. Numbing cream isn't worth the risk of a crooked piercing or weird sensations later on. A quick pinch is always better than a permanent mistake!
How Do I Eat Without Hurting My New Piercing?
Navigating mealtime with a fresh lip piercing takes a little bit of strategy, but you'll be a pro in no time. For the first week or so, think soft. Smoothies, yogurt, oatmeal, and lukewarm soups are going to be your best friends.
Here's your mealtime survival guide:
- Go Small: Cut your food into tiny, manageable bites. This means less chewing and a lower chance of bumping your new jewelry.
- Chew Carefully: Try to chew on the side of your mouth opposite the piercing. It feels a little awkward at first, but it quickly becomes second nature.
- Dodge the Irritants: For now, say goodbye to anything super crunchy (chips, hard bread), sticky (caramel, gum), or excessively spicy and acidic. These are guaranteed to irritate a healing piercing.
- Rinse After Everything: After every single meal or snack, give your mouth a good swish with either clean water or a sterile saline solution. This is non-negotiable for flushing out food bits that can get trapped.
What Should I Do If I Accidentally Bite My Lip Ring?
First off, take a breath. It happens to almost everyone, especially when you have that initial long bar in to account for swelling. Biting down on your jewelry is practically a rite of passage for new oral piercings.
If you chomp down on it, the area will probably get a bit sore and might even swell up again. Just go back to day-one care. Gently rinse your mouth with a sterile saline solution and maybe hold a cool compress against the outside of your lip for a few minutes.
The most important thing is to be extra mindful when you're eating and talking for the next day or two. But the real fix? Downsize your jewelry. As soon as your piercer gives you the all-clear (usually after a few weeks), get that long initial bar swapped for a shorter one that sits flush. This is the #1 way to protect your piercing and your teeth long-term.
Ready to find the perfect starter jewelry or aftercare to make your healing journey a breeze? Bodycandy has everything you need, from implant-grade titanium labrets to soothing saline sprays.
Shop our full collection of lip rings and aftercare products today!