So, you got your nipples pierced—hell yeah! It's a super exciting way to express yourself, but the real journey starts after you walk out of the piercing studio. The nipple piercing healing stages typically unfold over 6 to 12 months, taking you from a tender, brand-new piercing to one that's fully settled and happy.
Patience and a solid aftercare routine are your absolute best friends for a smooth recovery. Trust us on this one.
Your Nipple Piercing Healing Roadmap
You took the plunge—awesome! Now, let’s talk about what comes next. Healing a nipple piercing is a marathon, not a sprint. Your body is doing some seriously incredible work behind the scenes to create a healthy, stable channel (called a fistula) for your new jewelry. Understanding the process makes it way less intimidating and helps you feel confident every step of the way.
The entire journey is broken down into a few key phases. Knowing what’s normal will help you stay chill, care for your piercing correctly, and spot any potential drama before it becomes a real problem.
- The First Few Weeks: Expect some tenderness, swelling, and redness right off the bat. This is totally normal—it's just your body's initial "whoa, what is this?!" reaction.
- "Crusties" Are Your Friends (Seriously!): You'll notice some light-colored discharge that dries around the jewelry. Don't pick at them! This is just lymph fluid, a clear sign your body is hard at work healing.
- Looks Can Be Deceiving: After a couple of months, your piercing might look and feel much better on the outside. But don't be fooled! It's still working hard to heal and strengthen on the inside.
The Three Core Healing Phases
The nipple piercing healing process is generally divided into three main stages: the initial phase (the open wound), the middle phase (when things start to settle), and the final phase (full maturation).
This visual timeline gives you a great overview of the key phases, from day one to fully healed.
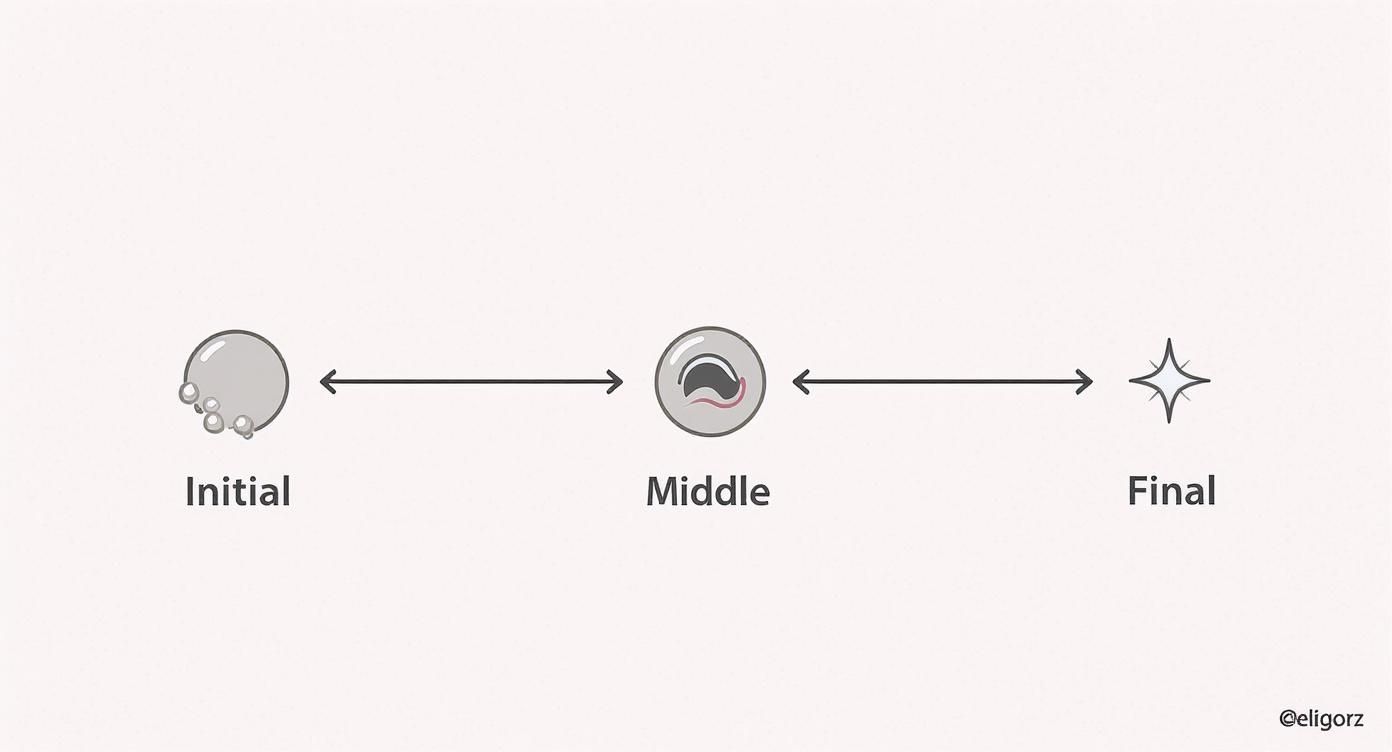
As the infographic shows, even when your piercing looks amazing during the middle months, the tissue inside is still maturing and getting stronger. That's why sticking with your aftercare routine is so, so important.
Here’s a quick table to break down what you can expect from each stage.
A Quick Look at Nipple Piercing Healing Stages
This table provides a snapshot of the journey ahead, helping you understand what's normal and what your focus should be during each phase.
| Healing Stage | Typical Timeline | Key Signs to Expect | Your Main Goal |
|---|---|---|---|
| Stage 1: The Inflammatory Phase | Week 1 to Week 4 | Redness, swelling, tenderness, bleeding, and "crusties" (lymph fluid). | Keep it clean, don't touch it, and avoid irritation at all costs. |
| Stage 2: The Proliferative Phase | Month 1 to Month 6 | Redness and swelling go down. The fistula begins to form inside. | Continue cleaning, be gentle, and resist the urge to change the jewelry. |
| Stage 3: The Maturation Phase | Month 6 to Month 12+ | Piercing looks and feels normal. The fistula becomes strong and stable. | Maintain basic hygiene and wait for the "all clear" before changing jewelry. |
Remember, these timelines are just an estimate. Everyone's body heals at its own pace, so don't stress if you're a little ahead or behind this schedule.
For some extra perspective on how this compares to other piercings, check out our guide on the healing times for popular piercings.
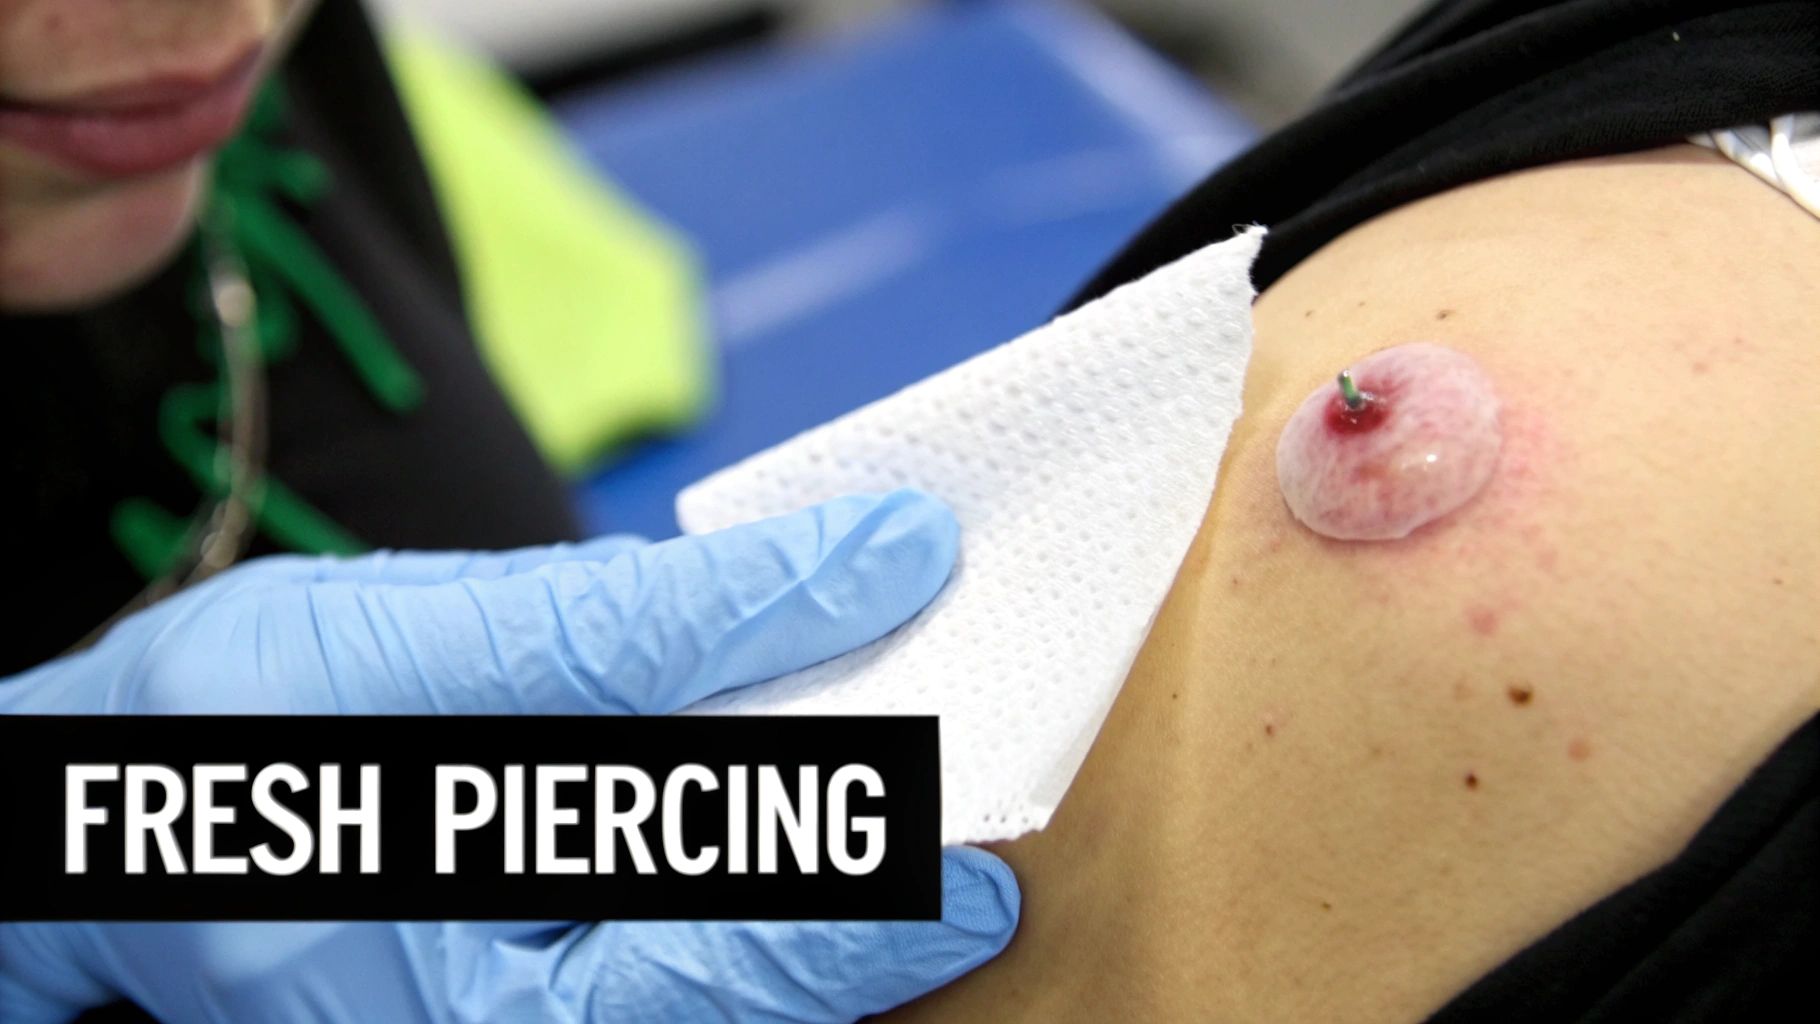
Stage 1: The Inflammatory Phase (Weeks 1-4)
Alright, you did it! Welcome to the fresh piercing club. The first stop on your healing journey is what we call the inflammatory phase, and it’s pretty much exactly what it sounds like. Right now, your body is getting acquainted with its cool new addition, and its first order of business is to send in the troops to protect the area and kickstart the healing process. This initial stage for any nipple piercing typically lasts from week one up to week four.
Think of it like this: your body just sustained a tiny, very controlled wound. Its natural defense system immediately goes into high gear, which is why you'll notice some specific, and totally normal, signs right off the bat.
What to Expect Right After Your Piercing
The first few days (and even weeks) can feel a bit intense, but don't sweat it—this is all part of the plan. You’re likely to experience some combination of the following:
- Redness and Swelling: The area around your new jewelry will almost certainly be red, a little puffy, and feel warm when you touch it. That's just a sign of increased blood flow rushing to the site to deliver all the good stuff needed for healing.
- Tenderness and Sensitivity: Yep, it’s going to be tender. Be super mindful when getting dressed, showering, and especially when sleeping. Bumping it is no fun.
- Minor Bleeding: A little bit of bleeding or spotting is super common in the first couple of days. Don’t panic if you see a small spot of blood on your shirt or bra. This usually stops pretty quickly.
All these symptoms are just your body’s way of saying, "Okay, we've got a situation here, and we're on it!" This immediate response is absolutely crucial for setting up a successful healing environment down the road.
Bodycandy Pro Tip: For the first week or so, try wearing a clean, soft cotton bra or a snug-fitting sports bra to bed. This little trick helps minimize movement and keeps your new jewelry from snagging on your sheets while you sleep—a major source of irritation!
Understanding "Crusties" and Discharge
One of the most common things you'll notice during this phase is a clear or whitish-yellow fluid that seeps from the piercing. This isn't pus! It's called lymph fluid, and it's your body's built-in cleaning crew, packed with white blood cells that are working to clean the wound from the inside out.
When this fluid dries, it forms what everyone in the piercing world affectionately calls "crusties" around your jewelry. As tempting as it might be to pick them off, please, resist the urge!
Picking at them with your fingers can introduce bacteria and tear the super delicate, healing skin inside the piercing channel. Instead, your daily saline soaks will do the work for you by gently softening and rinsing them away without causing any trauma. Just remember, seeing crusties is actually a good sign that your body is doing its job.
Your Week-by-Week Guide to the First Month
Everyone's body heals at its own pace, but here’s a general timeline of what you can probably expect during this first, fiery phase.
Week 1
This is when things will be at their most sensitive. Swelling and redness will likely be at their peak. Your only job right now is to be incredibly gentle. Follow your piercer's aftercare routine to the letter, avoid touching the piercing unless you’re cleaning it (with freshly washed hands!), and just focus on keeping it protected.
Week 2
You should start to notice the initial intensity calming down a bit. The swelling should begin to go down, and any bleeding you had should have stopped completely. Crusties will probably be a regular guest during your daily cleaning routine. Consistency is everything here—don't start slacking on those saline soaks.
Weeks 3 & 4
By the end of the first month, your piercing should look and feel much more settled. Most of the redness will have faded, and that initial tenderness should be way less noticeable. But—and this is a big one—it is nowhere near healed. The tissue on the inside is still extremely fragile. This is the stage where it’s way too easy to get a false sense of security. One good snag or bump can easily set your progress back. Keep up the gentle care and stay patient. You've successfully navigated the most critical part of the nipple piercing healing stages, and your body has built the foundation for the next phase of recovery.
Stage 2: The Proliferative (or "Building") Phase
Alright, you made it through the most intense part. Give yourself a pat on the back! You're now entering the second stage of nipple piercing healing, often called the proliferative phase. This is the long game—the marathon, not the sprint. On the outside, things are starting to look much better, but your body is still working overtime on some serious internal construction.
This phase usually starts after the first month and can stick around for several more. Your main job now is to be patient, stay consistent with your aftercare, and protect your piercing from getting snagged or bumped.
Building the Fistula
So what's all this internal construction about? The main event of this stage is creating a fistula. The easiest way to think of a fistula is as a tiny, healed tunnel of skin that your body builds right through the piercing, connecting one side of your nipple to the other. This little tunnel is what your jewelry will eventually call home.
Your body builds this fistula by creating brand new tissue in a process called granulation. It’s a pretty amazing biological feat, but it's also incredibly delicate. This is exactly why the crazy swelling and redness from stage one have calmed down, but the piercing still feels super sensitive if you accidentally snag or bump it.
What to Expect During This Long Haul
The proliferative stage is where a lot of people get a false sense of security. Because the piercing looks so much better, it's really tempting to slack off on cleaning or—even worse—try swapping out the jewelry. Do not change your jewelry yet!
Trying to change it now can easily tear all that fragile new tissue your body has worked so hard to build. That mistake could set your healing back by weeks, or even months. Here’s what’s perfectly normal during this time:
- Less Swelling and Redness: The piercing should look way calmer and less "angry" than it did in the first month.
- "Crusties" Are Still a Thing: You’ll still find that yellowish crust (dried lymph fluid) forming around the jewelry. This is actually a good sign that your body is still hard at work.
- Occasional Tenderness: The constant, dull ache should be gone. However, you'll likely still feel a bit of tenderness if the piercing gets knocked around.
Don't Be Fooled by a Healed Appearance: This is the most common mistake people make. Just because it looks good on the outside doesn't mean it's healed on the inside. That fistula is still weak and needs several more months to get strong. Patience is everything right now.
Hormones and Healing Flare-Ups
During this long phase, you might notice your piercing has good days and bad days. It can be frustrating, but one of the biggest culprits is something you can't control: hormones.
Many people find their piercings get a little more tender, slightly swollen, or extra crusty around their menstrual cycle. This is 100% normal. Hormonal shifts can trigger temporary inflammation all over your body, and your healing piercing is definitely not immune. If you notice this pattern, just give it some extra love with a gentle saline soak and maybe avoid super tight bras or tops for a few days.
This phase is all about consistency. Keep up with your gentle cleaning, protect your piercing from snags, and just let your body do its thing. The patience you practice now will pay off big time with a happy, healthy piercing later.
The Third Stage: The Maturation Phase
You’ve made it to the final stretch—congratulations! Welcome to the maturation phase, the last and longest part of the nipple piercing healing process. This is where all your patience and diligent aftercare truly start to pay off. On the outside, your piercing probably looks and feels fantastic, but deep inside, your body is still putting the finishing touches on the fistula, making it strong and permanent.
Think of it like baking a cake. The last phase was when you pulled it out of the oven, and it looked done. This maturation phase is the crucial cooling period. If you try to frost it or slice it too soon, the whole thing will fall apart. Right now, your piercing is "cooling"—the internal tissue is settling in, strengthening, and getting ready for its big debut.
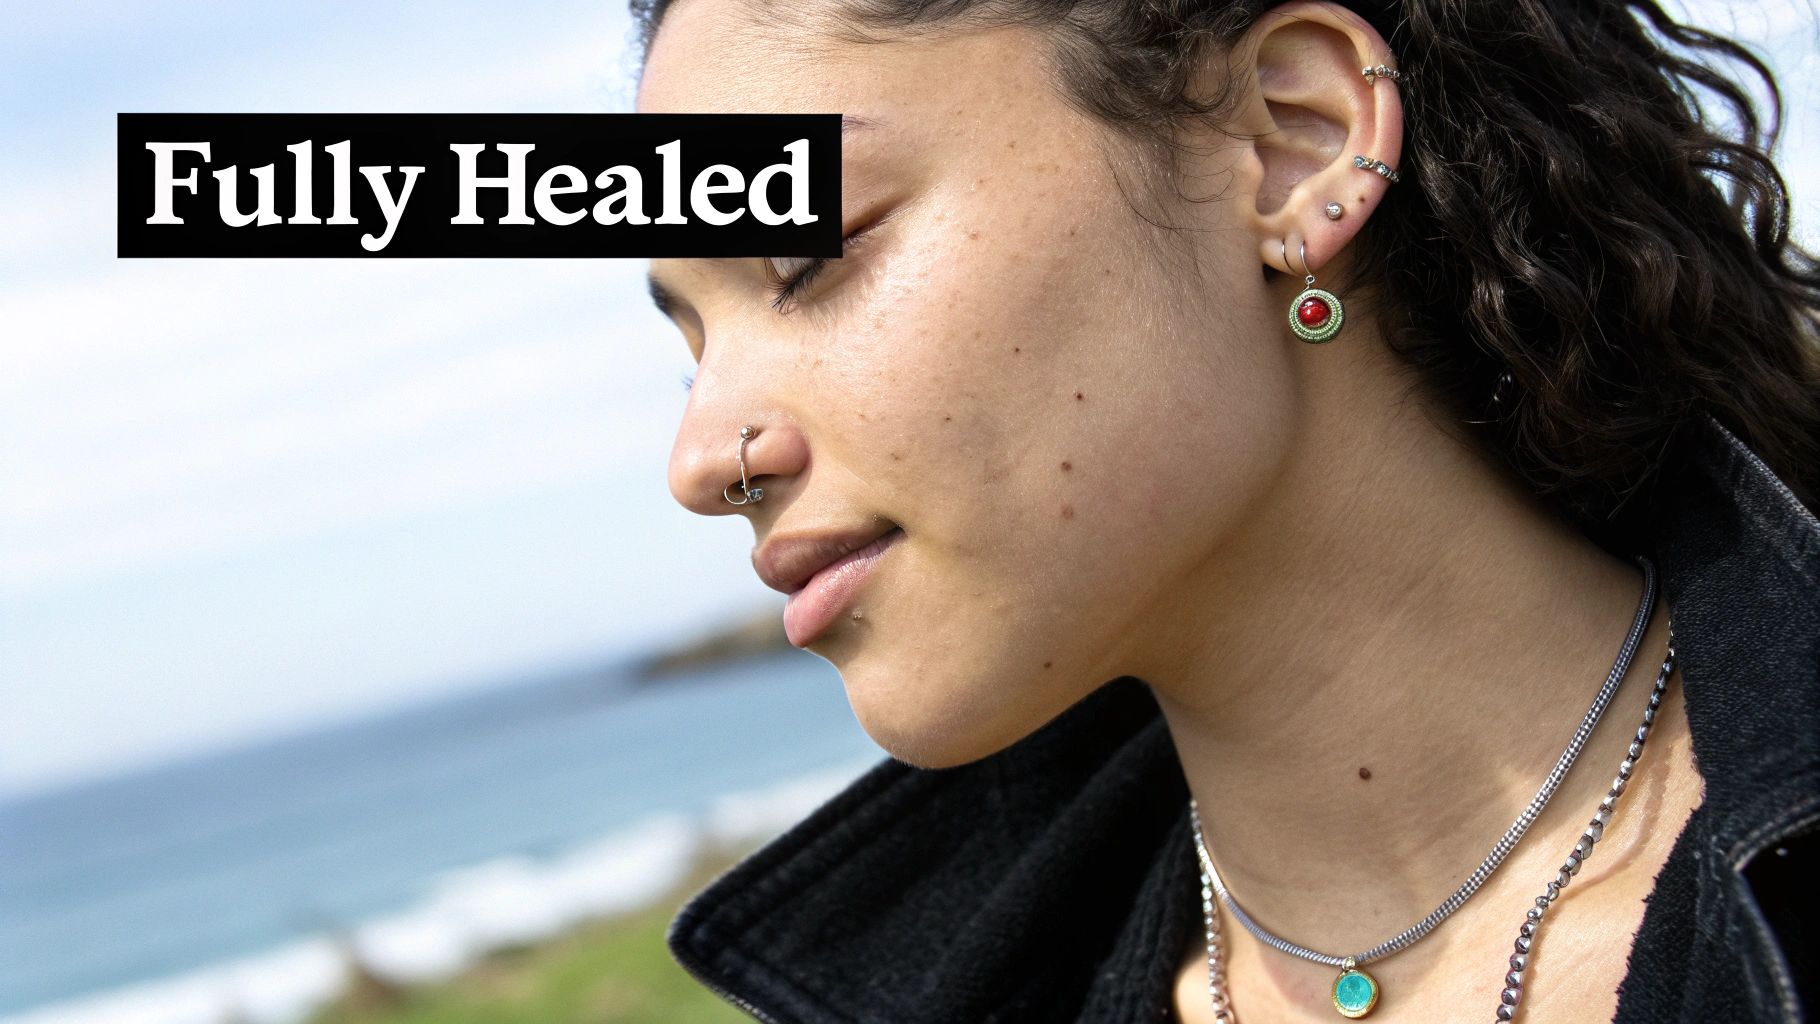
Signs You're Fully Healed
So, how do you know when you've officially crossed the finish line? A fully healed and matured nipple piercing has some very clear signs. It’s not just about how much time has passed; it’s about how your body feels.
Here’s your checklist for a happy, healed piercing:
- No More Pain or Tenderness: Even if you accidentally bump or snag it, a healed piercing shouldn't send you through the roof. It should feel like a normal part of your body.
- Zero Discharge or "Crusties": The days of finding dried lymph fluid on your jewelry are long gone. The entry and exit holes should be clean and clear.
- The Jewelry Moves Freely: When you're cleaning it, the jewelry should glide smoothly through the fistula without any tugging, pinching, or discomfort.
- Normal Skin Tone and Texture: The skin around the piercing holes should look just like the rest of the skin on your nipple—no redness, no swelling, and no weird puckering. The edges of the fistula should look smooth and well-defined.
This final stage is the longest, often lasting from the six-month mark all the way up to a full year, and sometimes even longer for some people. Rushing it now would be like running 25 miles of a marathon and then quitting right before the end. You're so close!
Remember, the 6 to 12-month timeline is an average, not a hard deadline. Everyone's body is different. If you're at the nine-month mark and still get a little tenderness now and then, that's okay! Just give your body the extra time it needs.
It's Finally Time to Change Your Jewelry!
This is the moment you've been waiting for! Once you can confidently tick every single item off the "fully healed" checklist, you can finally start thinking about swapping out your starter jewelry for something that truly shows off your style. But before you dive into that shopping cart, let's make sure you're really ready.
Changing your jewelry too early can tear the delicate new fistula, which dramatically increases your risk of infection and can set your healing clock all the way back to zero. Yikes.
Your First Jewelry Change: A Step-by-Step Guide
For your very first swap, we can't recommend visiting your piercer enough. They can confirm you're fully healed, change the jewelry for you safely and hygienically, and show you how to do it yourself for next time.
If you're confident and ready to tackle it at home, here's how to make it a smooth process:
- Wash Your Hands: Start with squeaky clean hands. Use antibacterial soap and warm water.
- Clean Your Gear: Make sure your new jewelry is sterilized. You can boil it (if it's a simple metal piece without gems) or wipe it down thoroughly with an alcohol pad and let it dry completely.
- Get Ready: Find a clean, well-lit space. A tiny bit of water-based lubricant on the new barbell can make insertion much easier and more comfortable.
- Work Quickly but Gently: Unscrew one end of your current barbell. Gently slide it out, and immediately follow it with the new piece of jewelry. Don't leave the piercing empty for any length of time, as even a healed fistula can begin to shrink surprisingly fast.
- Secure and Clean: Screw the ball on tightly and give the area a quick, gentle wipe-down with some sterile saline solution.
And that's it! You've successfully navigated the nipple piercing healing journey. Now, the real fun begins.
Understanding Irritation Bumps and Infections
Even with the most perfect aftercare routine, your healing journey might hit a few bumps—literally. But don't panic! Most of the time, these issues are minor and easy to manage once you know what you’re looking at. Let's break down the difference between a common irritation bump and a more serious infection.
One of the most frequent freak-outs during the nipple piercing healing stages is the sudden appearance of a small bump near one of the piercing holes. Your mind might jump straight to "infection," but more than 90% of the time, this is just a simple irritation bump. Think of it as your body's way of sending up a flare signal, telling you, "Hey, something is bothering me here!"
What Causes Irritation Bumps
Irritation bumps, sometimes called pustules, are typically small, fluid-filled sacs that look a bit like a pimple. They’re annoying, for sure, but they aren't dangerous. The key is to play detective and figure out what’s causing the irritation so you can get rid of the source.
So, what are the usual suspects?
- Friction and Pressure: Did you wear a tight, lacy bra all day? Maybe you’re a stomach sleeper putting pressure on your piercing all night. Consistent friction is the number one cause of these bumps.
- Snagging Your Jewelry: We’ve all done it. Catching your new piercing on a towel, loofah, or clothing is a surefire way to make it angry.
- Poor Quality Jewelry: Your body might actually be reacting to the metal itself. Nickel is a common allergen found in lower-quality jewelry, which is why we always recommend implant-grade materials from the start.
- Improper Aftercare: Using harsh chemicals like alcohol or peroxide, over-cleaning, or not cleaning enough can all throw your healing out of whack.
The fix is usually pretty simple: find the problem and remove it. Go back to basics with your sterile saline soaks, be extra gentle, and the bump should start to shrink and disappear on its own. If you think the metal might be the issue, you can get the full rundown on piercing irritation and potential allergic reactions to see if that's the real cause.
How to Spot a Real Infection
While they're way less common, genuine infections are serious and require prompt medical attention. An infection is a bacterial issue, and it will look and feel very different from a simple irritation bump. You need to know these signs so you can act fast.
Don't Ignore These Red Flags: An infection won't get better on its own. If you experience these symptoms, it's time to stop troubleshooting and call a doctor. Your health comes first!
Here’s a no-nonsense comparison to help you tell the difference.
Irritation vs Infection Knowing the Signs
| Symptom | Irritation | Infection |
|---|---|---|
| Discharge | Clear or whitish fluid (lymph); can be crusty | Thick, opaque pus (yellow, green, or brown); may have a foul odor |
| Pain Level | Localized tenderness; sore only when touched or bumped | Intense, throbbing pain that may spread and get worse over time |
| Swelling | Minor swelling directly around the piercing hole | Significant, spreading swelling that doesn't go down |
| Redness | Pink or reddish color concentrated around the jewelry | Deep, angry red that spreads; may see red streaks leaving the piercing |
| Heat | Area may feel slightly warm | The entire area feels hot to the touch |
When in doubt, it's always better to be safe than sorry. An irritated piercing will usually calm down once the source of the problem is removed, but an infection needs a doctor's intervention.
If you suspect an infection, do not remove your jewelry. I know it seems counterintuitive, but taking the jewelry out can allow the piercing holes to close up. This traps the infection inside and can lead to a much more serious abscess. A doctor can prescribe antibiotics to clear everything up while keeping your piercing channel open and safe.
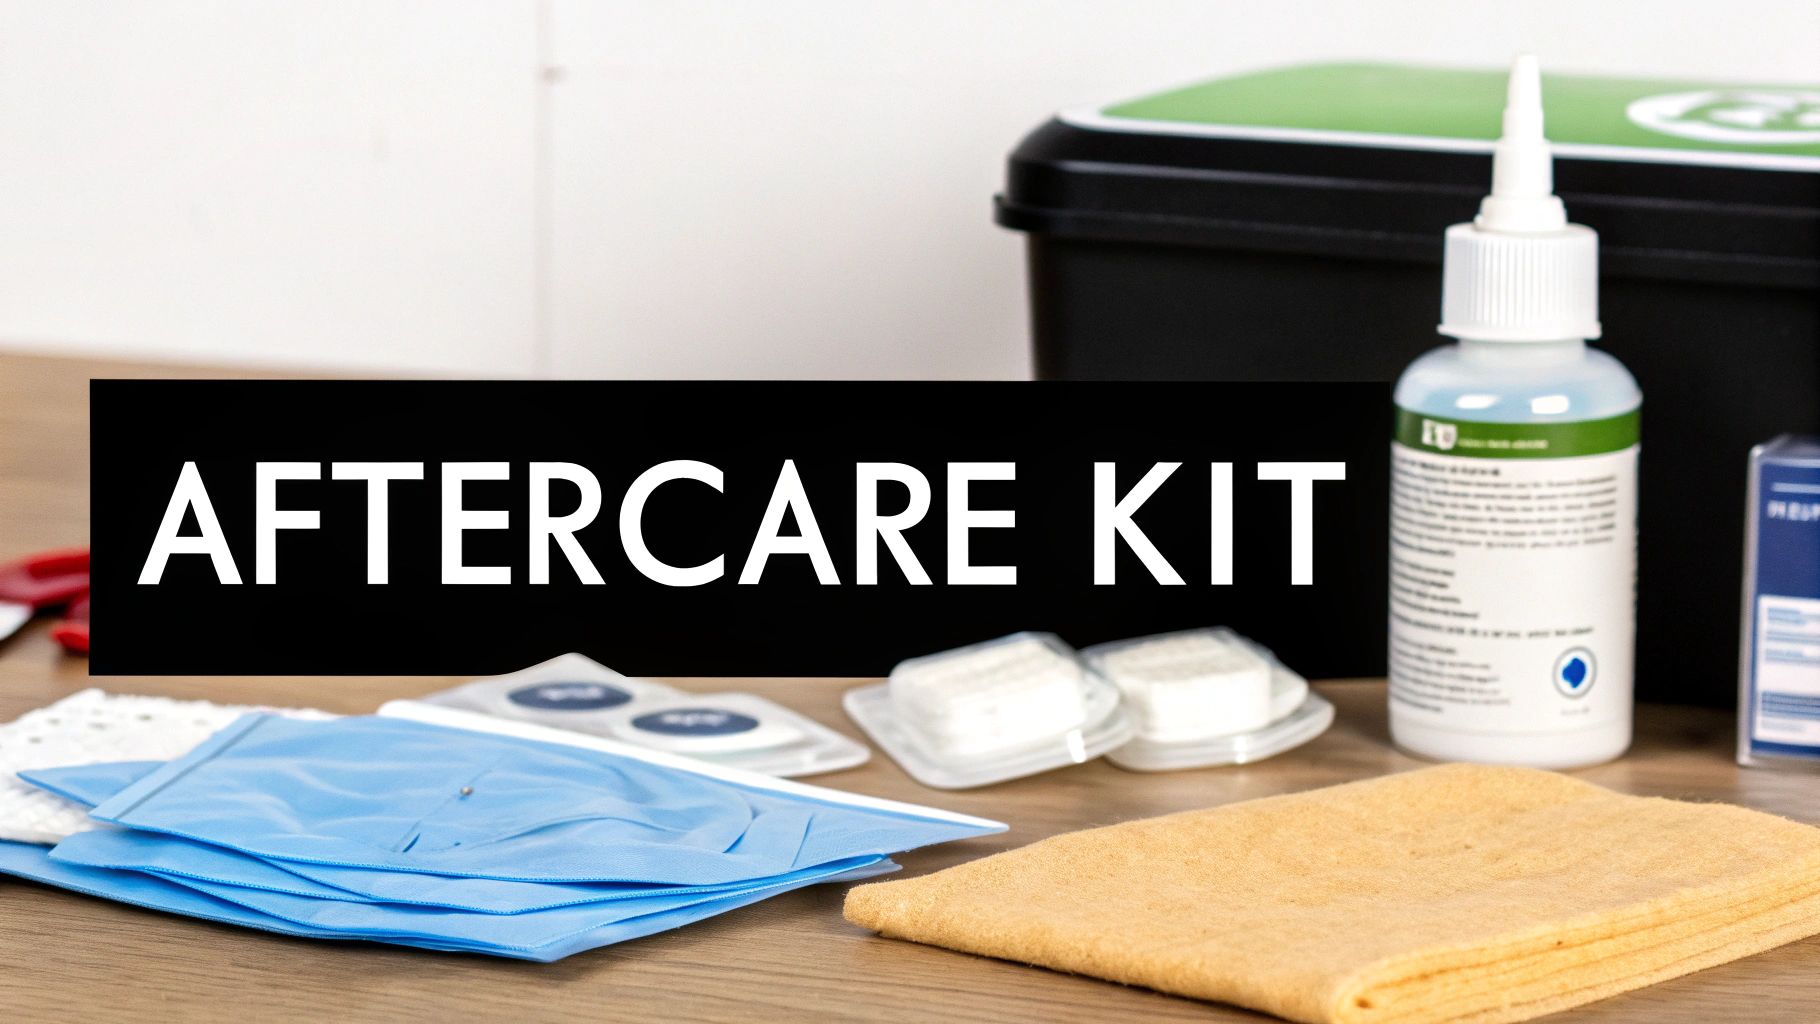
Your Essential Nipple Piercing Aftercare Kit
Having the right tools makes any job easier, and healing your brand new nipple piercings is definitely a job. A solid aftercare routine is about to become your new best friend, and putting together the perfect kit is step one. Forget complicated potions and homemade concoctions—the key here is simplicity and being consistent.
Your main goal is to keep things clean and free from irritation so your body can do its healing magic. This means using products that help, not harm, the delicate new tissue that's forming.
The Gold Standard: Sterile Saline Solution
The absolute star of your aftercare show should be a sterile saline solution. This isn't just DIY saltwater; it’s a specific, gentle formula made to match your body's natural fluids, making it the safest and most effective way to clean your piercing.
A good saline spray will gently flush away bacteria and those infamous "crusties" (which are just dried lymph fluid) without messing up the healing process. Plan on cleaning your piercings twice a day—once in the morning and once at night. Just spray the solution right on the piercing, hitting both the entry and exit holes.
What to Avoid at All Costs
Just as important as knowing what to use is knowing what to stay far, far away from. The skin around a fresh piercing is incredibly sensitive, and the wrong stuff can cause some serious irritation, dryness, and major healing setbacks.
Keep these items away from your new piercings:
- Alcohol and Hydrogen Peroxide: These are way too harsh. They don't just kill the bad bacteria; they also destroy the fragile new cells your body is working so hard to build.
- Antibacterial Soaps: Soaps with heavy fragrances or dyes will strip your skin of its natural moisture, which just leads to dryness and irritation.
- Ointments and Creams: Products like Neosporin are a huge no. They're way too thick, trapping bacteria against your skin and preventing the piercing from getting the air it needs to breathe and heal.
Lifestyle Tips for a Smooth Heal
Your daily habits play a bigger role in your healing journey than you might think. A few small tweaks can make a massive difference in preventing snags, irritation, and headaches.
Bodycandy Pro Tip: For the first few weeks, try wearing a clean, soft cotton bra or even a snug-fitting sports bra to bed. This simple trick gives you some gentle support and, more importantly, protects your new jewelry from getting snagged on your sheets or blankets while you sleep.
During the day, go for loose-fitting tops made from breathable fabrics like cotton. When you're in the shower, it's fine to let the warm water run over the piercing, but try to keep soaps and body washes from getting directly in it. After you hop out, gently pat the area completely dry with a fresh paper towel—your regular bath towel can be a breeding ground for bacteria and can easily snag on your jewelry.
With the right kit and a few smart habits, you’re all set for a smooth recovery
Common Nipple Piercing Questions Answered
We get it—even with the best guide in hand, a million little questions can pop up while you're healing. It's totally normal! Let's walk through some of the most common worries so you can feel confident and in control of your healing journey.
What If My Piercing Looks Red and Angry?
First, take a deep breath! A bit of redness and attitude is completely expected, especially in the first few weeks as your body gets used to its new bling. This is part of the normal inflammatory response.
However, you'll want to pay closer attention if that redness starts to spread, the area feels hot to the touch, or you notice thick, funky-colored discharge (think yellow or green).
If you see those signs, go back to basics. Stick to your sterile saline soaks twice a day, and be extra gentle with it. If things aren't looking better in a day or two, it’s time to call your professional piercer. They've seen it all and can help you figure out what’s really going on.
Is Swimming Completely Off-Limits?
In a word: yes. For the entire healing timeline—which can easily be up to a year—you need to stay out of pools, hot tubs, lakes, and oceans.
Think of those bodies of water as a giant bacterial soup, and your fresh piercing is an open door. It's just not worth the massive risk of a gnarly infection.
For now, stick to showers. If some gentle, fragrance-free soap runs over the area, that's fine. Just make sure to rinse it completely with clean water when you're done.
The Patience Test: The urge to swap out your starter jewelry is so real, we know. But you absolutely must wait until you are 100% healed. That means zero crusties, no tenderness, and no irritation, which usually takes 6 to 12 months.
For that very first jewelry change, we can't recommend this enough: go see your piercer. They'll not only change it safely and hygienically, but more importantly, they can give you the professional green light that your piercing is truly ready for its sparkly new upgrade. Waiting feels like forever, but a healthy, happy piercing is the ultimate reward.
You've made it through the healing journey, and now it's time to celebrate! Reward all that patience by exploring the incredible collection of high-quality nipple jewelry at Bodycandy. Find your new favorite look today!