
Ready to turn your ear into a personalized work of art? The trend of getting multiple ear piercings has absolutely exploded, and it’s one of the coolest ways to show off your personal style. Think of your ear as a blank canvas and all the gorgeous jewelry out there as your paint—this guide is your roadmap to creating the perfect "ear-scape."
Welcome To The World Of Curated Ears
If you're looking to start your piercing journey, you're in the right place. A "curated ear" isn't just about poking a few random holes; it's a thoughtfully designed collection of piercings that flow together to create one stunning, cohesive look. It’s about telling your own story, whether that story is minimalist and chic, bold and edgy, or full-on sparkling glamour.
This trend has gone way beyond just adding a second hole in your lobe. Now, it’s all about creating a unique constellation of shimmer that works its way from your lobe clear up to your helix and beyond. Celebs like Kylie Jenner and Beyoncé have turned their ears into high-fashion statements, inspiring tons of people to do the same. But here's the good news: you don’t need a red-carpet budget to build a beautiful, personalized stack.
Why Is Everyone Obsessed With Stacking?
Honestly, the magic of multiple ear piercings is all in the customization. Your ear anatomy is totally unique to you, which means your piercing placement will be, too. This isn't some cookie-cutter trend; it's a chance to create something that is 100% you. Even the process itself is part of the fun—planning your next addition, watching it heal, and finally swapping in that perfect piece of jewelry you’ve been dreaming about.
The real goal is to build a look over time, not to get it all done at once. Each new piercing adds another layer to your personal style, making your curated ear a living piece of art that evolves right along with you.
What To Expect From This Guide
Think of us as your piercing-obsessed best friend on this adventure. We're here to walk you through every single step, from getting that first spark of inspiration to styling your stack for the long haul. We’ll get real about pain levels, break down the best jewelry materials for happy healing, and show you how to design a look that truly fits your vibe.
We’re going to cover all the essentials:
- Planning and Placement: How to map out your dream constellation based on your ear’s unique shape and folds.
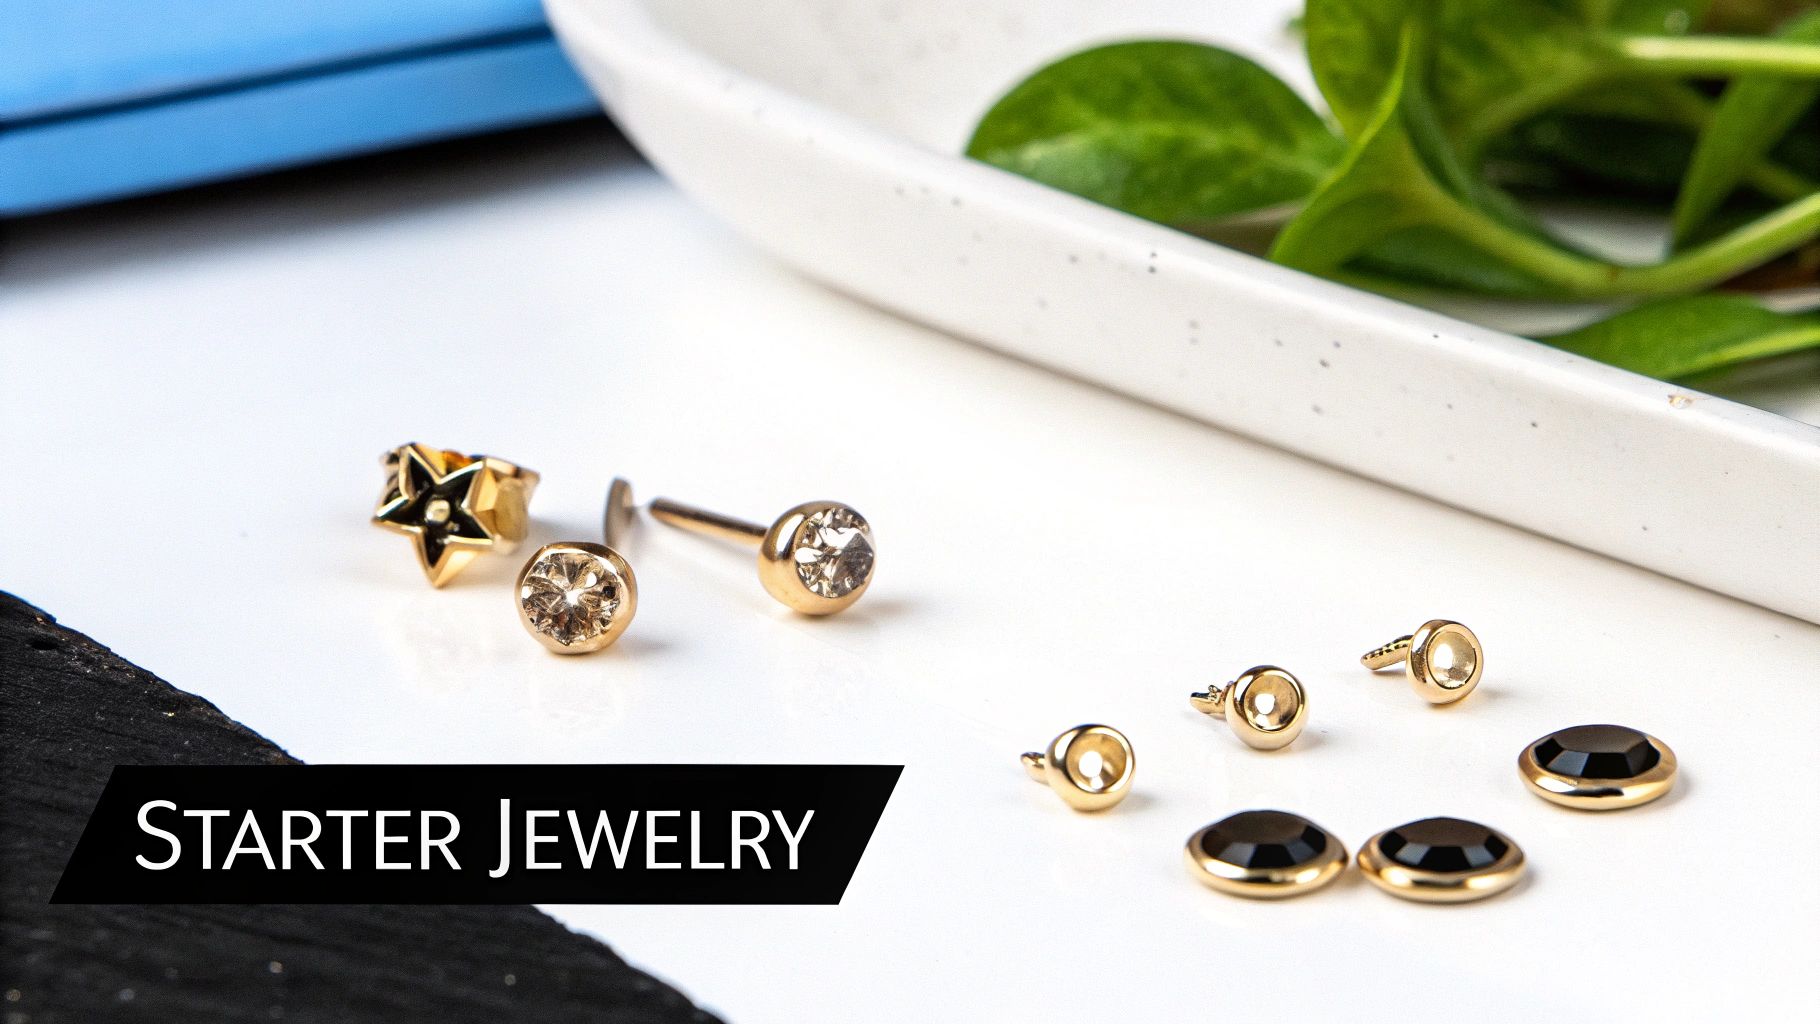
- Jewelry Essentials: Picking out the right starter jewelry, from implant-grade titanium studs to gorgeous gold flat backs.
- Aftercare Mastery: The absolute dos and don'ts for keeping your new piercings clean, happy, and free of complications.
- Styling Like a Pro: All the fun stuff! How to mix, match, and stack your jewelry once everything is fully healed up.
By the time you're done reading, you’ll have all the confidence and know-how to start building your dream ear stack with Bodycandy right there with you. Let's get started!
Planning Your Perfect Piercing Constellation
A truly stunning ear stack doesn't happen by accident—it’s the result of a little creativity and a smart plan. Think of it as being the architect of your own ear, mapping out the entire journey before the first needle ever gets close. It’s all about creating a vibe that’s 100% you.
Before you even think about stepping into a piercing studio, spend some time dreaming up your ideal look. Are you feeling a more minimalist vibe with tiny, delicate studs? Or are you all-in on a bold, boho-chic look, mixing hoops and chains? You could even go for something edgy and eclectic that plays with different shapes and textures. There are no rules here!
Find Your Vibe And Theme
The first step is deciding on a theme. This doesn't have to be super strict, but having a general direction will help you make choices that look cohesive and intentional later on. It’s like picking a color palette before you start painting a room—it just helps everything tie together beautifully in the end.
Not sure where to begin? Here are a few popular themes to get the ideas flowing:
- Minimalist & Dainty: This look is built on the idea that "less is more." We're talking tiny studs, super-thin seamless rings, and simple barbells. It's sophisticated, subtle, and perfect for everyday wear.
- Bohemian Dream: Channel your inner free spirit by mixing up textures. You can pair hoops with dangling charms, add a pop of turquoise, and don't be afraid to mix your metals for a perfectly laid-back, earthy feel.
- Edgy & Eclectic: This one is for the bold. Think spikes, daggers, chains connecting multiple piercings, and dramatic black jewelry. It’s a powerful look that makes a serious statement.
- Sparkle Central: If you're drawn to anything and everything that glitters, this is your calling. Build your stack around shimmering gems, pavé hoops, and brilliant opals that will catch the light from every single angle.
Think of this simple roadmap as your guide, breaking down the core parts of planning, styling, and caring for your ear project.
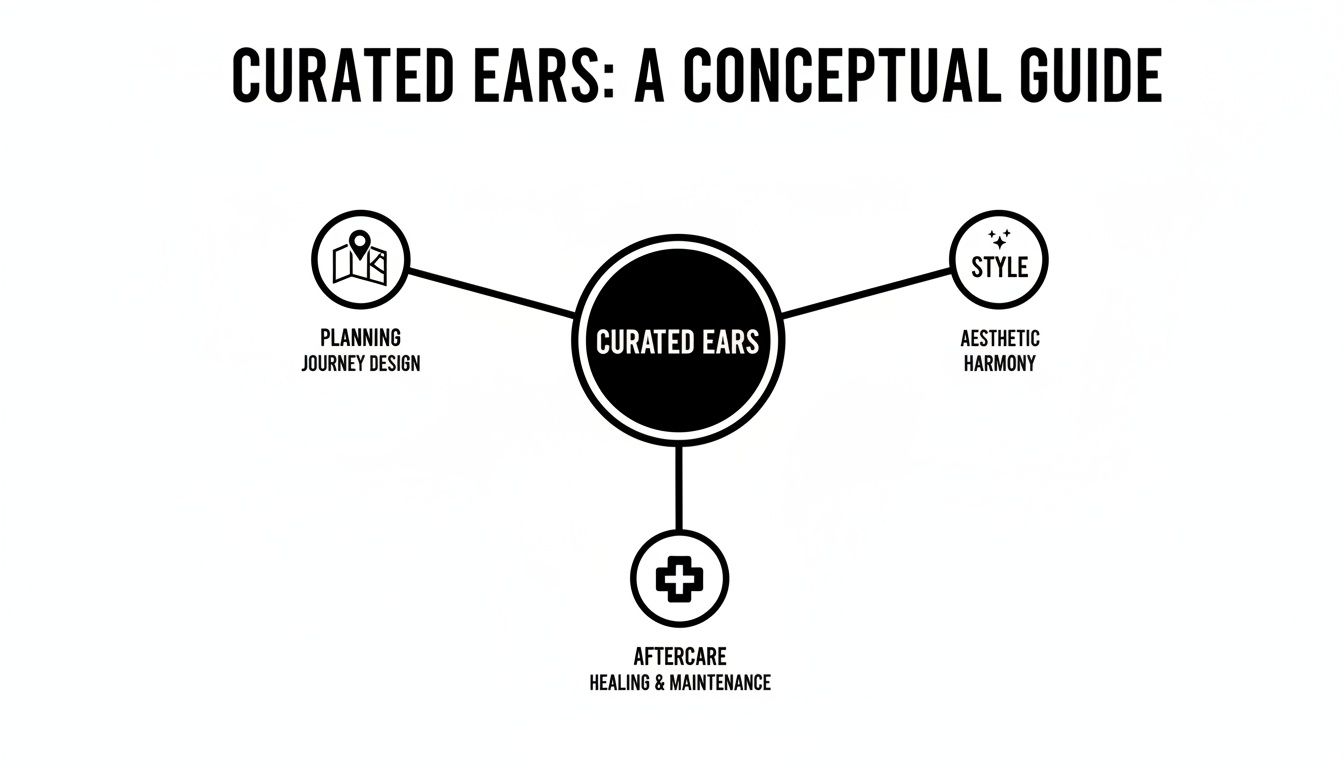
As you can see, a successful curated ear is really a balance of thoughtful placement, personal style, and dedicated aftercare.
Work With Your Unique Anatomy
Your ear is as unique as your fingerprint, and that’s a huge part of what makes a curated ear project so special. Those little curves, folds, and flat spaces on your ear are what will ultimately determine which piercings look best and heal most comfortably. A great piercer can look at your ear and immediately spot the perfect home for a snug daith ring or a flat piercing that can really show off a cool stud.
Don't get bummed out if your ear isn't a perfect match for a specific piercing you saw online. An experienced piercer can suggest amazing alternatives that will highlight your anatomy in a way that’s even better for you. If you want to dive deeper into this, you might be interested in The Guide to Modern Piercisms and Doubling Up on our blog.
The Golden Rule: Pierce In Stages
Okay, this is probably the most important part of your entire plan: patience is everything. It is so tempting to walk into a studio and ask for five new piercings all at once, but trust us, it’s not a great idea for your body. Healing takes energy, and getting too many piercings at the same time can totally overwhelm your immune system. That just leads to a much longer, tougher healing process for everything.
Most professional piercers will recommend getting no more than three piercings in a single session. This gives your body a real fighting chance to heal each one properly without getting overworked.
Focusing on one ear at a time is also a total game-changer, especially for sleeping. Trying to heal fresh piercings on both ears at once can lead to some seriously uncomfortable nights! The whole curated ear trend has absolutely exploded, which is awesome, but it's important to do it right.
By mapping out your piercings, picking a theme that excites you, and embracing the healing process one step at a time, you're setting yourself up for a beautiful result you’ll love for years.
Choosing The Right Jewelry For Happy Healing
Okay, let's get to the fun part—the bling! But picking out your starter jewelry is way more than just a style choice. It's honestly one of the most critical decisions you'll make for the health and happiness of your new multiple ear piercing project. The right material can make healing a total breeze, while the wrong one can kick off a frustrating cycle of irritation.
Think of your new piercing as a tiny, sensitive wound that needs to be babied. You wouldn't put a cheap, mystery-metal bandage on an open cut, would you? Same logic applies here. Your body needs to heal around something pure, non-reactive, and totally body-safe. This is exactly why high-quality materials are non-negotiable.
Unpacking The Best Materials For New Piercings
When you get pierced by a pro, they'll use jewelry made from specific, high-grade metals. These materials aren't just fancy—they’re chosen for being biocompatible, which is just a technical way of saying your body is very unlikely to freak out and have a bad reaction to them. Let's break down the top contenders.
Implant-Grade Titanium (ASTM F-136)
This is the undisputed champion in the piercing world, and for good reason. It's the same material used for surgical implants like hip replacements, so you know it's incredibly body-safe. Best of all, it's completely nickel-free, making it the perfect choice if you have sensitive skin or a known metal allergy.
- Pros: Hypoallergenic, feather-light, and can be anodized into a whole rainbow of cool colors.
- Cons: It might cost a little more upfront, but it's worth every single penny for a problem-free piercing.
Want to dive deeper into this powerhouse metal? Check out our guide on everything you need to know about titanium body jewelry.
316L Surgical Steel
This is another super popular option you'll see in professional studios. While it's considered body-safe for most, it's important to know that it does contain a tiny amount of nickel. For the majority of people, this is no big deal, but if you have a severe nickel allergy, titanium is definitely the safer bet.
- Pros: Super durable, budget-friendly, and has that classic, polished silver look.
- Cons: Contains trace amounts of nickel, which could cause issues for the ultra-sensitive.
14k or 18k Solid Gold
Who doesn't love a touch of gold? When it comes to new piercings, though, it's crucial that you go for solid gold, not gold-plated. Plating can flake or wear off over time, exposing the base metal underneath (which is often nickel-based and not friendly to healing tissue). Stick to 14k or 18k gold, as pure 24k is actually too soft and can easily get nicked or scratched, creating little hideouts for bacteria.
- Pros: A timeless, beautiful look that's generally well-tolerated by most people.
- Cons: It's a pricier option and can sometimes contain other alloy metals that irritate some skin types. Always confirm it's nickel-free.
Pro Tip: No matter what metal you choose, make sure your initial jewelry is either internally threaded or threadless (press-fit). This design keeps the sharp screw threads from being dragged through your fresh piercing, which can feel like a cheese grater on that sensitive new tissue. Ouch.
Demystifying Jewelry Size And Style
Once you’ve settled on a material, the next piece of the puzzle is the right size and style. Your piercer will handle the specifics, but it helps to know the lingo so you can follow along.
- Gauge (Thickness): This just refers to the thickness of the jewelry post. Most ear piercings start somewhere between 20g (the thinnest) and 16g (a bit thicker).
- Length (Wearable Surface): For stud-style jewelry, this is the length of the bar. Your piercer will intentionally use a slightly longer bar at first to leave room for the initial swelling.
For just about any cartilage piercing, you'll be starting with a flat back labret stud. These are absolute game-changers for healing. The flat disc on the back sits flush against your ear, making it far less likely to snag on hair and clothes. Plus, it's way more comfortable to sleep on than a traditional butterfly back.
As tempting as they are, hoops should wait until you're fully healed. Their movement can constantly irritate a new piercing, delaying the healing process. Patience now means a happier piercing later!
Your Essential Aftercare And Healing Guide
Alright, you did it! The hard part is over, and you're officially on your way to that dream ear stack. Now comes the most critical phase of your multiple ear piercing journey: the aftercare.
Think of it like this: your new piercing is just a tiny wound. Your body knows exactly how to heal it, and your only job is to create a clean, calm environment so it can work its magic. Nailing your cleaning routine is the single best thing you can do to make sure your piercings heal up beautifully, without any drama. Don't worry, it’s way easier than it sounds.
Your Simple Daily Cleaning Routine
Forget everything you’ve heard about harsh soaps, alcohol, or twisting the jewelry. Modern aftercare is all about being gentle. Your mission is simple: keep it clean and leave it alone.
Here’s the only routine you’ll need:
- Wash Your Hands: Before you even think about touching your new piercing, scrub your hands with soap and water. This is non-negotiable!
- Spray with Saline: Grab a sterile saline wound wash spray (you can find this at any pharmacy). Gently spray the front and back of your piercing until the area is saturated.
- Pat Dry Gently: Use a clean, disposable paper towel to very gently pat the area dry. Cloth towels can snag on jewelry and harbor pesky bacteria, so it's best to avoid them.
And that's it! Do this just twice a day—once when you wake up and once before bed. It's tempting to clean more often, but over-cleaning can be just as irritating as not cleaning enough. Stick to the schedule.
Normal Healing vs. Infection Red Flags
The healing process can look a little weird sometimes, and it’s easy to panic. Knowing what’s normal will help you stay calm and spot any real trouble before it starts.
During the first few weeks, it’s totally normal to see some of this:
- Mild Swelling and Redness: The area will likely be a bit puffy and pink for a week or two.
- Tenderness: It might feel sore, especially if you accidentally bump it.
- Clear or Whitish Fluid: This is just lymph fluid, a normal part of your body's healing response.
- "Crusties": This is simply dried lymph fluid. Don’t pick at them! Let the saline spray soften and wash them away.
However, you should get in touch with your piercer or a doctor if you notice any signs of a potential infection, such as:
- Intense, Throbbing Pain: Pain that gets worse instead of better after the first few days.
- Thick, Yellow, or Green Discharge: This is a classic sign of infection.
- Hot to the Touch: The area around the piercing feels much warmer than the rest of your ear.
- Red Streaks: Any red lines spreading out from the piercing site.
A common myth is that you need to twist your jewelry to keep it from "sticking." Please don’t do this! Twisting and turning the post only irritates the delicate healing tissue, introduces bacteria from your hands, and can seriously set back your healing time. The best motto is LITHA: Leave It The Heck Alone!
Common Aftercare Mistakes To Avoid
Even with the best intentions, a few simple mistakes can derail your healing. Steering clear of these common pitfalls will make your journey so much smoother.
- Using Harsh Chemicals: Stay far away from rubbing alcohol, hydrogen peroxide, and antibacterial soaps. They are way too harsh and will only dry out and irritate your fresh piercing.
- Touching Your Piercing: Fiddling with your new jewelry is a one-way ticket to irritation and a potential infection. Keep your hands off!
- Sleeping on Your New Piercing: This is a big one. Putting pressure on a healing piercing can cause major swelling, irritation, and can even change the angle of the piercing itself. A travel pillow is your new best friend—just rest your ear in the hole.
- Using Cotton Swabs or Balls: Those tiny fibers love to get wrapped around your jewelry and stuck in the piercing channel, which is no fun for anyone. Stick to paper towels.
- Changing Jewelry Too Soon: We know you’re dying to swap in some new bling, but patience is everything. Wait until your piercer gives you the official green light before changing anything.
Understanding the timeline for different placements can also help you manage your expectations. If you want to get a better idea of what you’re in for, you can learn more about healing times for popular piercings in our detailed guide.
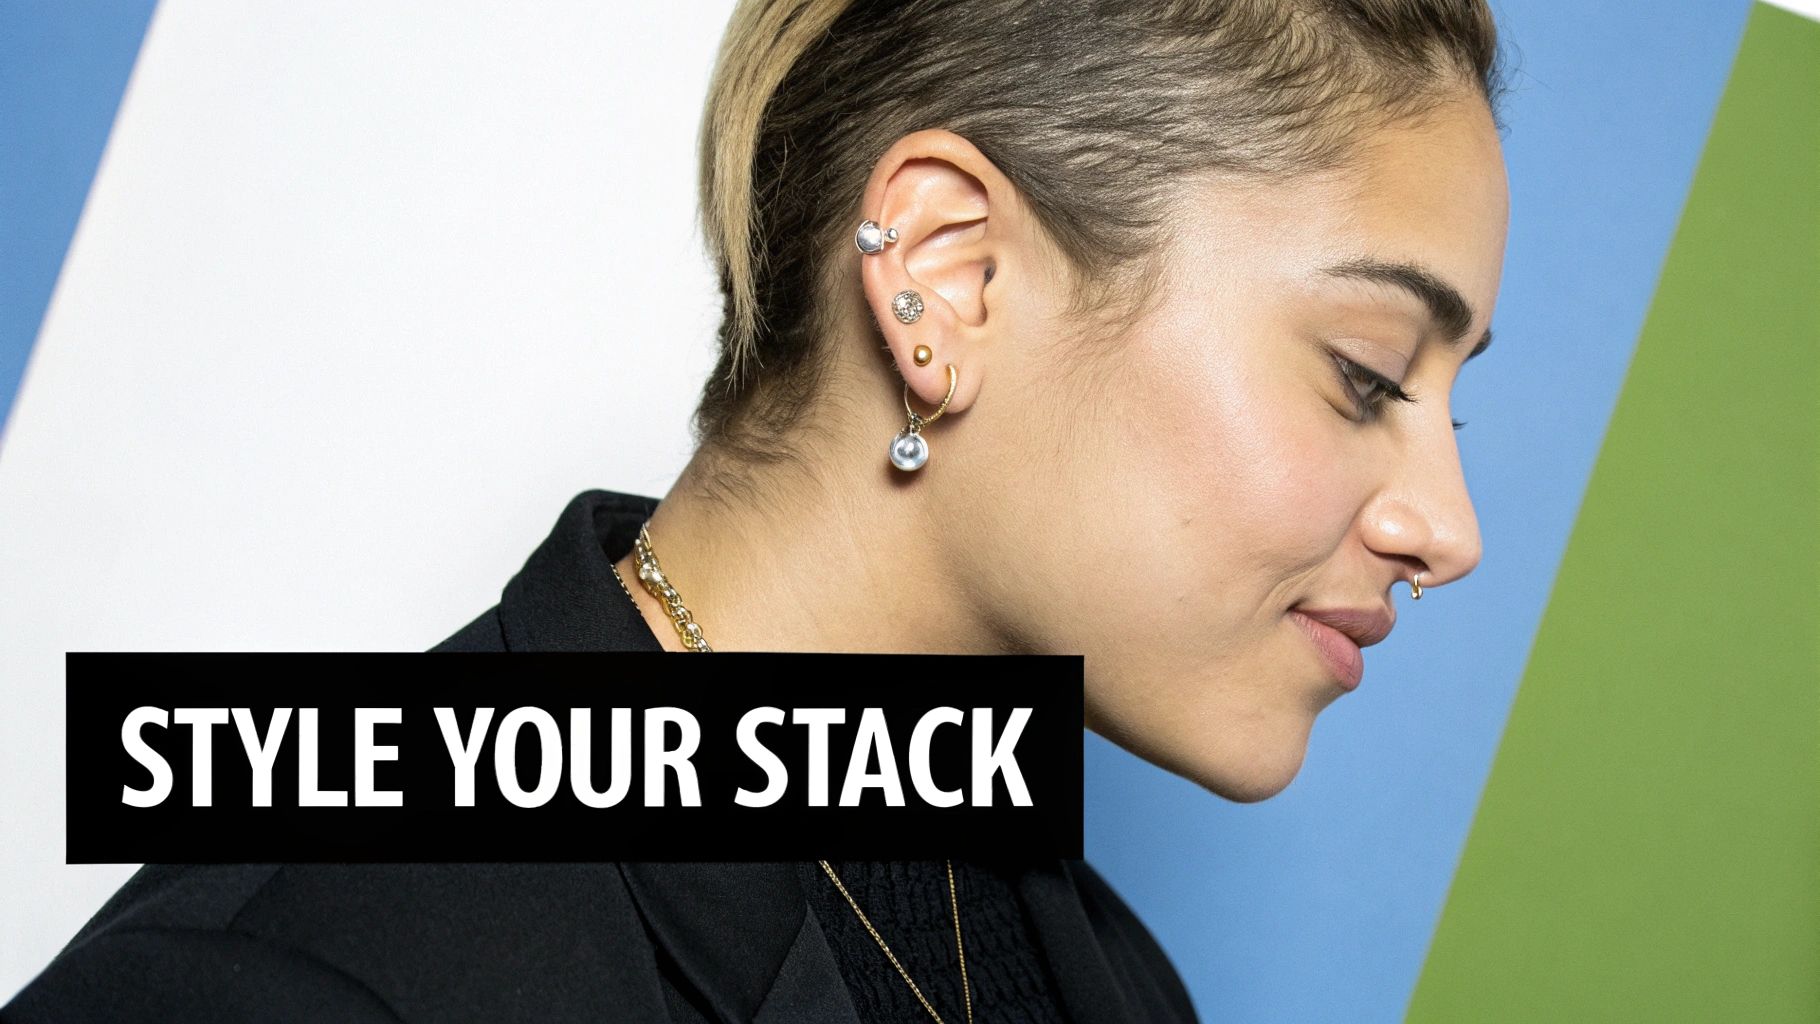
Styling Your Healed Ear Stack Like A Pro
You did it. You went through the planning, you got the pokes, and you healed everything up like a total champ. Now comes the best part—the ultimate reward for all that patience: finally styling your multiple ear piercing collection! This is where your ear officially becomes a canvas for your personal style. It's time to have some real fun and curate a look that is 100% you.
Once every piercing is fully healed, the sky's the limit. You can finally swap out those simple starter studs for all the gorgeous hoops, dangles, and sparkly gems you’ve been daydreaming about. This is the moment your piercing journey shifts from a healing process into pure, unadulterated self-expression.
Finding Your Ear Stack Aesthetic
The first move is to figure out your vibe. Are you going for something delicate and almost invisible, or are you trying to make a bold statement that can't be missed? There's no right or wrong answer here—it’s all about what feels authentic to you.
Not sure where to start? Check out these popular aesthetics for a little inspiration:
- Dainty & Delicate: Think tiny diamond studs, whisper-thin gold huggie hoops, and minimalist flat back studs. This look is all about creating a soft, shimmering effect with understated elegance.
- Bold & Eclectic: Ready to turn some heads? This vibe is all about mixing metals, playing with textures, and throwing in some killer statement pieces. Try pairing a chunky silver hoop with a delicate gold chain and a pop of turquoise for a look that feels intentionally cool and collected.
- Monochromatic Magic: Sticking to a single metal creates a powerful and cohesive look. An all-gold or all-silver setup looks incredibly chic, letting the different shapes and placements of your piercings do all the talking.
This whole trend has come a long way from just being a simple act of rebellion. Since the 2010s, style experts have been documenting the rise of the “curated ear,” where people in their 20s, 30s, and beyond add three, four, or even more piercings over time as part of a deliberate, jewelry-focused style. It’s why so many of us are now happy to invest in higher-quality metals and coordinated sets. To see how this trend is shaping modern style, explore more about the rise of the curated ear.
Creating Balance And Flow
A well-styled ear stack just feels right because it has a sense of visual balance. It’s not just about the jewelry you pick, but where you put it. A great rule of thumb is to place your biggest or boldest pieces in your lobes and get progressively smaller and more delicate as you move up your ear.
For example, you could rock a statement hoop in your first lobe piercing, a smaller huggie in your second, and a tiny gem stud in your third. This creates a beautiful visual taper that draws the eye upward along the natural curve of your ear.
This little trick helps keep your ear from looking cluttered or bottom-heavy. It gives your entire stack a natural flow that looks harmonious and thoughtfully designed.
Tips For Building A Cohesive Look
Once you've got a general aesthetic in mind, it's time to bring it all together. Building a killer stack is a lot like putting together a great outfit—you just need to make sure the individual pieces work as a team.
Here are a few pro tips for creating that perfect synergy:
- Match Your Metals (Or Don't!): An all-gold or all-silver look is timeless and always works. But don't be afraid to mix it up! The key is to do it with intention. A good starting point is sticking to a "two-metal maximum" (like gold and silver) to keep it from looking accidental.
- Create a Color Story: Use gemstones to tie everything together. You could build a stack around a single color, like brilliant blue opals, or go for a full-on rainbow effect with multi-colored gems.
- Play with Textures and Shapes: Don't just settle for simple round studs. Mix in different shapes like stars, moons, or lightning bolts. Try pairing a smooth, polished hoop with a textured or beaded one to add some extra visual interest.
At the end of the day, your ear stack tells your story. Dive into Bodycandy’s huge collection of flat back labret studs, hoops, and dangles, and experiment until you find a combination that makes you feel absolutely amazing.
Finding A Professional Piercer You Can Trust
Your ear piercing journey is super exciting, but honestly, its success really boils down to one person: your piercer. Choosing the right professional isn't just a good idea—it's everything. Think of them as a trusted partner for your body art adventure; they're the expert who sets the foundation for a safe, beautiful, and stress-free experience.
A top-tier studio is more than just cool vibes and a slick Instagram feed. The absolute, non-negotiable cornerstone of any reputable shop is a serious commitment to hygiene. This means a spotless environment and, most importantly, the use of a medical-grade autoclave to sterilize all equipment. This machine is the only way to guarantee that every single tool, from needles to the initial jewelry, is 100% sterile.
Vetting Their Portfolio And Expertise
Once you've confirmed a studio is obsessed with cleanliness, it's time to play detective with their portfolio. A piercer's portfolio is their resume, and you want to see solid proof that they're skilled in the specific placements you're dreaming of. Got your heart set on a tricky daith or a chic flat piercing? Look for clear, well-lit photos of healed piercings they've done, not just the fresh ones.
A great portfolio shows consistency, precision, and experience with all kinds of different ear shapes. It’s your best window into the quality of their work and their ability to bring your curated ear vision to life.
Pay close attention to the jewelry they use for initial piercings and the techniques they show off in their work. This brings us to a major red flag you should never, ever ignore.
The Piercing Gun Problem
You'll want to run—not walk—from any studio that uses piercing guns, especially for anything other than a simple lobe piercing. A piercing gun uses blunt force trauma to shove a stud through your tissue, which can cause serious damage to delicate cartilage. This often leads to longer, more painful healing, increased scarring, and a much higher risk of complications.
Believe it or not, the global ear piercing guns market was valued at about USD 1.2 billion in 2023 and is expected to keep growing. This just shows how common they still are, which makes it vital for you to choose a professional who uses a sterile, single-use needle for a clean, precise, and much safer piercing. You can find out more about the ear piercing market and its trends to understand why professional technique is so important.
Questions To Ask During Your Consultation
A consultation is your chance to interview your potential piercer and get a feel for their vibe. Don't be shy—a true professional will welcome your questions and be happy to put your mind at ease.
Here are a few smart things to ask:
- What kind of jewelry materials do you use for fresh piercings? (You're listening for answers like implant-grade titanium, 14k solid gold, or niobium).
- Can you walk me through your sterilization process from start to finish?
- What's your recommended aftercare routine?
- Have you worked with my ear anatomy before for the placements I want?
Finding the right piercer gives you more than just a great piercing; it gives you peace of mind, knowing you're in safe, skilled hands.
Your Top Multiple Ear Piercing Questions, Answered
So, you're dreaming up that perfect ear constellation, but a few questions are still bouncing around in your head. Perfectly normal! Let's clear up some of the most common things people wonder about before curating their ear stack.
How Many Piercings Can I Get At Once?
It's so tempting to go all-in and get a full ear project done in one sitting, but we've got to pump the brakes just a little. Most reputable piercers will recommend getting no more than 3-4 piercings at a time.
Think of it like this: your body has a certain amount of energy it can dedicate to healing. Each new piercing is a tiny wound that needs attention, and loading up on too many at once can seriously tax your immune system. This can mean a longer, more difficult healing journey for every single one of them.
And don't forget about actually sleeping! Getting both ears pierced at the same time can turn your nights into an uncomfortable mess. A much better strategy is to focus on one ear, give it a good chance to heal up, and then start planning your next session.
Do I Have To Wait For One To Fully Heal Before Getting Another?
The good news is you don't have to wait until a piercing is 100% healed and settled, which can take a year or more for some cartilage spots. But giving it a solid head start is definitely the smart way to go. It's all about not overwhelming your body's healing crew.
A great rule of thumb is to wait at least 2-3 months between piercing sessions, especially on the same ear. This gives your first piercing enough time to get through that initial, super-delicate, and inflammation-prone stage. It becomes a much stronger foundation for a new neighbor.
Piling on another piercing too soon can just re-irritate the area and put the brakes on the healing process for everything. Your piercer is your best friend here—they can take a look at how you're healing and give you the professional green light when it's safe to add that next gorgeous piece.
What Is The Best Way To Sleep With New Piercings?
Learning how to sleep with new piercings is absolutely key to a happy healing process. The main goal is simple: avoid putting any pressure on them. At all.
If you only got one ear pierced, this part is easy—just become a dedicated one-sided sleeper for a while. But if you have fresh piercings on both ears, or you're just a notorious toss-and-turner, a travel pillow is about to become your new best friend.
The "donut hole" in a travel or piercing pillow is a total game-changer. You can lay your ear right in the empty space, allowing you to sleep on your side without any direct pressure on your new jewelry. This one simple trick prevents so much irritation and can make a huge difference in your healing time. Remember, pressure is the ultimate enemy of a new piercing!
Ready to bring your dream ear stack to life? From delicate studs to bold hoops, BodyCandy has everything you need to express yourself. Start curating your perfect look today by exploring our massive collection of high-quality ear jewelry at https://bodycandy.com.


