
So, you're ready to dive into the world of body jewelry, but the whole "earring gauge size" thing has you scratching your head? Don't worry, you're not alone! It's one of the first hurdles everyone new to piercings faces, but we promise it's simpler than it looks.
Here's the one thing you absolutely need to remember: the smaller the gauge number, the thicker the jewelry. It feels totally backward, but it's true. A standard lobe earring is usually a thin 20 gauge (20g), while a much chunkier plug could be a 2 gauge (2g).
Decoding The Language Of Gauge Sizes
Welcome to the club! Figuring out earring gauges can feel like you're learning a secret code. But once you crack it, a whole new universe of incredible jewelry opens up. You're not just picking out a cool design anymore; you're choosing the perfect fit for your piercing, which is crucial for keeping it happy and healthy.
Think of "gauge" as simply the official term for the thickness of the earring post—the part that actually goes through your ear.
This measurement system is the standard for everything from your first lobe piercing to stretched ears and other body mods. Getting comfortable with these numbers is your first real step toward becoming a piercing pro. It helps you:
- Shop with confidence: You'll know exactly what size to look for online or in a studio. No more guessing games!
- Talk to your piercer like a pro: You can clearly communicate your goals and understand their recommendations.
- Keep your piercings happy: Wearing the right size is the #1 way to prevent irritation and ensure your jewelry fits just right.
Why The Numbers Seem Backwards
This is the part that trips everyone up at first. Why in the world is a 16g post thicker than a 20g post? It's a weird quirk that comes from the system's origins in the wire manufacturing industry, specifically the American Wire Gauge (AWG) scale.
On this scale, a wire's thickness was determined by how many times it was pulled through a sizing machine to stretch and thin it out.
A simple way to remember it: The gauge number represents how many times a wire was pulled through a machine to make it thinner. Fewer pulls (like 14g) mean a thicker wire, while more pulls (like 22g) result in a much thinner one.
This system might feel totally strange, but it’s the universal standard across the body jewelry world. And with the global earring market projected to grow from USD 25 billion in 2023 to USD 38 billion by 2032, understanding these sizes is more important than ever. As you'll see in this in-depth look at earring market growth on dataintelo.com, the options are exploding. Knowing your gauge is your ticket to exploring this massive and exciting world of self-expression.
Your Go-To Earring Gauge Size Chart
Alright, let's get down to the nitty-gritty. Now that you understand the weird "smaller number, bigger size" rule, it's time to master the most important tool in your jewelry box: the earring gauge size chart.
Think of this chart as the Rosetta Stone for your piercings. It translates those cryptic "g" numbers into real-world measurements you can actually understand. It takes all the guesswork out of buying jewelry online, making sure you always grab the perfect fit for your lobes, cartilage, or any other piercing you're rocking. Getting comfortable with this chart is the key to a world of amazing new styles.
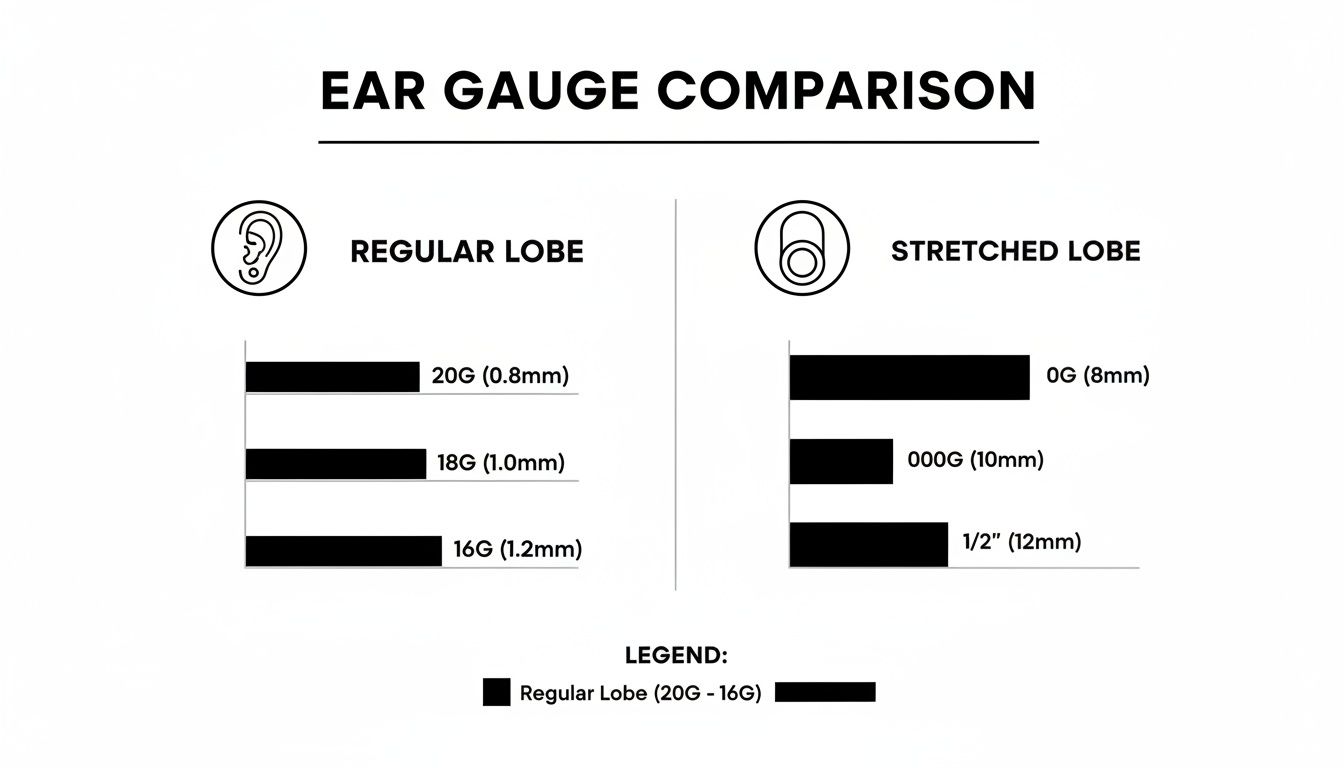
As you can see, the jump from a standard 20g earring to even an early stretching size like 8g is a big one. This visual really drives home why taking it slow and stretching gradually is so important for keeping your ears happy and healthy.
For those who want to see every size in detail, this comprehensive chart breaks down gauge sizes into their millimeter and inch equivalents. Keep this handy for your next jewelry shopping trip!
Detailed Gauge to Millimeter and Inch Conversion Chart
| Gauge (g) | Millimeters (mm) | Inches (Approximate) |
|---|---|---|
| 22g | 0.64 mm | 1/40" |
| 20g | 0.81 mm | 1/32" |
| 18g | 1.0 mm | 1/25" |
| 16g | 1.2 mm | 3/64" |
| 14g | 1.6 mm | 1/16" |
| 12g | 2.0 mm | 5/64" |
| 10g | 2.4 mm | 3/32" |
| 8g | 3.2 mm | 1/8" |
| 6g | 4.0 mm | 5/32" |
| 4g | 5.0 mm | 3/16" |
| 2g | 6.0 mm | 1/4" |
| 0g | 8.0 mm | 5/16" |
| 00g | 10.0 mm | 3/8" |
| 7/16" | 11.0 mm | 7/16" |
| 1/2" | 12.7 mm | 1/2" |
| 9/16" | 14.0 mm | 9/16" |
| 5/8" | 16.0 mm | 5/8" |
| 3/4" | 19.0 mm | 3/4" |
| 7/8" | 22.0 mm | 7/8" |
| 1" | 25.0 mm | 1" |
This table is your ultimate cheat sheet for converting between gauges, millimeters, and inches, ensuring you always know exactly what size you're looking for.
Standard Piercing Sizes (22g - 14g)
This is where almost every ear piercing story begins. These sizes are the go-to for everything from your first piercing at a mall kiosk to professional cartilage work done in a studio.
- 22g & 20g (0.64mm & 0.81mm): These are the thinnest posts out there. Think of the "standard" butterfly-back earrings you'd find at any department store—that's usually a 20g or 22g.
- 18g (1.0mm): A little thicker, an 18g post is what many professional piercers use for initial lobe piercings. That extra bit of thickness adds stability while you heal.
- 16g (1.2mm): This is the workhorse of the cartilage world. If you have a helix, tragus, or conch piercing, there's a good chance it's a 16g. It's the most common size for labrets and flat-back studs.
- 14g (1.6mm): As we get to the thicker end of the "standard" range, you'll find 14g. It's a popular starting size for industrial piercings and is also common for navel rings.
The Bridge to Stretching (12g - 2g)
Ready to move beyond the basics? This is the range where the real stretching journey starts. Each step up is a deliberate move toward your goal size, and it requires both patience and care.
A friendly but firm reminder: Always move up only one gauge size at a time. Skipping sizes is the quickest way to cause a tear, an infection, or the dreaded "blowout." Trust us, your lobes will thank you for taking it slow.
Large Gauge Sizes (0g and Beyond)
Once you move past 2g, the sizing system often ditches gauge numbers and switches to fractions of an inch. Welcome to the big leagues!
- 0g (8mm)
- 00g (10mm)
- 7/16" (11mm)
- 1/2" (12mm)
And that's just the start. Plugs and tunnels can go up to several inches in diameter for those truly dedicated to the craft. This incredible variety is part of what makes stretching such a cool form of self-expression.
To see how these sizing conventions apply to other types of piercings, check out this great resource on the standards of gauge sizing for body jewelry.
How To Find Your Current Piercing Size
Okay, so you're ready to score some awesome new jewelry, but you've hit a little snag—you have absolutely no idea what size your current piercing is. Don't sweat it, this is a super common question! Knowing your starting point is the most important step before you start shopping or even think about your stretching journey.
Figuring out your current earring gauge is way easier than you might think. We'll walk you through two simple, foolproof methods to get a solid measurement so you can shop with total confidence.
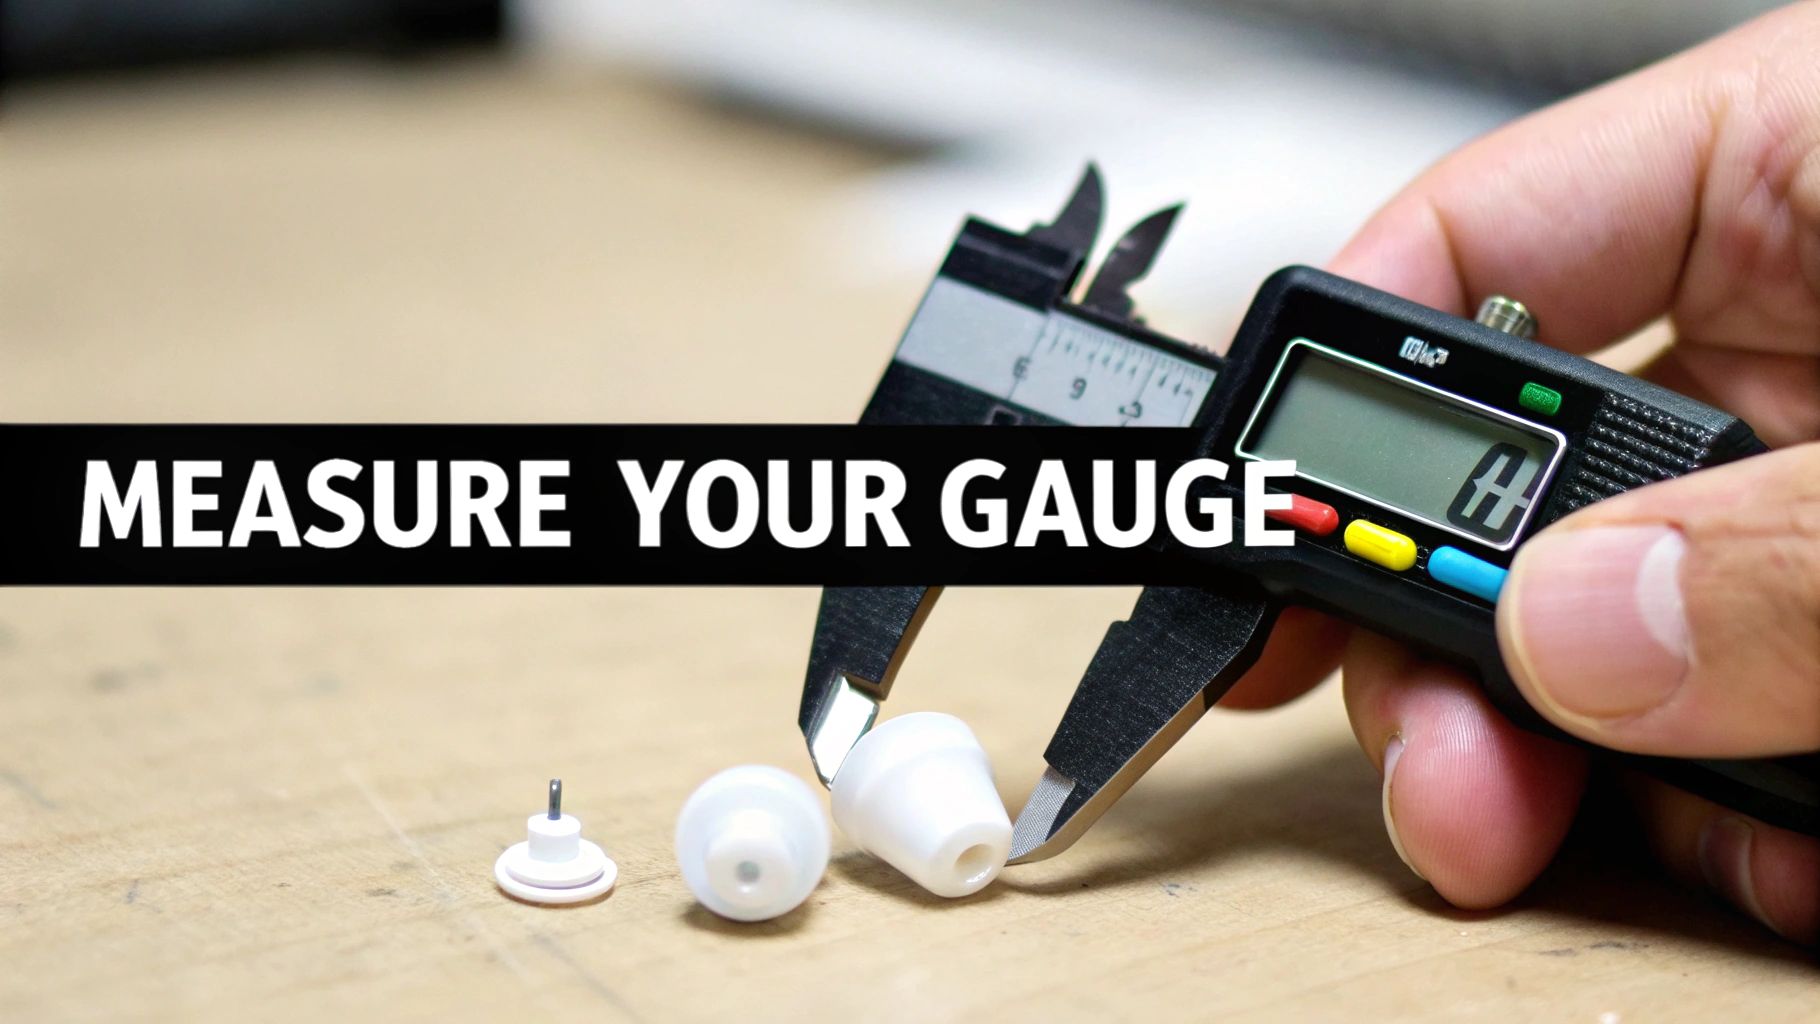
Method 1: The Precision Approach with a Digital Caliper
If you want a perfectly accurate reading, a digital caliper is your new best friend. This tool is inexpensive, easy to grab online, and gives you a precise measurement in millimeters that you can then match up with our gauge chart.
Here’s the step-by-step:
- Clean Everything First: Always start by washing your hands and cleaning your jewelry with a safe solution.
- Remove Your Jewelry: Carefully take out the earring you want to measure.
- Measure the Post: Gently close the jaws of the caliper around the post or wearable area of the jewelry. Just a heads-up: never measure the flared end or decorative front! You only want the thickness of the part that actually sits inside your ear.
- Read the Measurement: The caliper will show you the thickness in millimeters (mm). For example, it might say "1.2mm."
- Match it to the Chart: Take a look at our gauge size chart. A reading of 1.2mm means you're wearing a 16g piece of jewelry. Simple as that!
Method 2: The Quick Comparison Trick
Don't have a caliper lying around? No problem at all. You can still get a really good idea of your size by using a clever comparison trick. This works best if you happen to have a few other pieces of jewelry with known sizes.
The basic idea is to visually compare your mystery earring to one you already know the size of. For instance, if you have a standard 16g cartilage stud, just hold it up next to the other piece. If they look like a perfect match in thickness, you've found your size.
Pro Tip: A regular, cheap butterfly-back earring from a department store is almost always a 20g or 22g. This is a great, reliable baseline to compare against. If your jewelry is noticeably thicker, you're probably looking at an 18g or larger.
Knowing your current earring gauge size is empowering. It takes all the guesswork out of the equation and makes sure that every new piece of jewelry you buy from Bodycandy will be a perfect, comfortable fit.
A Beginner's Guide To Stretching Your Ears Safely
So, you've mastered the earring gauge chart and you're ready to start your stretching adventure. Awesome! This is where the real fun of self-expression begins, but we have to get one thing straight: safety first, always. Healthy lobes are happy lobes, and taking your time is the only way to reach your goal size without any nasty surprises.
Think of stretching as a marathon, not a sprint. Your ear tissue needs time to chill out and heal between each size-up. Rushing the process is the number one mistake people make, and it can lead to tears, infections, or the dreaded "blowout"—which can seriously damage your ear and slam the brakes on your progress.
The Golden Rule of Stretching: Listen to your body. If you feel sharp pain or a lot of resistance when trying to insert a new size, stop. Seriously, just stop. Your ears are telling you loud and clear that they aren't ready.
The Right Tools For The Job
To get started on the right foot, you'll need a few key items. Using the proper equipment makes everything smoother, safer, and way more comfortable. It's like a fun little starter kit for your lobes.
Here’s what you absolutely have to have:
- Single-Flare Plugs: These are the gold standard for stretching for a reason. They have a flat back and one flared edge on the front, which makes them easy to slide in and keeps them from falling out. Materials like surgical steel or glass are perfect for fresh stretches since they're non-porous and a breeze to keep clean.
- A Good Lubricant: Never, ever stretch dry! A quality, body-safe lubricant is a non-negotiable. Jojoba oil, emu oil, or a special ear stretching balm will help the jewelry glide in smoothly, cutting down on friction and the risk of tearing your skin.
- Patience: This is your most important tool, and you can't buy it. You just have to have it. Trust us, rushing will only lead to trouble down the road.
The Stretching Process Step-By-Step
Ready to move up a size? The key is to be gentle and super clean. Taking a hot shower right before you start can help relax your earlobes, making them a bit more pliable and ready for the next step.
- Clean Up: Wash your hands really well with soap and water. Then, clean your lobes and the new jewelry with a gentle, antibacterial soap.
- Lube Up: Apply a generous amount of your chosen lubricant to both your earlobe and the single-flare plug. Don't be shy with it!
- Gentle Insertion: Gently pull your earlobe down and slowly insert the tapered end of the plug. It should slide in with very little resistance. If you feel pain, that's your cue to stop.
- Wait Patiently: This is the most crucial part. You absolutely need to give your lobes at least 4-6 weeks (sometimes even longer!) to fully heal and relax before you even think about the next size. For a more detailed walkthrough, our complete guide on how to properly stretch your lobes has all the info you need.
By following these simple rules, you'll make sure your stretching journey is a safe, successful, and amazing experience.
Choosing The Best Jewelry For Your Gauge Size
Alright, this is where the real fun kicks in! You've figured out your earring gauge size, you know the basics of safe stretching, and now a whole universe of awesome jewelry is waiting for you. Picking out new styles is the best reward for your patience, and we’re here to be your personal stylists.
Knowing what jewelry to wear is just as important as knowing how to stretch. The right material and style will keep your lobes happy, especially during the healing process. Let's break down the best options for fresh stretches versus fully healed piercings.
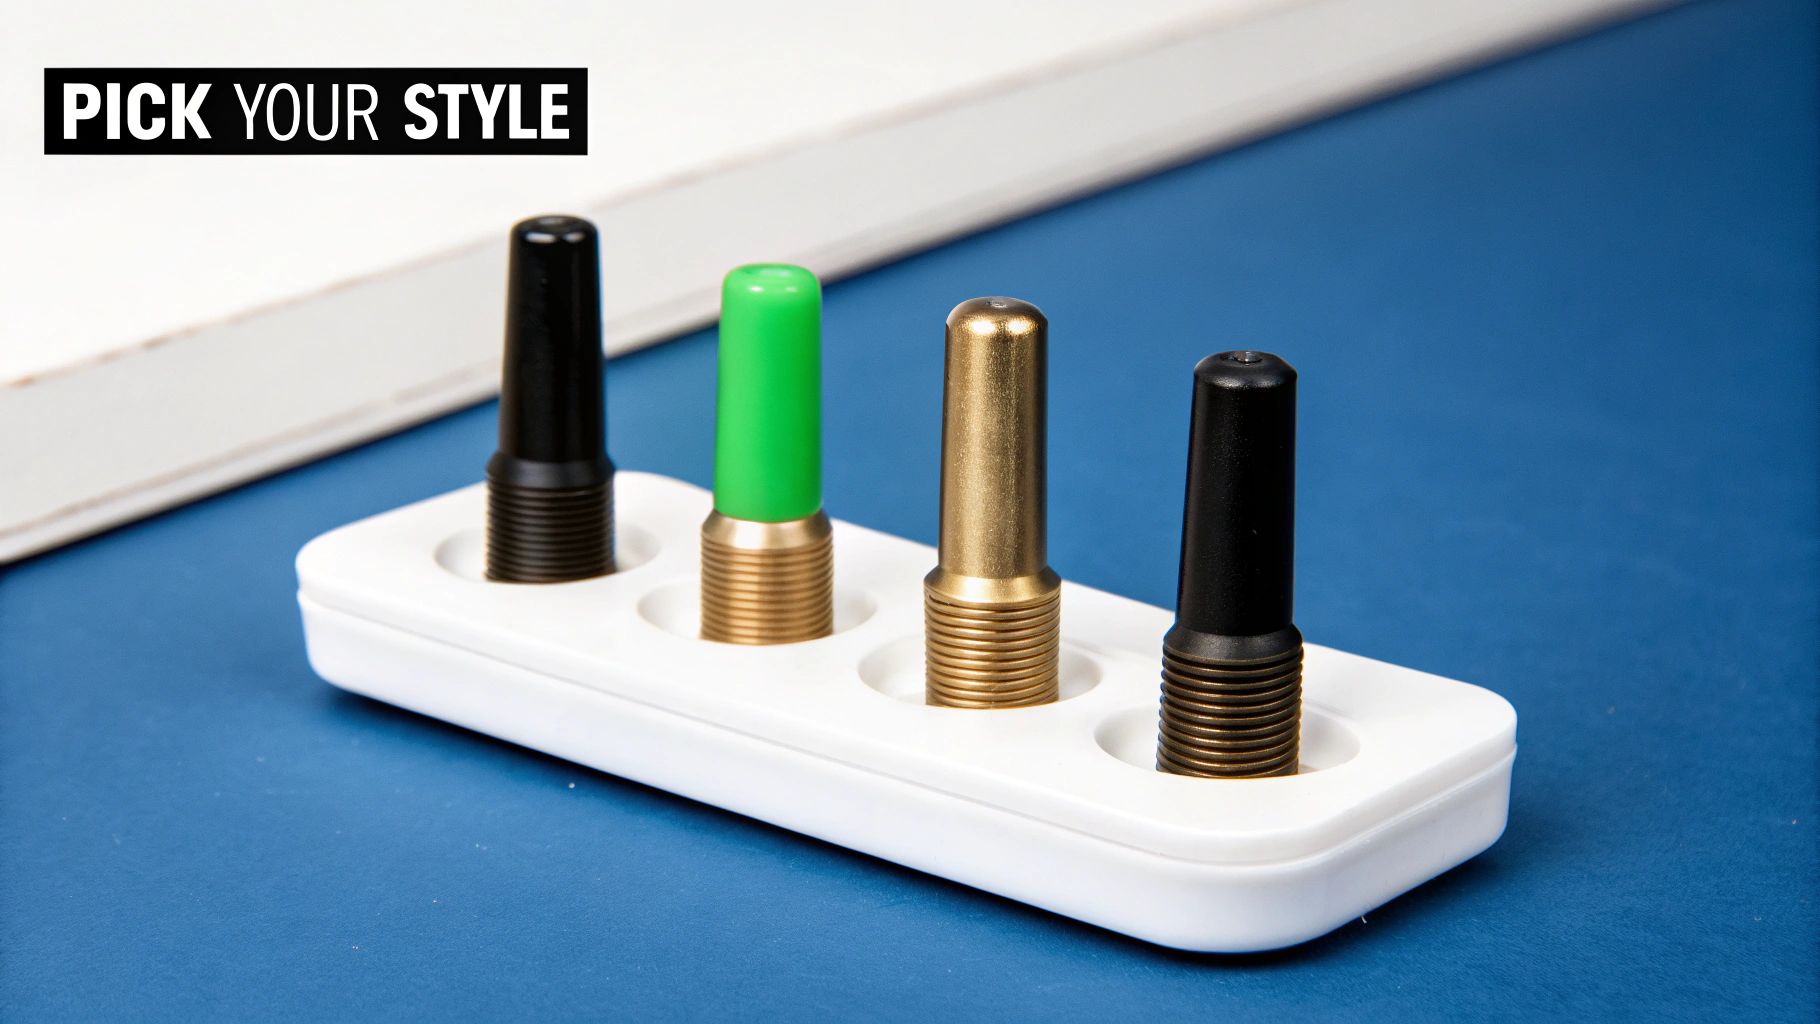
Jewelry For Fresh Stretches
When you’ve just sized up, your earlobes are in a delicate healing phase. Your top priority is choosing jewelry that is non-porous, easy to clean, and super gentle on your skin. This is not the time for fancy materials or complex shapes.
Your go-to options should be:
- Single-Flare Plugs: These are the undisputed champions for stretching. The single flared edge on the front keeps the plug secure, while the flat back makes insertion easy and won't irritate your healing tissue.
- Safe Materials: Stick with high-quality, non-porous materials. Implant-grade titanium and glass are your absolute best friends here. They are incredibly smooth, body-safe, and won't harbor bacteria, which is crucial for a healthy heal. Surgical steel is also a popular choice.
Pro Tip: Avoid silicone, acrylic, or any organic materials like wood or stone in a fresh stretch. These materials are porous and can trap bacteria, leading to irritation or infection. Save those cool styles for when you're fully healed!
Jewelry For Healed Piercings
Once your lobes are fully healed and comfortable at their new size (which usually takes at least 4-6 weeks!), you can start exploring all the amazing styles out there. Your piercing is now stable enough to handle different materials and shapes, so it's time to show off your personality.
Exploring Different Styles
This is your chance to get creative and find what truly fits your vibe. The options are practically endless, but here are some of the most popular choices for healed lobes:
- Double-Flare Plugs: These have a flared edge on both the front and back, holding them in place without the need for O-rings. They offer a super clean look but require your lobe to be flexible enough to get the back flare through.
- Tunnels (Eyelets): Love a see-through look? Tunnels are hollow plugs that let you see right through your lobe. They come in tons of materials, from sleek surgical steel tunnels to lightweight silicone.
- Captive Bead Rings (CBRs): For a different aesthetic, you can rock a large-gauge CBR. These bold rings add a totally different dimension to your stretched ears.
- Organic Materials: Now’s the time to try out those awesome wood, stone, or bone plugs. They are lightweight, breathable, and each piece has a unique, natural pattern.
For a deeper dive into the world of plugs and how they’re sized, be sure to check out our quick guide to understanding plug sizing. Choosing the best jewelry for your earring gauge size is all about balancing health with style. Be smart with your fresh stretches, and you’ll have a lifetime to rock every amazing style imaginable.
Common Stretching Problems And How To Fix Them
Even if you follow all the rules to a T, your stretching journey can sometimes hit a snag. First off, don't panic! Most issues are totally fixable if you catch them early and know what to do.
The real key is learning to listen to your body. You need to know the difference between normal healing and a real cry for help. Think of it this way: a little bit of redness and tenderness right after a stretch is pretty standard. But sharp pain, swelling that just won't quit, or any weird discharge? That’s your body waving a big red flag.
The Dreaded Blowout
The most infamous stretching problem is, without a doubt, the dreaded blowout. This is what happens when you stretch too fast or skip a size, which forces the delicate skin inside your piercing (called a fistula) out the back. The result is an ugly, ring-like flap of skin that can be a real pain to get rid of.
If you think you might have a blowout, here's what you need to do immediately:
- Downsize, Right Now: Take out your current jewelry and put your previous size back in. You might even need to go a size smaller. This takes the pressure off the tissue and gives it a chance to actually recover.
- Keep It Clean: Gentle sea salt soaks once or twice a day will help keep the area clean and bring down some of that inflammation.
- Massage, Massage, Massage: Once the initial irritation has calmed down, you can start gently massaging the area every day with a good oil, like jojoba oil. This can help break down scar tissue and encourage that flap of skin to settle back into place.
Don't try to just tough it out with a blowout. Ignoring it will only make it worse and harder to fix later. Downsizing is your best and only real option to let your ear heal properly so you can get back on track.
Other Common Issues
While blowouts get all the attention, a few other issues can pop up along the way. Knowing what they are is half the battle.
You might run into general irritation, which can look like persistent redness or itchiness. This is often caused by an allergy to a certain jewelry material or, again, just moving too quickly. Minor tears are another possibility—these are tiny rips in the skin from forcing jewelry in. They can feel sharp and might bleed a little.
Both of these are clear signs to slow your roll, baby your lobes, and probably downsize for a bit until things calm down completely. Your piercing journey is a marathon, not a sprint.
Your Top Earring Gauge Questions Answered
Got a few more questions rattling around in your head? You've come to the right place. We see tons of DMs and comments pop up about earring gauges, so we've put together the most common ones to give you straight-up, no-fluff answers. Let's clear up these last few mysteries so you can feel totally confident in your stretching journey.
Can I Wear Regular 20g Earrings in a Stretched Lobe?
Totally! You can absolutely pop standard 20g or 18g earrings into your stretched lobes. The trick is to use "earskins" or silicone tunnels first.
Just slide the tunnel into your ear, and then you can wear your regular earring right through the middle of it. This is a great way to keep your lobe from shrinking back down, and honestly, it creates a pretty cool layered look.
How Long Until I Can't Close My Stretched Ears?
This is a big one, and the real answer is: it totally depends on your body and how your skin heals.
For most people, any size smaller than 2g (6mm) will probably shrink back down close to a standard piercing size if you stop wearing jewelry for a while. Once you stretch past 0g (8mm), that's often considered the "point of no return." At that size, your lobe might not ever fully close on its own.
Ready to show off your size with some serious style? Bodycandy has an incredible collection of plugs, tunnels, and tapers for every single step of your journey. Shop our full collection of plugs and gauges today and find your next favorite piece


