So, you're rocking a brand-new belly button piercing! Congrats. Proper belly button piercing care isn't complicated, but it does demand consistency. It all starts the moment you walk out of the piercing studio. Your main job? Clean it twice a day with a sterile saline solution and otherwise leave it completely alone.
It’s a marathon, not a sprint—a full recovery can take anywhere from 6-12 months. Patience is totally key here. Just as important as cleaning is a strict "hands-off" policy. Messing with your new jewelry is the fastest way to invite problems.
Your Guide To A Happy Healing Navel Piercing
So, you did it! Welcome to the belly piercing club. That awesome new sparkle on your midriff is a serious style statement, but now comes the most important part—making sure it heals perfectly. A happy piercing starts with great day-one habits, and we’re here to give you the no-nonsense guide to getting it right.
Forget confusing advice and myths you've heard. The truth is, navel piercing aftercare is pretty straightforward. It’s all about creating a clean, low-stress environment for your body to do its thing. Think of it less as a chore and more as a daily ritual to protect your new investment.
Your body is amazing at healing, but it needs your help. This means being mindful of everything from the clothes you wear to how you sleep. Let's break down the essential dos and don'ts that will set you up for a smooth, irritation-free journey.
The First Few Weeks: The Golden Rules
Right now, your new piercing is an open wound and needs to be treated gently. It's totally normal to see some swelling, a bit of redness, and even some clear or whitish fluid (that's just lymph fluid, a good sign!). Don't panic! This just means your body’s healing engine is firing up.
Your only job is to keep things clean and avoid anything that could introduce bacteria or cause physical trauma. This is where a simple, consistent routine becomes your best friend.
- Clean, But Don't Over-Clean: Stick to cleaning just twice a day with a sterile saline solution. Going overboard can dry out the skin and cause more irritation, which actually slows down the healing process.
- Hands Off!: Seriously, this is non-negotiable. Touching, twisting, or playing with your new jewelry is the number one way to introduce bacteria and cause those dreaded irritation bumps. Just let it be!
- Dress for Success: Loose, breathable clothing is your new uniform. High-waisted pants, tight dresses, or scratchy fabrics can snag your jewelry and cause major setbacks. Soft cotton and low-rise bottoms are going to be your go-to for a while.
Daily Dos and Don'ts For Navel Piercing Care
To make things super simple, here's a quick-reference guide. Pin this, screenshot it, or write it on your mirror—whatever it takes to remember these crucial tips for your belly button piercing's aftercare.
| Do ✅ | Don't ❌ |
|---|---|
| Clean twice daily with a sterile saline solution. | Use harsh chemicals like alcohol, hydrogen peroxide, or antibacterial soaps. |
| Gently pat the area dry with a clean paper towel after cleaning. | Touch, twist, or rotate your jewelry—ever. |
| Wear loose-fitting, low-rise clothing to avoid friction and snagging. | Submerge your piercing in pools, hot tubs, lakes, or oceans. |
| Eat a healthy diet and stay hydrated to support your immune system. | Sleep directly on your stomach. |
| Check that the balls on your barbell are secure (with freshly washed hands!). | Change the jewelry before it's fully healed (6-12 months). |
Sticking to these simple rules will make your healing journey much smoother. It might seem like a lot to remember at first, but it quickly becomes second nature. Happy healing!
Understanding The Complete Healing Timeline
Let's get real about the one thing most people underestimate with a new navel piercing: the healing time. It's so easy to get impatient, but healing this piercing is a marathon, not a sprint. Knowing what to expect month-by-month will save you a ton of stress and keep you from getting discouraged when it feels like it’s taking forever.
Patience is your absolute best friend here. A belly button piercing typically takes anywhere from six to twelve months to fully heal on the inside, even if it looks perfect on the outside much sooner. It's a commitment, but trust us, it's worth it for a healthy, happy piercing you can rock for years to come.
The First Three Months: The Settling-In Phase
Welcome to the most delicate stage of your piercing journey! For the first few months, your body is working overtime to build a brand-new tunnel of skin (called a fistula) around the jewelry. It's completely normal to see some initial redness, swelling, and maybe even a little bruising right after you get it.
You'll also notice some clear or whitish fluid seeping out. Don’t freak out—this isn't pus! It’s just lymph fluid, a clear sign that your immune system is on the job. During this phase, your goals are simple: clean it twice a day with sterile saline, stick to loose clothing, and avoid any and all friction.
Key Takeaway: The piercing might start to look and feel better after just a month, but it is nowhere near healed. Resisting the urge to change your jewelry or slack on aftercare is absolutely crucial right now.
It’s also helpful to remember that different piercings heal at different rates. If you want to see how your navel piercing compares to others, check out our in-depth article on healing times for popular piercings.
Months Four to Six: The Deceptive Stage
This is where so many people get tripped up. Around the four-to-six-month mark, your navel piercing will likely look pretty good. The redness and swelling should be long gone, and it probably won't feel tender anymore. You'll be tempted to think, "It's healed!" and start eyeing that sparkly new dangle belly ring.
Not so fast! While the outside has calmed down, the inside is still a construction zone. The fistula is still super fragile and can be easily damaged. Changing jewelry too soon or getting lazy with your aftercare can send you right back to square one with a nasty bout of irritation.
This graphic gives you a great visual of just how important that first month is.
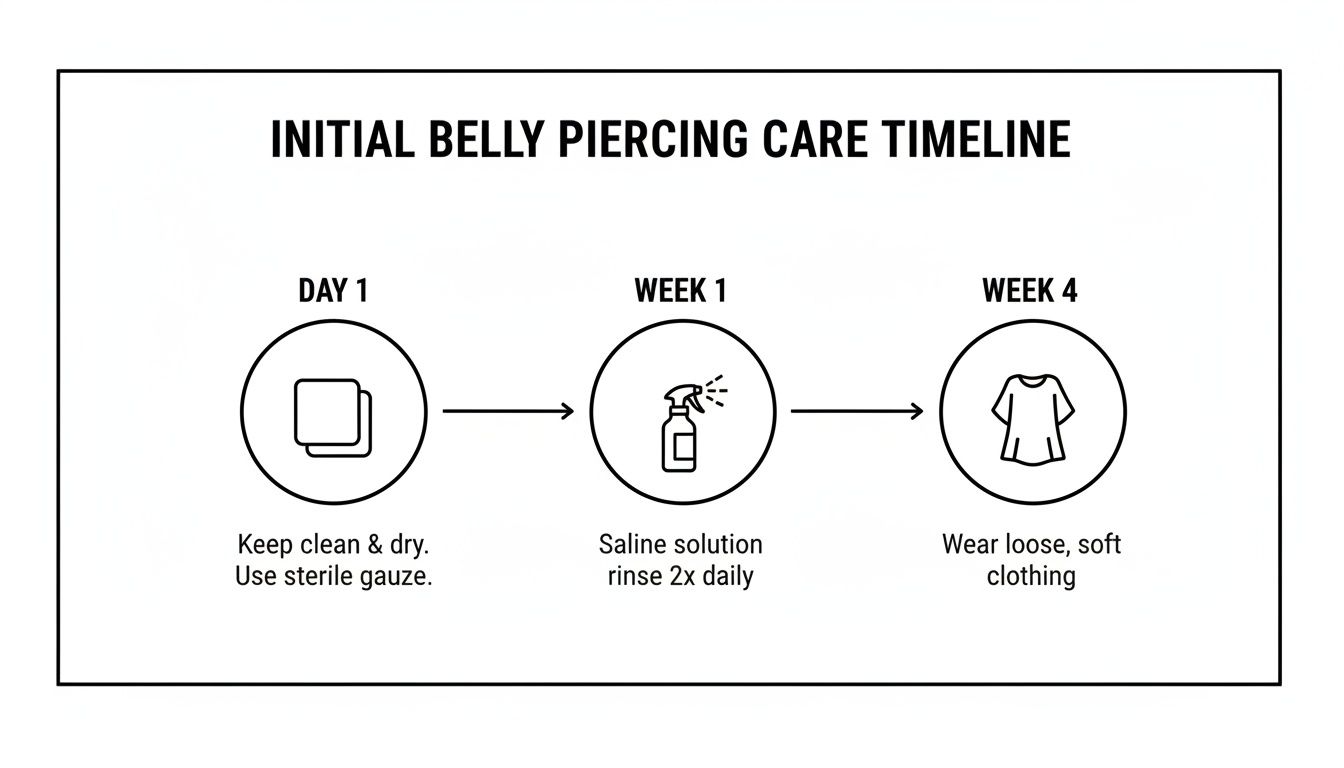
It’s a perfect reminder to stay consistent, from protecting it on day one to being mindful of your clothing choices a month later.
Six Months and Beyond: The Home Stretch
Once you've passed the six-month mark, you're officially in the home stretch. For some lucky people with ideal anatomy and a flawless healing process, the piercing might be fully healed around nine months. For most of us, though, it's closer to the one-year mark.
So how do you know when it's truly healed?
- There's absolutely no soreness or tenderness, even when you gently press on the area.
- The fistula (the skin tunnel) feels soft and normal, not hard or bumpy.
- There's no more crusting or discharge, ever.
- The jewelry can be moved gently without any discomfort at all.
This extended healing window is precisely why proper care is so critical. Historically, navel piercings have a reputation for being slow healers, and modern data backs this up. Clinical guidance often cites a healing window of 6 to 12 months, which is 3 to 6 times longer than a simple earlobe piercing. During this long period, improper care dramatically increases risks, as general body piercing infection rates can range from 10% to over 20%. The navel area is particularly vulnerable due to all the friction and moisture it’s exposed to.
Only when all of the above conditions are met should you even think about changing your jewelry for the first time. Even then, it’s a great idea to have a professional piercer do the first swap to make sure everything looks good and that the new piece is inserted safely.
Mastering Your Daily Cleaning Routine
Your daily cleaning routine is the single most important part of your belly button piercing care. Honestly, if you get this right, you're setting yourself up for a smooth, drama-free healing journey. Let's break down exactly how to create a simple, effective habit that keeps your new piercing happy and healthy.
The goal here isn't to blast your piercing with harsh chemicals. It’s all about gently removing any crusties (that dried lymph fluid we talked about) and creating a clean environment for your body to work its healing magic. Consistency is everything.
Your Piercing Cleaning Toolkit
Forget digging through the bathroom cabinet for a bunch of different products. You only need a few key items to get the job done right. Keeping it simple is the best way to avoid irritating your sensitive new piercing.
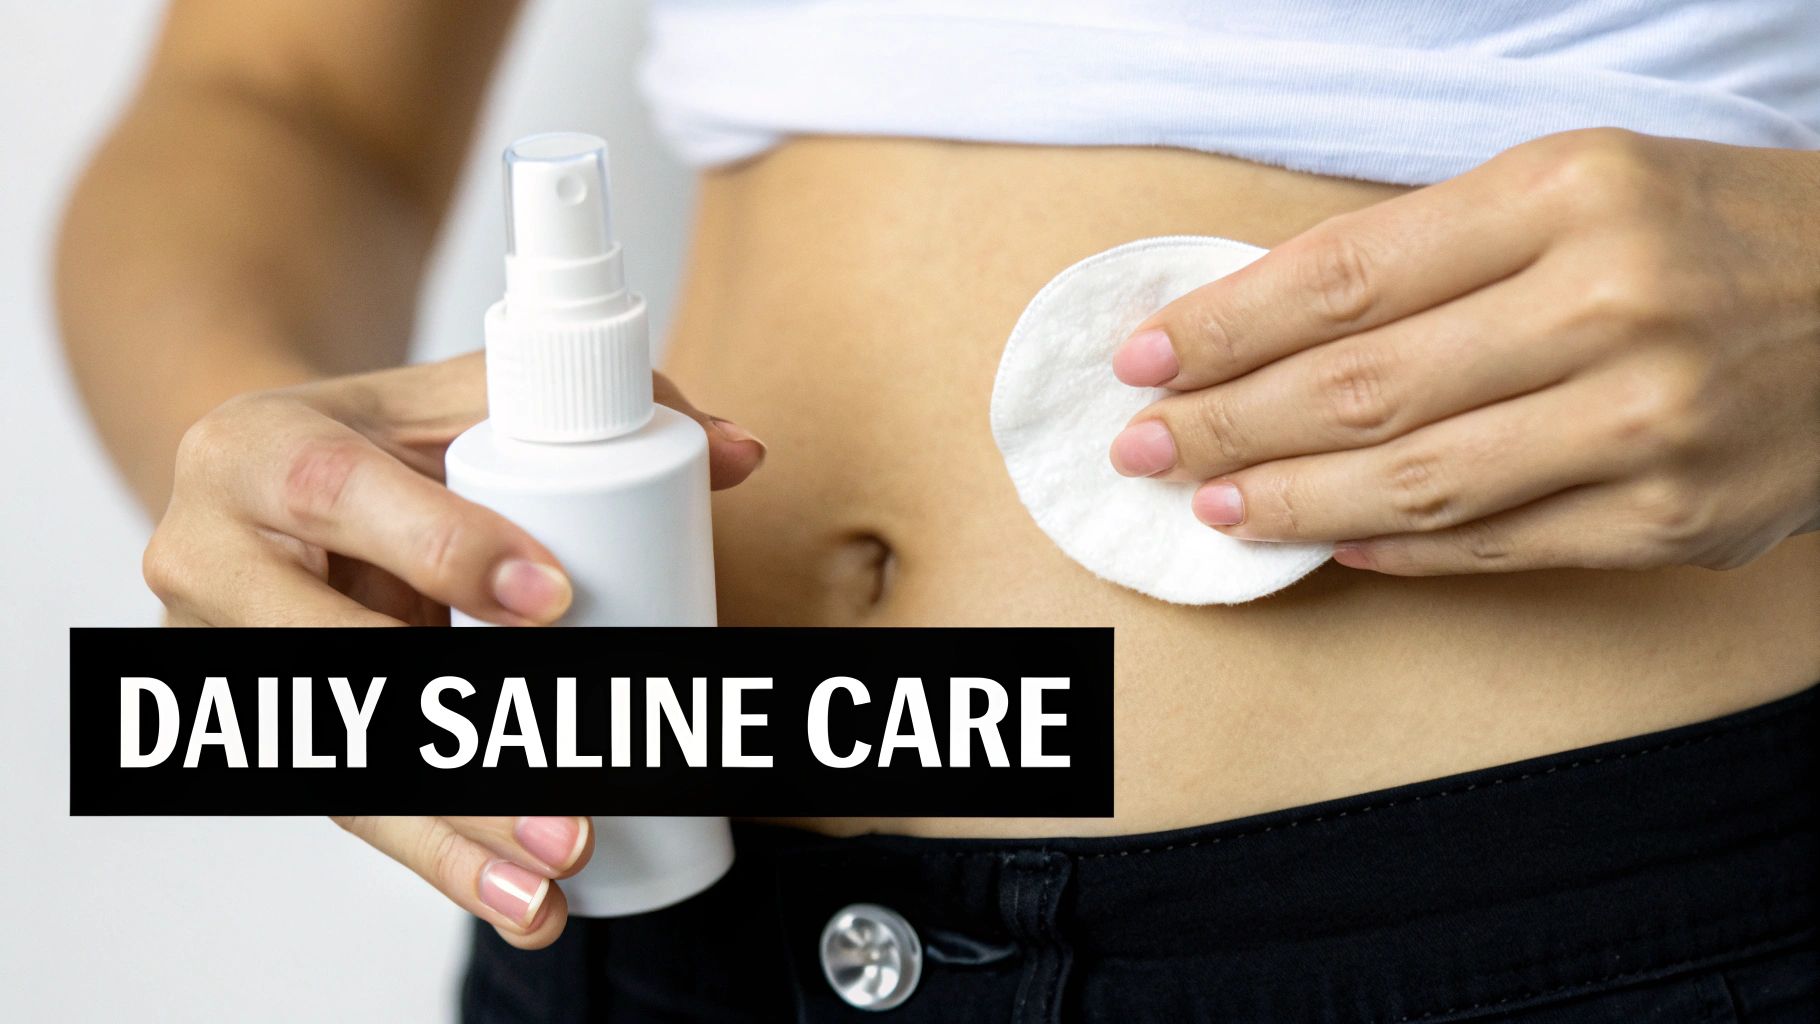
- Sterile Saline Solution: This is your holy grail. Look for a wound wash saline spray that contains only 0.9% sodium chloride and water. No additives, no "ear care solutions"—just pure, simple saline.
- Clean Paper Towels: Ditch the fuzzy bath towels. They can easily snag your jewelry and are notorious for harboring bacteria. Non-woven gauze or a clean paper towel is perfect for gently patting the area dry.
- Clean Hands: It sounds obvious, but it has to be said: never, ever touch your piercing without first washing your hands thoroughly with soap and water.
Pro Tip: Never use alcohol, hydrogen peroxide, or antibacterial soaps on your piercing. These are way too harsh. They kill off the good cells your body needs for healing and will lead to dryness, irritation, and a much longer healing time.
The Perfect Cleaning Frequency
So, how often should you actually be cleaning your piercing? The magic number is twice a day. A quick clean in the morning and once again in the evening is the sweet spot for most people.
Cleaning more than twice a day can strip the area of its natural moisture, which leads to irritation. On the flip side, not cleaning enough allows bacteria and crust to build up, which is a recipe for infection. A balanced approach is absolutely key.
If you've had a particularly sweaty day or just finished a workout, it's a good idea to do an extra rinse. A quick spritz of saline is all you need to wash away sweat and prevent buildup. Just don't make it a habit to do a full, intensive clean more than twice daily.
Step-by-Step Saline Cleaning Guide
Ready to nail the routine? It’s super easy and should only take a couple of minutes out of your day. Here’s a simple, piercer-approved method:
- Wash Your Hands: Lather up with soap and water for at least 20 seconds before you even think about touching the area around your piercing.
- Spray Generously: Liberally spray the sterile saline solution directly onto the top and bottom holes of your navel piercing. Don't be shy—you want to flush the area well.
- Soften and Remove Debris: Let the saline sit for about a minute to soften any of those "crusties." If they don't fall off on their own, you can use the corner of a clean paper towel or a piece of non-woven gauze soaked in saline to gently wipe them away. Whatever you do, never pick at them with your fingernails!
- Pat Gently Dry: Use a fresh, clean paper towel to gently pat the entire area dry. Moisture is not your friend when it comes to healing, as it can create a breeding ground for bacteria.
And that’s it! No twisting, turning, or moving the jewelry. Your body knows what to do, and the saline rinse is all the help it needs from you. If you want to dive deeper into the benefits of specific aftercare products, you can explore more about why piercers recommend H2Ocean aftercare and its specialized formulas.
Choosing The Right Jewelry For A Happy Piercing
Think of your first belly ring as the foundation for your piercing's entire future. It's not just about style—the jewelry you start with is one of the most critical factors in your healing journey. The right piece helps your body heal, while the wrong one can trigger irritation, allergic reactions, and some major setbacks.
When your piercing is fresh, your body is incredibly sensitive to what you put inside it. This is exactly why professional piercers are so particular about the materials they use. Let's get into what makes a belly ring a healing hero versus a potential problem.
The Best Metals For Your New Piercing
For a brand-new navel piercing, only a handful of materials actually make the cut. Your body needs something biocompatible, which is just a fancy way of saying it won't cause a negative reaction when it's in contact with your tissue. This is completely non-negotiable for a smooth healing process.
Here are the gold standards your piercer will almost certainly recommend:
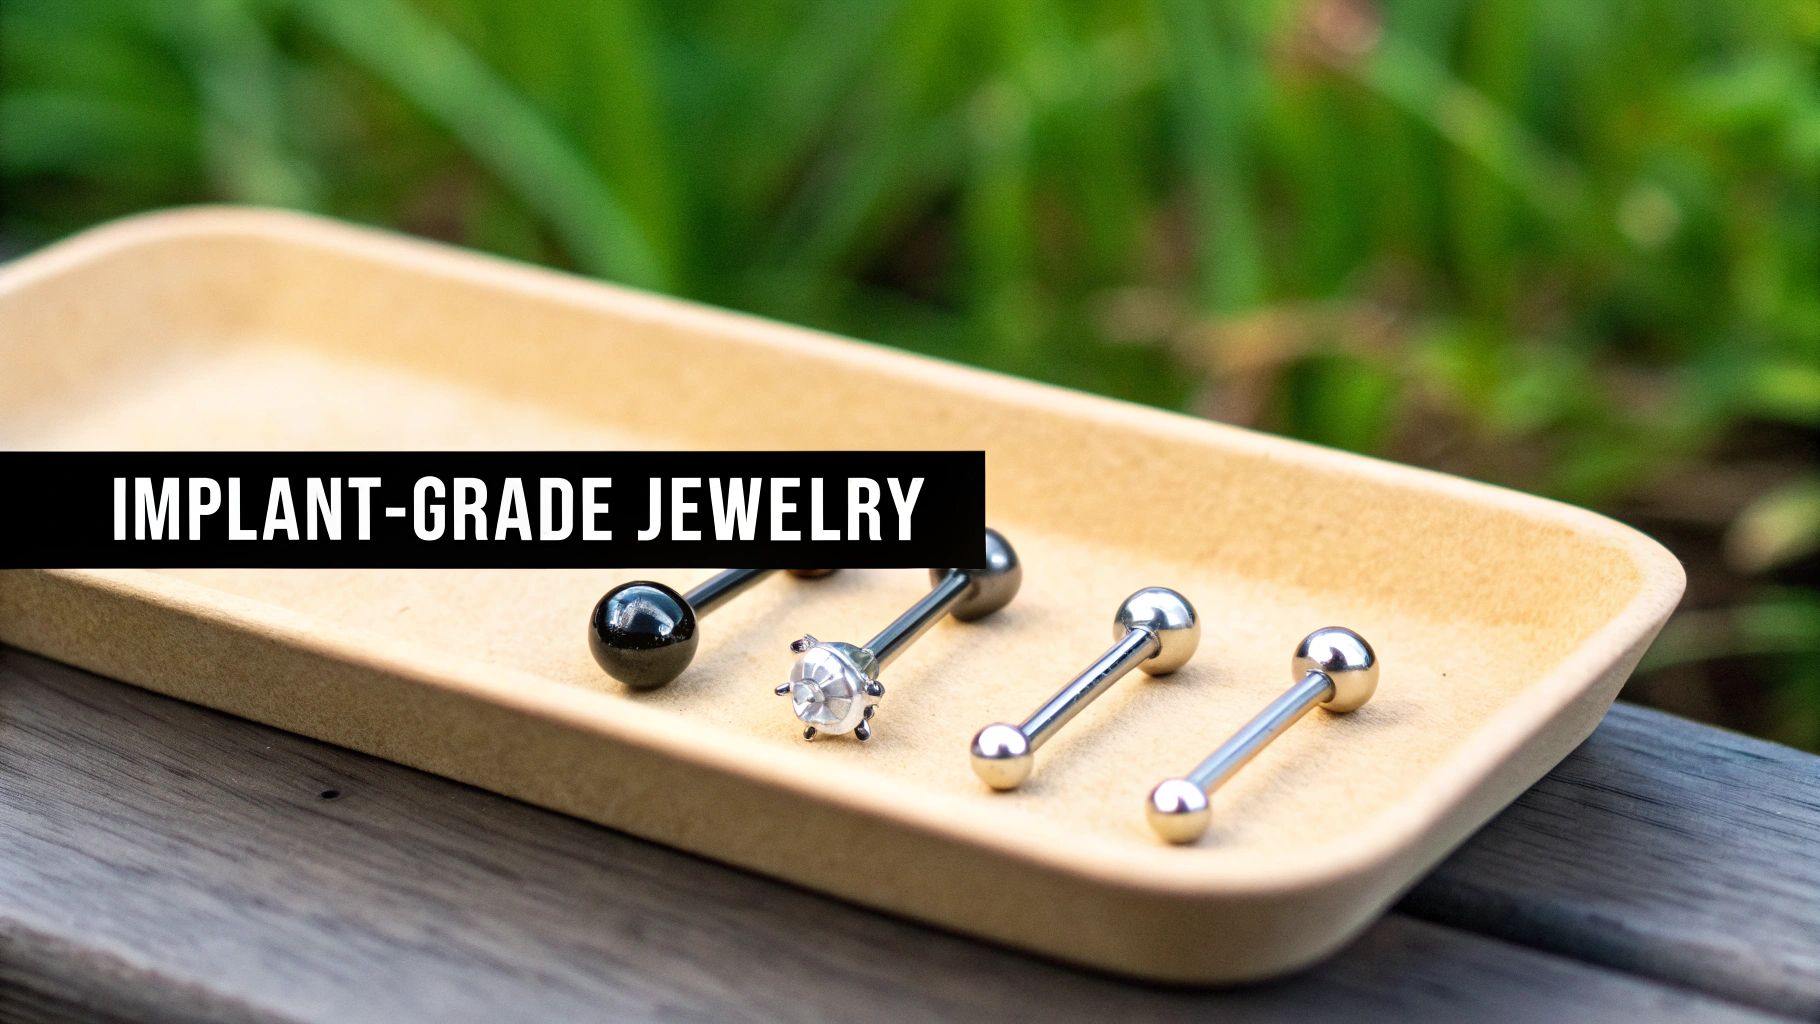
- Implant-Grade Titanium (ASTM F-136): This is the top choice, and for good reason. It's totally nickel-free, super lightweight, and the same material used for medical implants. If you have sensitive skin or know you have a nickel allergy, this is your safest possible bet.
- Implant-Grade Surgical Steel (ASTM F-138): A really solid and body-safe option. This specific grade of steel has an extremely low nickel-release rate, which makes it safe for most people. It's a durable and very popular choice for initial piercings.
- 14k or 18k Solid Gold: If you're a gold lover, just make sure it’s solid—not plated. Plated jewelry has a thin layer of gold that can flake off over time, exposing the mystery metal underneath and causing a world of irritation. Stick to 14k or 18k solid gold made specifically for body piercings.
With nickel sensitivity affecting 10–20% of the population, picking high-quality, hypoallergenic metals is absolutely key to avoiding issues during that long healing period.
Not sure which metal is right for you? It really comes down to your skin's sensitivity and your budget. Titanium is often the top recommendation for its purity, but surgical steel and solid gold are also fantastic when sourced from a reputable supplier.
Belly Ring Material Comparison
| Material | Best For | Pros | Cons |
|---|---|---|---|
| Implant-Grade Titanium | Initial piercings, sensitive skin, nickel allergies | Completely nickel-free, lightweight, biocompatible, variety of colors | Can be more expensive than steel |
| Implant-Grade Steel | Most initial piercings (for those without allergies) | Durable, affordable, widely available | Contains trace amounts of nickel which can irritate some people |
| Solid 14k-18k Gold | Healed piercings, those wanting a luxury look | Classic appearance, holds value, safe if nickel-free | Softer metal (can scratch), expensive, must be solid (not plated) |
| Sterling Silver | Healed piercings, short-term wear only | Inexpensive, classic look | Tarnishes easily which can stain skin, can cause irritation |
| Acrylic/Bioplast | Healed piercings, temporary wear, sports | Flexible, lightweight, metal-free | Can degrade over time, porous material can harbor bacteria |
Ultimately, for a new piercing, you can't go wrong with implant-grade titanium. It removes any guesswork about potential metal sensitivities and gives your piercing the best possible start.
Why Style Matters During Healing
I know how tempting that dangly, gem-encrusted belly ring is, but you absolutely have to save it for later. During that initial six-to-twelve-month healing window, simplicity is your best friend. A simple, curved barbell with smooth, non-snagging balls on each end is the perfect starter piece.
Key Insight: A decorative or dangly belly ring is way more likely to get caught on your clothes, bedsheets, or towels. This snagging can cause serious trauma to the fragile, healing fistula, leading to irritation bumps, a much longer healing time, or even piercing rejection.
A basic barbell minimizes movement and friction, which is exactly what your piercing needs to heal up beautifully without any interruptions. To get a better handle on the different parts of your jewelry, our guide on the anatomy of a belly ring breaks down everything you need to know.
When Can You Change Your Jewelry?
Patience is a virtue, and with piercings, it's everything. This is easily the hardest part for any piercing enthusiast. You can’t safely change your jewelry just for fun until your navel piercing is 100% fully healed. As we've covered, this can take anywhere from six months to a full year—and sometimes even longer.
Swapping out your jewelry too early can re-injure the piercing, introduce bacteria, and basically force you to start the entire healing process over again. Trust us, it’s not worth the frustration.
Once you’re positive it’s completely healed (meaning no pain, no discharge, and no redness for several weeks), it’s still a great idea to have a professional piercer do the first jewelry change for you. They can confirm it’s actually ready and help you insert your new piece without damaging that delicate inner channel. After that, you're free to explore the entire universe of cute, sparkly, and expressive belly rings!
Troubleshooting Common Piercing Problems
Even with the most perfect belly button piercings care routine, sometimes your new piercing just decides to have a bad day. Don't panic! A bit of redness or an occasional grumpy phase is often just part of the healing game. The real trick is learning to tell the difference between normal healing weirdness and a genuine problem that needs your attention.
Think of this as your personal troubleshooting guide. We'll walk you through the most common bumps in the road—from scary-looking irritation bumps to the actual signs of infection—so you can tackle any minor setbacks with total confidence.
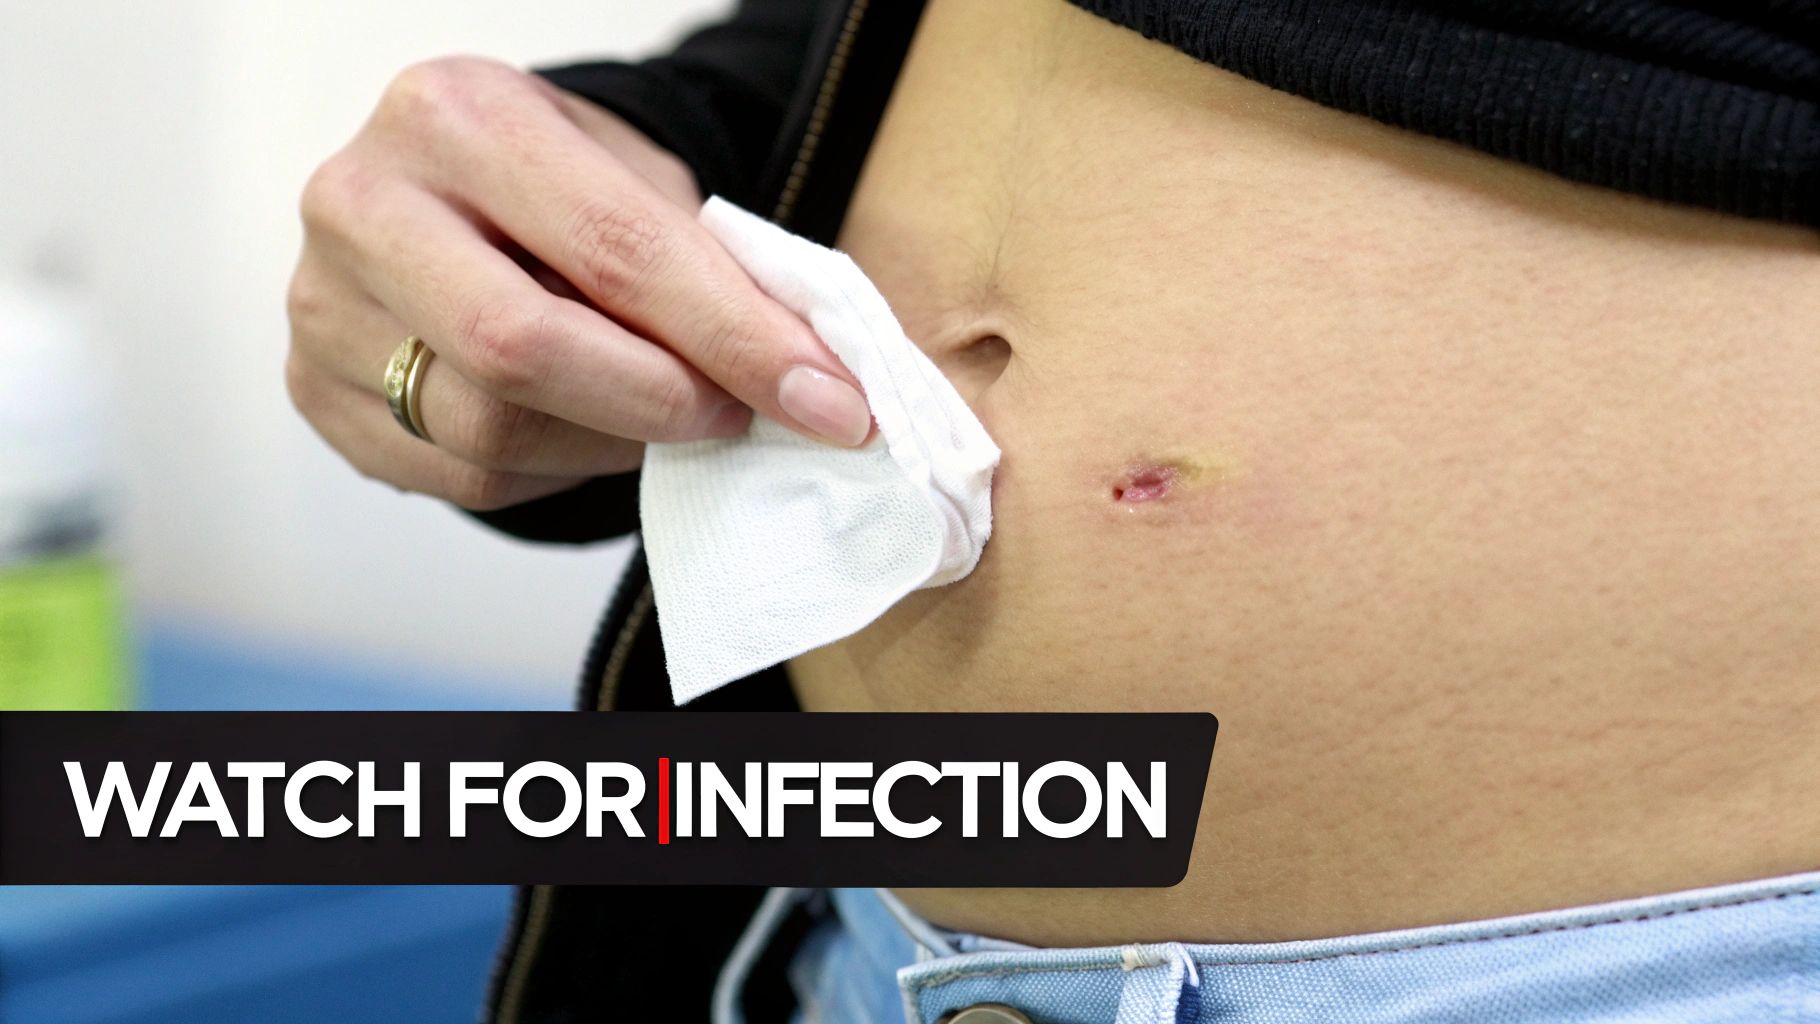
Is It Irritated Or Infected?
This is the number one question that sends people into a spiral, so let's clear it up right now. More often than not, what you're seeing is simple irritation, not a full-blown infection. Knowing the difference will save you a ton of stress.
An irritated piercing might look a little red, feel tender to the touch, or get slightly swollen, especially if you just snagged it on your waistband. You'll probably also see some clear or whitish fluid (that's lymph) that dries into "crusties." Totally normal. This is just your piercing's way of telling you it's been bothered.
An infection, however, is a whole different beast. That’s your body actively fighting off bacteria, and the signs are much more severe.
Signs of Irritation:
- Slight pinkness or redness right around the piercing holes.
- Mild swelling that might come and go.
- Tenderness, usually after it's been bumped or snagged.
- Clear or whitish fluid that forms those normal "crusties."
Signs of Infection:
- Intense, spreading redness that feels hot to the touch.
- Significant swelling that makes the skin look tight and shiny.
- Thick, cloudy discharge that is green or yellow.
- A foul odor coming from the piercing site.
- A deep, throbbing pain, even when you aren't touching it.
- You might also feel generally unwell, maybe even running a fever.
Crucial Takeaway: If you see thick, colored pus and the area is hot and painfully swollen, stop troubleshooting on your own. It's time to get professional medical advice.
The Dreaded Piercing Bump
Ah, the infamous piercing bump. This little bubble of tissue can pop up next to the piercing hole and is almost always a sign of irritation, not infection. It’s basically your body’s over-the-top reaction to some kind of stressor. They look alarming, but they’re usually fixable.
These bumps are typically caused by a few common culprits: physical trauma (like snagging your jewelry), moisture getting trapped, pressure from tight clothing, or wearing low-quality jewelry. The key to making it disappear is to figure out what's causing it and stop it.
Think back on your recent habits. Have you been sleeping on your stomach? Wearing high-waisted jeans? Fiddling with your jewelry? Once you identify the source of irritation and remove it, the bump will usually shrink and vanish on its own with continued, gentle saline soaks. Whatever you do, don't try to pop it or douse it in harsh chemicals—that will only make things a million times worse.
When To See A Professional
Knowing when to call in the experts is a vital part of your belly button piercing care. Never hesitate to reach out if you're worried. Your piercer is your best first point of contact for any non-medical issues.
See Your Piercer If:
- You think your jewelry is too tight or too long.
- You have an irritation bump that just won't go away.
- You're worried about migration (the piercing moving) or rejection (your body pushing the jewelry out).
- You need a hand with your first jewelry change.
Your piercer has seen it all. They can help you troubleshoot your aftercare, check your jewelry, and give you peace of mind based on years of real-world experience.
That said, a piercer is not a doctor. If you suspect a true infection, you need to see a medical professional right away.
See a Doctor If:
- You have clear signs of infection, like thick green/yellow pus and a hot, swollen piercing site.
- You have a fever or feel sick.
- You see red streaks radiating from the piercing.
A doctor can properly diagnose an infection and prescribe antibiotics if necessary. And please, do not remove the jewelry if you suspect an infection! This can trap the bacteria inside and lead to an abscess. A doctor will guide you on the best course of action to treat the infection while keeping the piercing channel open to drain properly.
Your Belly Piercing Care Questions Answered
Got a few more questions buzzing around in your head? You're not alone! Even with the best plan, the healing journey can throw a few curveballs your way. Let's tackle some of the most common questions we get about belly button piercing care.
We've gathered the queries we hear all the time to give you clear, real-world answers. From your first beach trip to figuring out how to sleep, we'll get you the info you need to feel totally confident.
Can I Go Swimming With A New Belly Button Piercing?
This is a huge one, especially when summer starts calling your name. The short answer? You really, really need to wait. It's best to stay out of pools, hot tubs, lakes, and oceans for at least the first few months, and ideally for the entire healing period.
Think about it: those bodies of water are a big party for bacteria, and your fresh piercing is basically an open invitation. On top of that, the chemicals in pools and hot tubs are super harsh and can seriously irritate healing tissue, leading to major setbacks.
If you absolutely have to take a dip, your only defense is a high-quality, waterproof bandage (like Tegaderm). You have to make sure it creates a perfect seal around the piercing. The second you get out of the water, that bandage comes off, and you need to immediately rinse the area and do a full saline cleaning. Just know this isn't a foolproof solution, so use it sparingly and understand the risks involved.
How Do I Know When My Belly Piercing Is Fully Healed?
Ah, the million-dollar question. The tricky thing about a belly piercing is that it can look totally healed on the outside months before the internal tissue (the fistula) is actually strong and stable. Don't let it fool you!
A truly, 100% healed piercing will have all of these signs:
- No More Gunk: The piercing site stays completely clean. No more "crusties" or any kind of fluid.
- No Redness or Swelling: The skin around both piercing holes looks calm and matches your normal skin tone.
- No Tenderness at All: You can gently press on the area and go about your day without any soreness.
- Jewelry Moves Freely: You can gently slide the barbell back and forth without any pain, tightness, or resistance.
Remember, reaching this point usually takes a full 6 to 12 months. Only when you can honestly check off every single one of those boxes is it safe to say your piercing is healed and ready for that fun first jewelry change.
What Should I Do If My Belly Ring Gets Snagged On Clothing?
Ugh, the dreaded snag. It happens to just about everyone at some point, and man, is it startling! First rule: don't panic and don't rip it. Just take a deep breath and gently, carefully untangle the jewelry from whatever it’s caught on.
Once it's free, check out the area. It's probably going to be red and pretty tender. If you see a little bit of bleeding, that's okay—just gently clean it away with a fresh piece of saline-soaked gauze.
After any trauma like a snag, it’s a good idea to do a soothing saline soak to calm things down. For the next few days, treat it like it's brand new again, being extra careful with high-waisted pants and your movements.
This is a perfect example of why your initial jewelry choice matters so much. As belly piercings have surged back into fashion, aftercare practices have evolved to minimize common issues like this. In fact, many piercers now recommend smaller, lower-profile jewelry for healing, as noted in recent trend reports that minimalist pieces are a "very good choice for healing." You can read more about how styles are adapting for safer healing in this article on piercing trends on Hypebae.
Key Insight: If a snag causes serious pain, swelling that doesn't go down, or visible damage to the tissue, check in with your professional piercer. They can take a look and give you personalized advice to get your healing journey back on track.
Can I Exercise With A New Navel Piercing?
You can definitely stay active, but you'll need to make a few tweaks to your routine. For the first few weeks, it's smart to stick to lower-impact activities that don’t put a ton of strain on your core. Think walking, light cycling, or focusing on upper-body workouts.
Anything involving a lot of intense abdominal movement—like crunches, sit-ups, or certain yoga poses—creates a ton of friction and pressure right where your piercing is trying to heal. It’s best to put those exercises on pause until the initial tenderness is gone.
The number one rule for working out? Hygiene. Sweat and bacteria are not your piercing's friends. You must clean your piercing with saline solution immediately after every single workout. No exceptions! Wearing loose, breathable, and moisture-wicking fabrics can also make a huge difference in keeping the area dry and irritation-free.
Ready to find the perfect piece for your beautifully healed piercing? Or maybe you're looking for that ideal starter barbell? We’ve got you covered.