Ever stared at a wall of amazing body jewelry and felt totally lost? When you see numbers like 20g, 16g, or 0g, it's so easy to get confused. Just remember this one super weird rule: the bigger the gauge number, the smaller the jewelry is. That tiny 20g nose stud is way thinner than your standard 14g belly ring. Wild, right?
What Are Piercing Gauges Anyway?
So, what exactly is a "gauge?" It’s simply the measurement system for the thickness of body jewelry. Think of it like a secret language that tells you how thick the post is that actually goes through your piercing. Getting a handle on this is your first step to shopping like a pro and keeping your piercings super happy.
The whole system actually comes from the world of wire manufacturing. The gauge number was tied to the production process, and the body jewelry world adopted it to create a standard that every piercer and jewelry fanatic could follow. Pretty cool!
Key Takeaway: The gauge system works backward. A high number like 22g is super fine and delicate, perfect for many nostril piercings. A low number like 8g is much thicker, something you'd see in stretched earlobes or larger septum piercings. Nail this concept, and you've totally cracked the code to body jewelry sizing.
Understanding gauges sizes in order is more than just trivia; it helps you:
- Find the perfect fit: Matching the jewelry gauge to your piercing's size is crucial for avoiding irritation, migration, or other healing headaches.
- Shop with confidence: You can stop guessing and filter your search for jewelry that you know will actually work for your piercing. Yes, please!
- Prevent piercing problems: Using a gauge that's too small can cause your piercing to shrink over time. Trying to force in one that’s too big can cause painful damage or tearing. Yikes.
Before we jump into the full conversion chart, let's look at where some of these common gauges are typically used. This gives you a real-world feel for how these numbers translate to different piercings on the body.
Quick Guide to Common Piercing Gauges
This table is your cheat sheet for matching a gauge size to common piercings. It's an amazing starting point for figuring out what size you might have, but always remember that your piercer makes the final call based on your unique anatomy.
| Gauge Size (g) | Common Piercings |
|---|---|
| 20g, 18g | Nostril, Tragus |
| 16g | Cartilage (Helix), Lip (Labret, Monroe), Eyebrow, Septum, Daith, Rook, Industrial, Tragus |
| 14g | Navel (Belly Button), Nipple, Tongue, Industrial, Bridge |
| 12g | Often used for initial Nipple or Tongue piercings for better healing |
| 10g | Larger gauge Nipple or Tongue piercings, initial stretching for earlobes |
| 8g and up | Stretched earlobes, Septums, Genital piercings |
Think of this as a general map. A professional piercer might use a slightly different gauge for a good reason—like giving a tricky piercing more stability to heal. When in doubt, a quick call or visit to your piercer is always the best move.
The Complete Gauge Size Conversion Chart
Alright, let's get down to the nitty-gritty. Talking about gauge theory is one thing, but seeing all the gauges sizes in order is where it really starts to make sense. This is your ultimate cheat sheet for grabbing the right piece of jewelry, every single time. No more guesswork!
We've laid everything out for you below, from the delicate 22g all the way to a much larger 00g. Go ahead and bookmark this page or screenshot the chart—it's about to become your piercing's new best friend.

As you can see, the higher the gauge number (like 20g), the thinner the actual post is. It's a bit backward, but once you get the hang of it, you'll be a pro.
Body Jewelry Gauges Sizes in Order
Here's the detailed breakdown you've been waiting for. This chart translates those gauge numbers into precise millimeters (mm) and inches ("). For what it's worth, millimeters are what the pros use, so it's a great measurement to get familiar with.
| Gauge (g) | Millimeters (mm) | Inches (") |
|---|---|---|
| 22g | 0.64 mm | 1/40" |
| 20g | 0.81 mm | 1/32" |
| 18g | 1.0 mm | 3/64" |
| 16g | 1.2 mm | 3/64" |
| 14g | 1.6 mm | 1/16" |
| 12g | 2.0 mm | 5/64" |
| 10g | 2.4 mm | 3/32" |
| 8g | 3.2 mm | 1/8" |
| 6g | 4.0 mm | 5/32" |
| 4g | 5.0 mm | 3/16" |
| 2g | 6.0 mm | 1/4" |
| 0g | 8.0 mm | 5/16" |
| 00g | 10.0 mm | 3/8" |
When you're shopping around, the millimeter measurement is your most reliable friend. It's a universal standard, so a 1.2mm piece is the exact same thickness whether you buy it online or from your local studio.
This chart is a perfect starting point, but it's also cool to know why these sizes became the go-to. For a little more background, check out our guide on the standards of gauge sizing for body jewelry. It helps connect the dots on why certain piercings almost always use specific sizes.
Now, let's get personal and figure out how to find the size of your actual piercing.
How to Find Your Piercing's Gauge Size
Okay, so you’ve seen the charts and you get how gauge sizes in order work. But how do you figure out the exact size for your piercing? Nailing down your current gauge is the secret to keeping your piercing happy, healthy, and looking its absolute best. It’s all about getting that perfect, comfortable fit.
The absolute easiest, no-fuss way to find your gauge size is to ask the person who did the piercing in the first place.
Pro Tip: Your professional piercer is your BFF here. They know your anatomy, remember the initial jewelry they used, and can probably tell you your size in seconds. When in doubt, always start by giving them a call or swinging by the studio.
Sticking with your piercing's original gauge is super important, especially while it's healing. If you put in jewelry that's too thin, the piercing channel (called a fistula) can actually shrink up, making it a real pain to go back to your original size later. On the flip side, trying to force in a thicker piece of jewelry can cause irritation, tearing, and some major setbacks in your healing journey. No thanks!
What to Do If You've Lost Track
Lost the info from your piercer? Don't sweat it—it happens to the best of us! Here are a couple of ways you can solve the mystery yourself:
- Check Your Old Jewelry: If you still have the original piece your piercer used, you can visually compare it to a gauge chart. Most piercers use standard sizes for specific piercings, which gives you a great starting point.
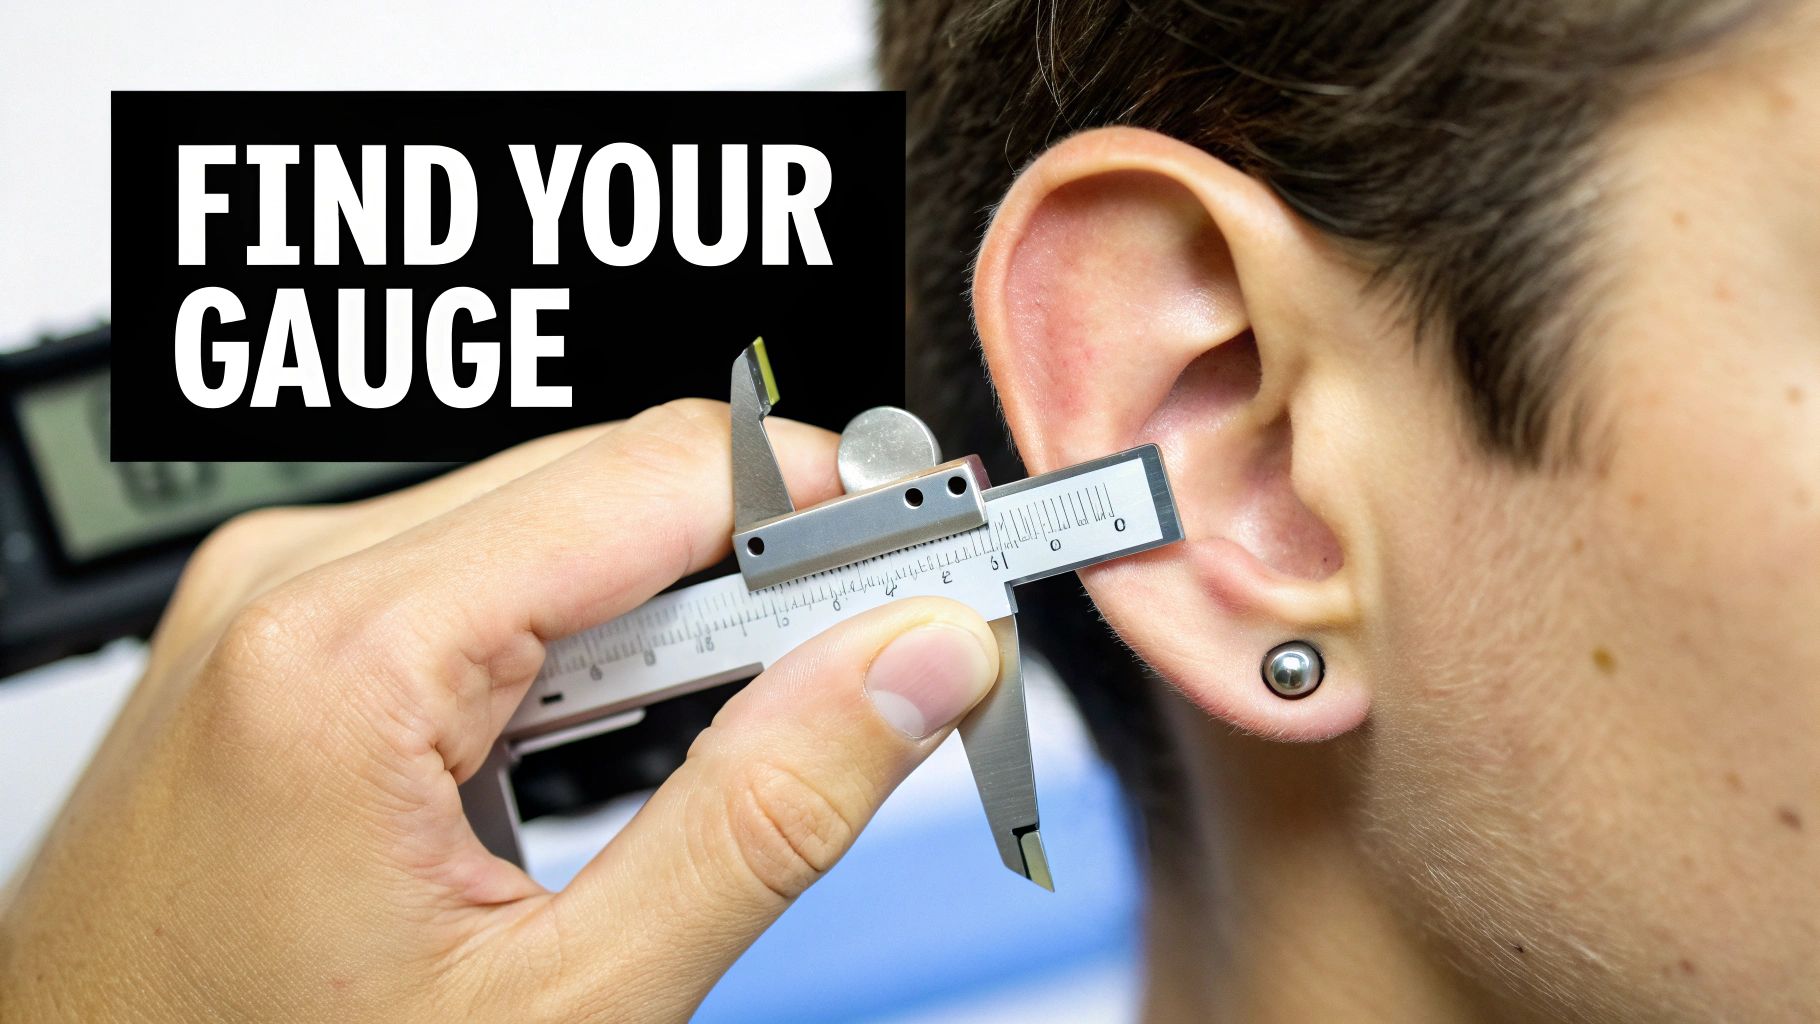
- Use a Gauge Wheel or Caliper: For a super precise measurement, you can grab a gauge wheel or a digital caliper. These tools are designed to measure the thickness of your existing jewelry right down to the millimeter.
If you want to get really comfortable with measuring your jewelry, check out our full guide on measuring up body jewelry sizing basics. It’s packed with more tips to help you find that perfect fit every time.
Standard Gauge Sizes for Popular Piercings
Let's get down to it, shall we? While your body is completely unique, professional piercers definitely have go-to standards for most piercings.
Picking the right starting gauge isn't just a random choice—it's a huge step in making sure you have a smooth healing process and a perfect jewelry fit later on. Think of this as your cheat sheet for the most popular piercing spots. These sizes are the industry's best practices, figured out over years to give your piercing the best possible chance to heal right, without annoying issues like migration or rejection.
Common Piercing Gauge Cheat Sheet
You should always, always listen to your piercer's recommendation first, but here are the standard gauges you'll most likely see for different piercings:
-
Nostril Piercings (20g or 18g): Because nostril piercings are so delicate, they need a thinner gauge. Most piercers will start with an 18g for better stability while healing, but 20g is also super common, especially for those cute, tiny studs.
-
Helix & Cartilage (16g): Your cartilage needs a bit more support to heal properly. A 16g is the gold standard for pretty much all ear cartilage piercings, from the helix to the tragus. It creates a stable channel that’s way less prone to getting irritated.
-
Septum Rings (16g or 14g): Septum piercings are usually done at 16g. It's a really versatile size that fits a massive variety of clickers and hoops. Some piercers might go with a 14g for a slightly bolder look and a little more stability.
-
Belly Button Rings (14g): The classic navel piercing is almost always done at 14g. This thicker gauge is absolutely essential to stop the jewelry from shifting around (migrating) or being pushed out by your body, especially in a spot that moves so much.
The idea of standardized sizing is a big deal in many fields, not just body jewelry. Industrial settings, for example, rely on exact measurements to guarantee quality and safety, with practices often shaped by regional needs. If you're curious about how these standards work in other sectors, you can explore more about the world of industrial gauges on persistencemarketresearch.com.
Changing Your Piercing Size: Stretching vs. Downsizing
Your piercing journey isn't always a straight line—sometimes you need to change your jewelry's size for comfort, healing, or a totally new look. This usually means either going smaller (downsizing) or larger (stretching). Both are super common, but you've got to handle them the right way to keep your piercing happy and healthy.
Think of downsizing as the final step of the initial healing process. When you first get pierced, your piercer uses a longer post to make room for swelling. Once that swelling goes down after a few weeks, you might notice that extra length gets snagged on hair and clothes. Swapping to a shorter, snugger post is the key to preventing irritation and making sure your piercing heals perfectly for the long haul.
Taking the Leap into Stretching
On the flip side, we have stretching—the exciting process of gradually sizing up your piercing’s gauge. If you've been dreaming of rocking some killer plugs or tunnels in your earlobes, doing it safely is absolutely non-negotiable.
Patience is your best friend here. The golden rule of stretching is to only move up one gauge size at a time. Seriously, don't rush it. Forcing jewelry that's too big can cause painful micro-tears, blowouts, or even permanent damage to your skin.
Listen to Your Body: A little bit of tenderness after a stretch can be normal, but sharp pain is a huge red flag. If it hurts, stop immediately. Your body will let you know when it's ready for the next size.
For your ears, it’s not just about the right size, but also the right materials. Stick with single-flare glass or titanium plugs for stretching, and always give your lobes plenty of time to heal between sizes—usually at least a month or two.
For a full deep-dive into the process, check out our guide on how to properly stretch your lobes. It’s packed with expert tips to make your stretching journey a safe and successful one.
A Few More Things You Might Be Wondering...
Got the basics of gauge sizing down? Awesome! But it's totally normal to still have a few questions rattling around in your head. Think of this as your quick-reference guide for those last-minute piercing puzzles. We've pulled together the most common questions we get asked, so you can get your answers right now.
Let's clear up any lingering confusion so you can rock your body jewelry with total confidence.
Can a Piercing Hole Actually Shrink?
Yes, it absolutely can! Your body is an amazing healing machine. If you leave your jewelry out for too long, the fistula (that's the little skin tube that makes up your piercing) will start to close up on its own.
This happens way faster with newer piercings, but even old, well-healed ones can shrink down. This can make it a real pain to get your favorite pieces back in later. Also, if you decide to wear a smaller piece of jewelry—like putting a 20g stud in a piercing that was made for an 18g—the hole will likely shrink over time to hug that smaller piece.
How Do I Know When It’s Safe to Change My Jewelry?
Patience, my friend! You should never, ever change your jewelry until the piercing is 100% fully healed. Swapping it out too early is an open invitation for bacteria, can cause some major irritation, and will seriously drag out your healing time.
You'll know your piercing is ready for a change when you see these signs:
- There's no more soreness, swelling, or tenderness.
- You're not seeing any "crusties" or fluid discharge.
- The jewelry can move around a bit without any discomfort.
If you're ever in doubt, just swing by your piercer's studio. They can take a quick look and give you the professional thumbs-up to start exploring new styles. Just remember, everyone's body is different, and healing times can vary a lot depending on where the piercing is.
Ready to put your new knowledge to the test? Now that you're practically a pro at this gauge stuff, you’re ready for the fun part! Over at BodyCandy, we have a massive collection of jewelry in every size you could possibly need.
Explore our entire collection of high-quality body jewelry today!