
Thinking about getting a cartilage piercing? If you're ready to venture past the earlobe, you've got a ton of amazing options to build a look that's totally you. From the ever-popular helix to the tucked-away daith, every spot on your ear has its own unique vibe, pain level, and healing journey.
Your Guide to Creating the Perfect Curated Ear
Welcome to the super fun world of cartilage piercings! Think of this guide as your personal roadmap to creating the perfect "curated ear" or "constellation piercing" that tells your story. We're here to walk you through everything you need to know before you head to the piercing studio.
This isn't just about picking a random spot; it's about designing a whole look. Ear curation is the art of choosing multiple piercings that work together to complement your personal style and, just as importantly, your ear's unique anatomy. It’s all about turning your ear into a personalized work of art.
Why Is Everyone So Obsessed With Cartilage Piercings?
It's not just you—cartilage piercings are literally everywhere right now. Over the past decade, they've exploded in popularity. In fact, piercings like the helix, tragus, and conch now make up about 30% of all ear piercings done each year. The trend is real, and you can read more about the latest piercing statistics to see just how massive the movement has become.
So, where do you start? We've broken down the three biggest things you need to think about: the pain, the healing time, and the jewelry you can wear. This handy chart gives you a quick visual of how it all connects.
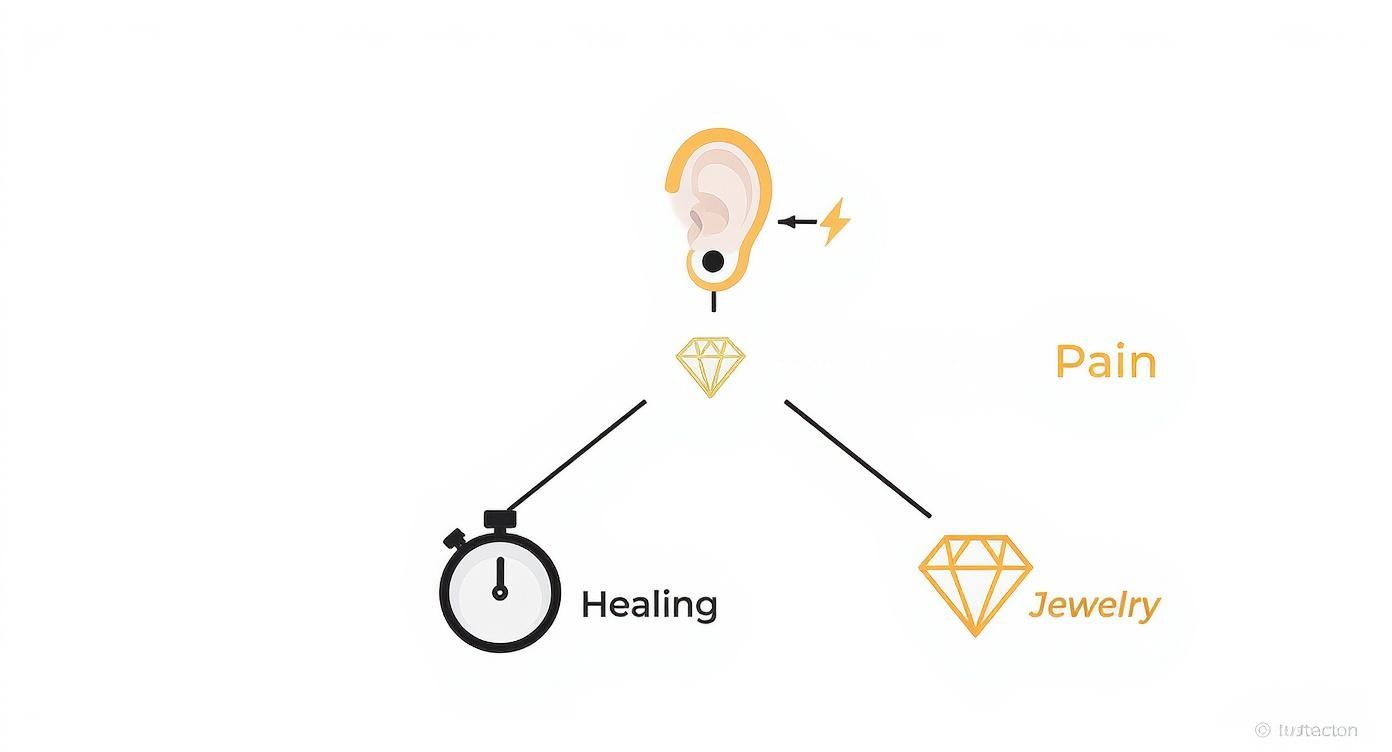
As you can see, these three factors are totally linked and will shape your whole experience, from the day you get pierced to the moment you can finally swap in that dream piece of jewelry.
To give you a head start, we put together a quick-glance table comparing some of the most popular options.
Quick Guide To Popular Cartilage Piercings
| Piercing Type | Pain Level (1-10) | Healing Time | Best Jewelry |
|---|---|---|---|
| Helix | 5-6 | 6-12 Months | Studs, Barbells, Hoops (after healing) |
| Forward Helix | 6-7 | 6-12 Months | Small Studs, Flat-Back Labrets |
| Tragus | 5-6 | 6-12 Months | Studs, Flat-Back Labrets, Small Hoops |
| Conch | 6-7 | 6-12+ Months | Studs (initially), Large Hoops (after healing) |
| Daith | 6-7 | 9-12+ Months | Hoops, Captive Bead Rings, Clickers |
| Rook | 7-8 | 9-12+ Months | Curved Barbells, Small Hoops |
| Industrial | 7-8 | 9-12+ Months | Straight Industrial Barbell |
This table is just a starting point, of course. In the sections ahead, we’ll dive deep into each specific piercing type, giving you all the details you need to choose with confidence and build the curated ear you've always wanted. Let's get started!
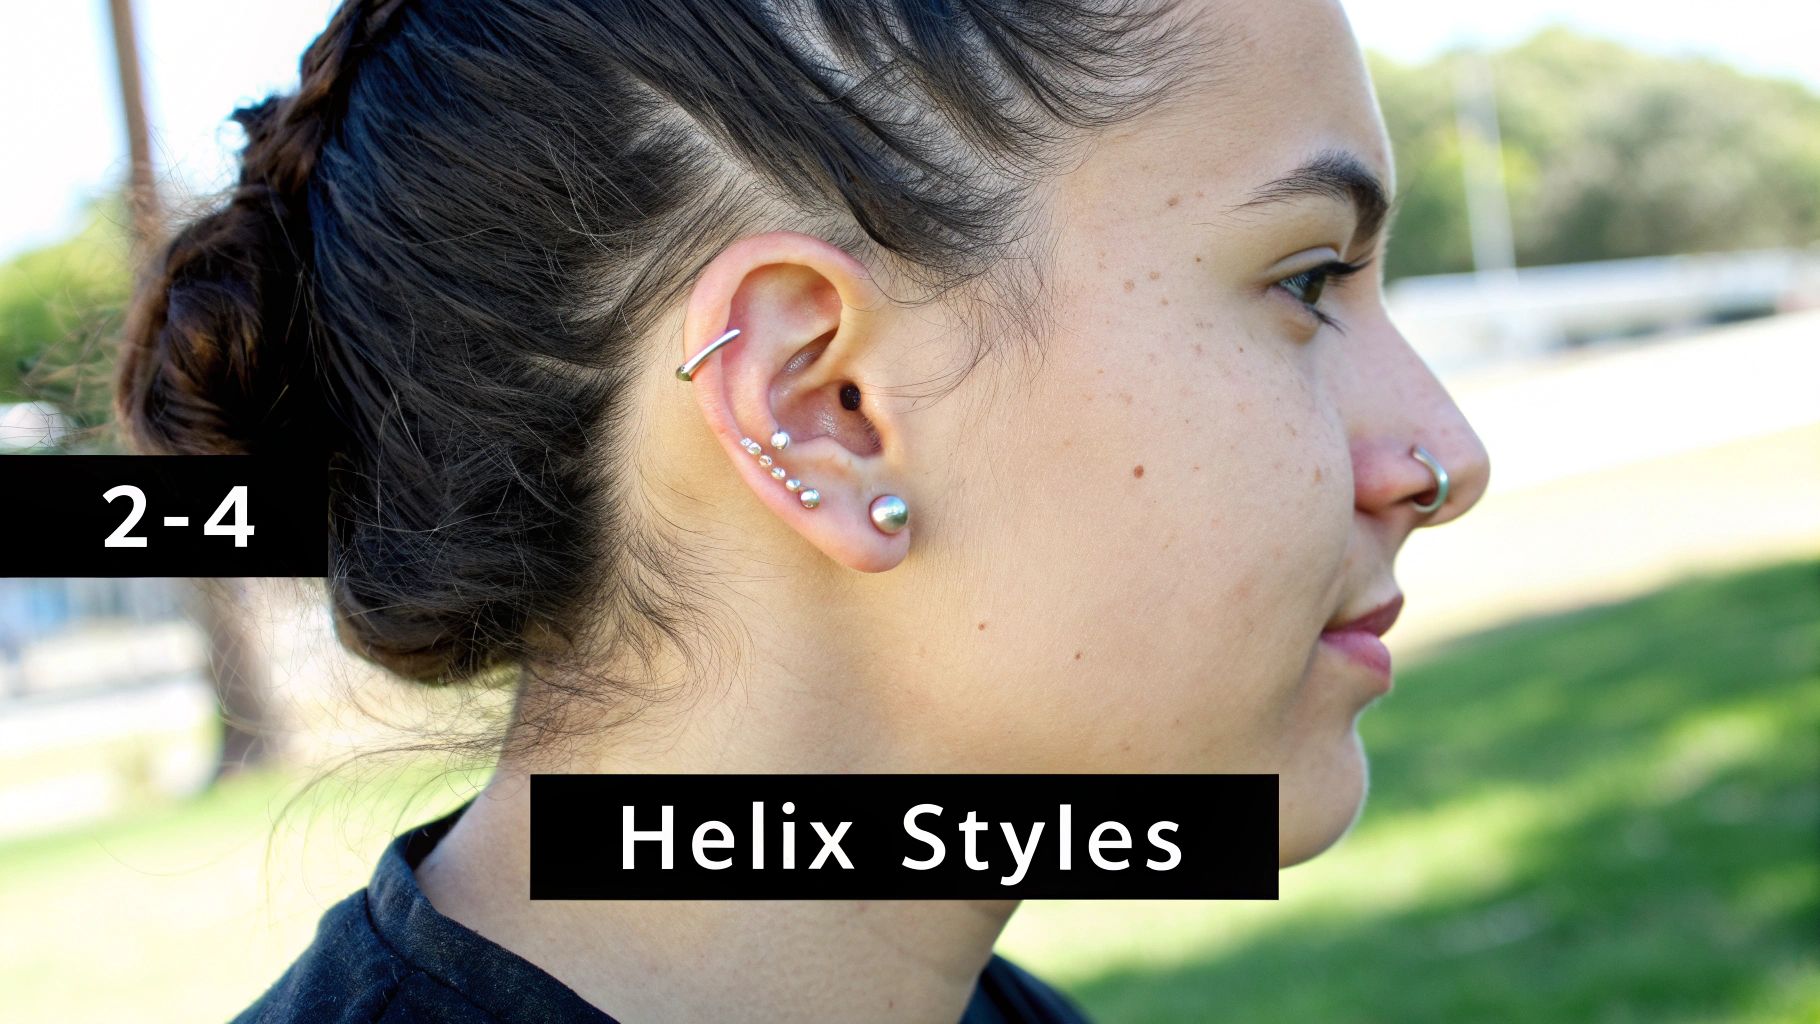
Mastering the Outer Rim: Helix and Forward Helix
When you're ready to jump into the awesome world of different cartilage piercings, the helix is usually the first stop. And for good reason! This piercing is the ultimate classic, sitting right on the upper cartilage rim of your ear. It’s like the perfect pair of jeans for your ear curation—it goes with everything and never, ever goes out of style.
The helix is just so versatile. You can rock a single, delicate stud for a minimalist vibe, or you can go all out with a double or even a triple helix piercing to create a stunning constellation. The customization options are pretty much endless, which is why it stays a fan-favorite year after year.
The Classic Helix Piercing
Getting a helix piercing is a pretty straightforward experience. Your piercer will help you pick the perfect spot along that upper curl of cartilage. When it comes to the pain, most people put it at about a 5 out of 10. It's a quick, sharp pinch that’s over in a flash, but it’s definitely a step up from a lobe piercing.
Healing, though, is the real commitment. A helix piercing can take anywhere from 6 to 12 months to fully settle down. During this time, you have to be super gentle with it. That means no sleeping on that side and being extra careful with your hair, hats, and headphones.
Pro Tip: One of the biggest headaches with a new helix piercing is the dreaded "hair snag." Seriously, it’s the worst. Try keeping your hair tied back during the first few weeks of healing to avoid irritating it and causing problems down the road.
For your first piece of jewelry, your piercer will almost certainly use a flat-back labret stud. This style is great because it minimizes movement and the back won't poke you, which is a total lifesaver when you’re trying to sleep. Once it's all healed up, you can swap it out for a chic hoop or a sparkly captive bead ring to really show off your style.
Its Edgy Cousin: The Forward Helix
Alright, let's talk about the helix's cool, edgy cousin: the forward helix. This piercing is placed on the front rim of your ear, right above the tragus where the top of your ear curves in to meet your face. It’s a bit more unique and gives you a fantastic opportunity for a delicate, curated look.
Because the cartilage here is a little thicker and the space is tighter, the forward helix can be a bit more of a challenge to pierce and heal.
- Pain Level: You can expect this one to be a bit spicier, usually landing around a 6 or 7 out of 10 on the pain scale. The sharp feeling is quick, but the area might feel tender and throb for a bit afterward.
- Healing Time: Just like the standard helix, you’re looking at a 6 to 12-month healing period. This spot can be prone to swelling, so being on top of your aftercare is absolutely non-negotiable.
- Jewelry Style: Tiny jewelry is the name of the game here! Small, decorative flat-back studs are perfect. Once healed, you can play around with tiny seamless rings for a snug, fitted look that really hugs the cartilage.
Double and triple forward helix piercings are also super popular, creating a stunning ladder effect up the front of your ear. But, it's really important that you have the right anatomy for this. A professional piercer needs to check out the fold of your ear to make sure there's enough room to safely place the jewelry. To get the full scoop on this placement, you can explore our complete guide to the forward helix piercing.
Whether you go for the timeless helix or the trendy forward helix, both placements are an incredible way to kick off or expand your ear curation project. They offer a fantastic canvas for expressing your personal style, from subtle and sweet to bold and beautiful.
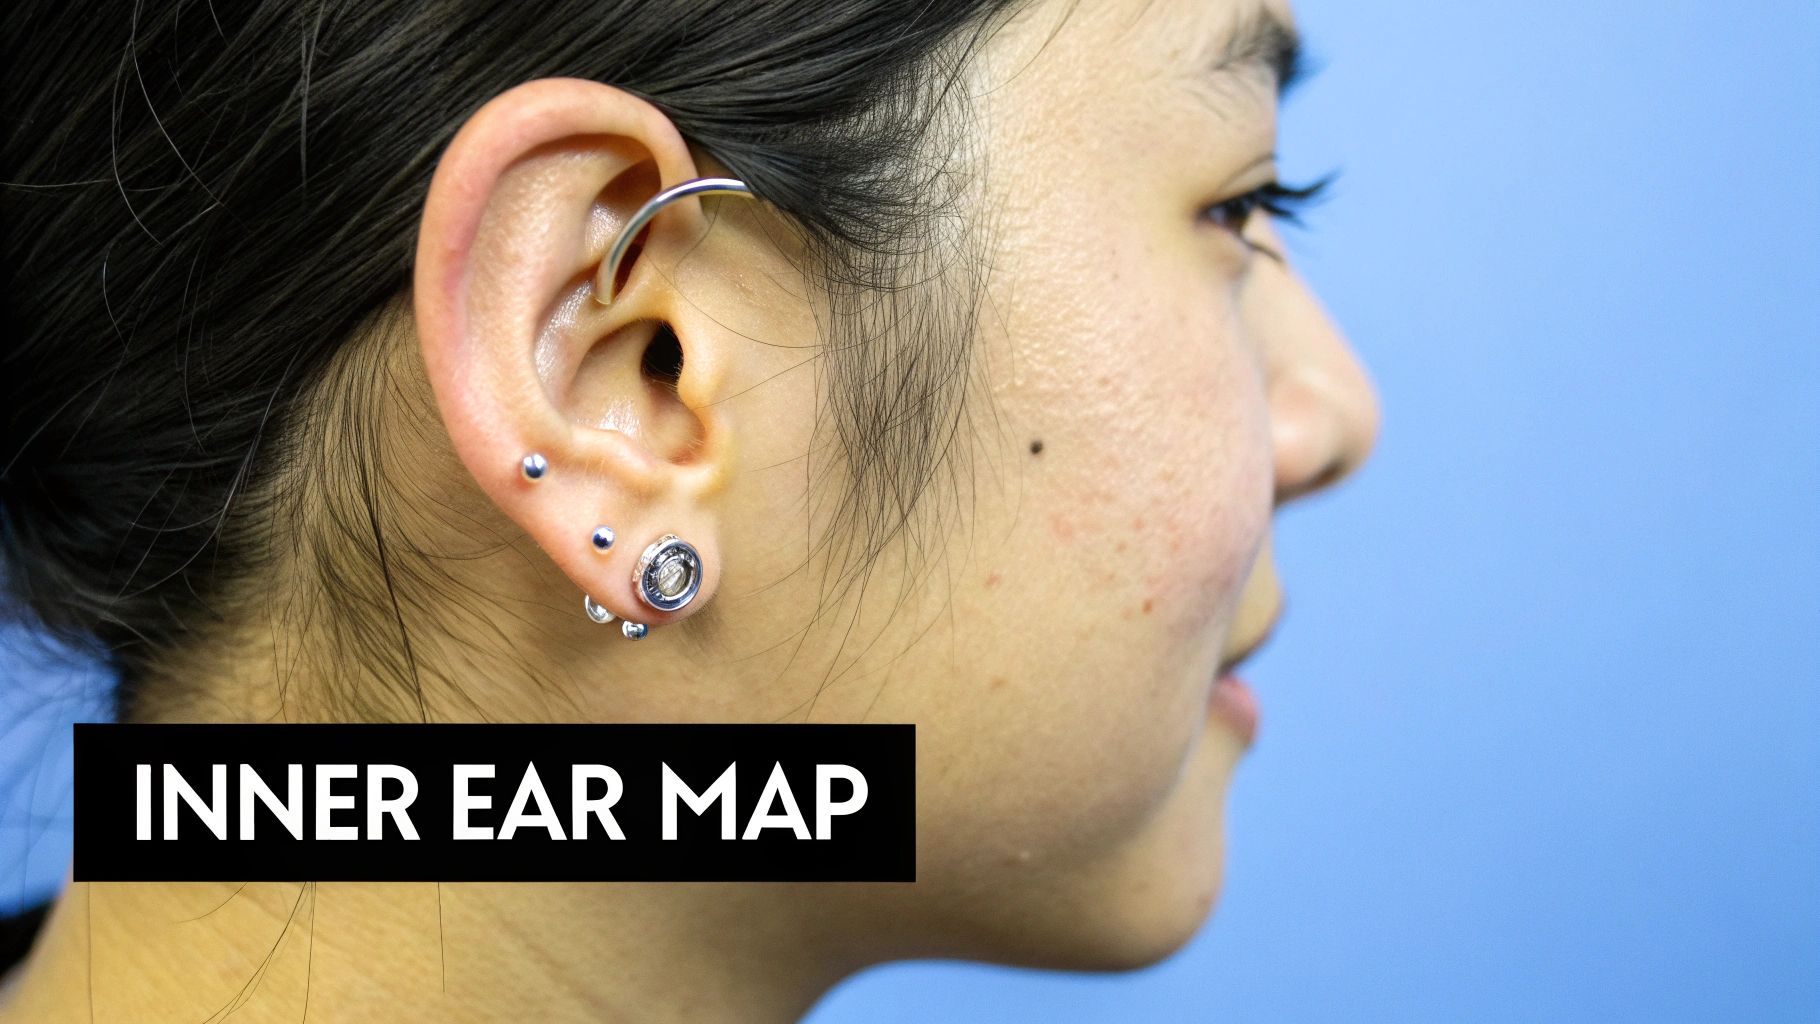
Exploring the Inner Ear: Rook, Daith, Conch, and Tragus
Ready to dive deeper into the unique landscape of your inner ear? This is where your personal style truly gets to shine with placements that are a bit more tucked away and totally stunning. We're moving beyond the outer rim to explore four incredible piercings, each with its own special vibe: the rook, daith, conch, and tragus.
These placements are perfect for adding depth and dimension to your curated ear. Think of them as the hidden gems of your collection—they draw the eye inward and create a beautifully complex look. Let's get into the details of what makes each of these inner ear piercings so awesome.
The Bold and Tucked-Away Rook Piercing
The rook piercing is a true showstopper for those who love a subtle yet edgy look. It’s pierced vertically through the antihelix, which is that upper fold of cartilage right inside the main ridge of your ear. When you look at your ear, it’s the little shelf of cartilage just above the daith.
Because it goes through a pretty thick chunk of cartilage, the rook has a reputation for being one of the more intense piercings. Most people rate the pain at a solid 7 or 8 out of 10. It's a quick but very noticeable pressure and pinch.
Healing a rook requires patience, typically taking 9 to 12 months or even longer. This spot is a bit protected, which is great for avoiding snags, but it's also prone to swelling. You'll need to be extra careful not to sleep on it and keep your aftercare routine consistent.
- Best Jewelry: A curved barbell is the go-to starter jewelry for a rook. This shape follows the natural curve of the cartilage and helps minimize irritation during healing. Once it's fully healed, you can switch to a cute, snug hoop for a different look.
- Anatomy Check: Not everyone's ear has a prominent enough ridge for a rook piercing. A good piercer will check your anatomy first to make sure this piercing is a safe and viable option for you.
The Snug and Mysterious Daith Piercing
The daith has become one of the most talked-about different cartilage piercings, and for good reason. This piercing goes through the crus of the helix—the innermost fold of cartilage right above your ear canal. It’s super snug and looks incredible with a fitted ring.
Pain-wise, the daith is often compared to the rook, landing around a 6 or 7 out of 10. The process involves a unique pressure sensation because of its location, but it's over in a moment.
One of the most interesting things about the daith is its rumored connection to migraine relief. While the science isn't conclusive, some people swear by it. We actually dive deep into this topic, and you can read more about whether the daith piercing can really help with migraines in our full breakdown.
The daith has a long healing journey, usually 9 to 12 months, and can be tricky to clean due to its tight spot. The biggest challenge? You'll have to say goodbye to earbuds for a while, as they can put pressure on the piercing and introduce bacteria. Over-the-ear headphones are your new best friend during healing.
Daith Healing Tip: To clean your daith effectively, try soaking a sterile non-woven gauze pad in saline solution and gently holding it against the piercing for a few minutes. This helps loosen any crusties without having to move the jewelry around.
The Statement-Making Conch Piercing
If you want a piercing that truly makes a statement, look no further than the conch. Named after the conch shell it resembles, this piercing sits in the "bowl" of your ear. You have two options here: the inner conch (in the cup part) or the outer conch (on the flat part between the helix and antihelix).
The conch goes through a fairly thick piece of cartilage, so the pain is typically rated around a 6 or 7 out of 10. The healing process is a long haul, usually taking 6 to 12 months, and sometimes even longer to feel fully settled.
The biggest pro of a conch piercing is its versatility. You can start with a simple flat-back labret stud, which sits flush and is super comfortable. Once it's completely healed, you can swap it for a large, dramatic hoop that wraps all the way around the outside of your ear for an "orbital" look that is absolutely breathtaking.
The Chic and Dainty Tragus Piercing
Last but certainly not least is the tragus piercing, a timeless and delicate choice. The tragus is that little nub of cartilage that sits right in front of your ear canal. It’s a super popular spot because it’s both subtle and incredibly chic.
For most people, the tragus is one of the less painful cartilage piercings, usually ranking about a 5 out of 10. It's a quick pop, and then it's done.
Healing a tragus takes about 6 to 12 months, and just like the daith, it has a complicated relationship with earbuds. Wearing them can be uncomfortable and potentially irritating during the healing phase. You’ll need to be mindful of this and perhaps switch to over-the-ear headphones to avoid any issues.
- Jewelry Options: Small, delicate jewelry is key for the tragus. Flat-back labret studs are the best for initial healing because they are secure and comfortable.
- Healing Challenges: Besides earbuds, the biggest thing to watch out for is keeping your phone, pillowcases, and hands clean to avoid introducing bacteria to such a central spot.
Choosing an inner ear piercing opens up a whole new world of styling possibilities. Whether you go for the bold conch or the tucked-away rook, these placements are guaranteed to add a unique and personal touch to your ear curation project.
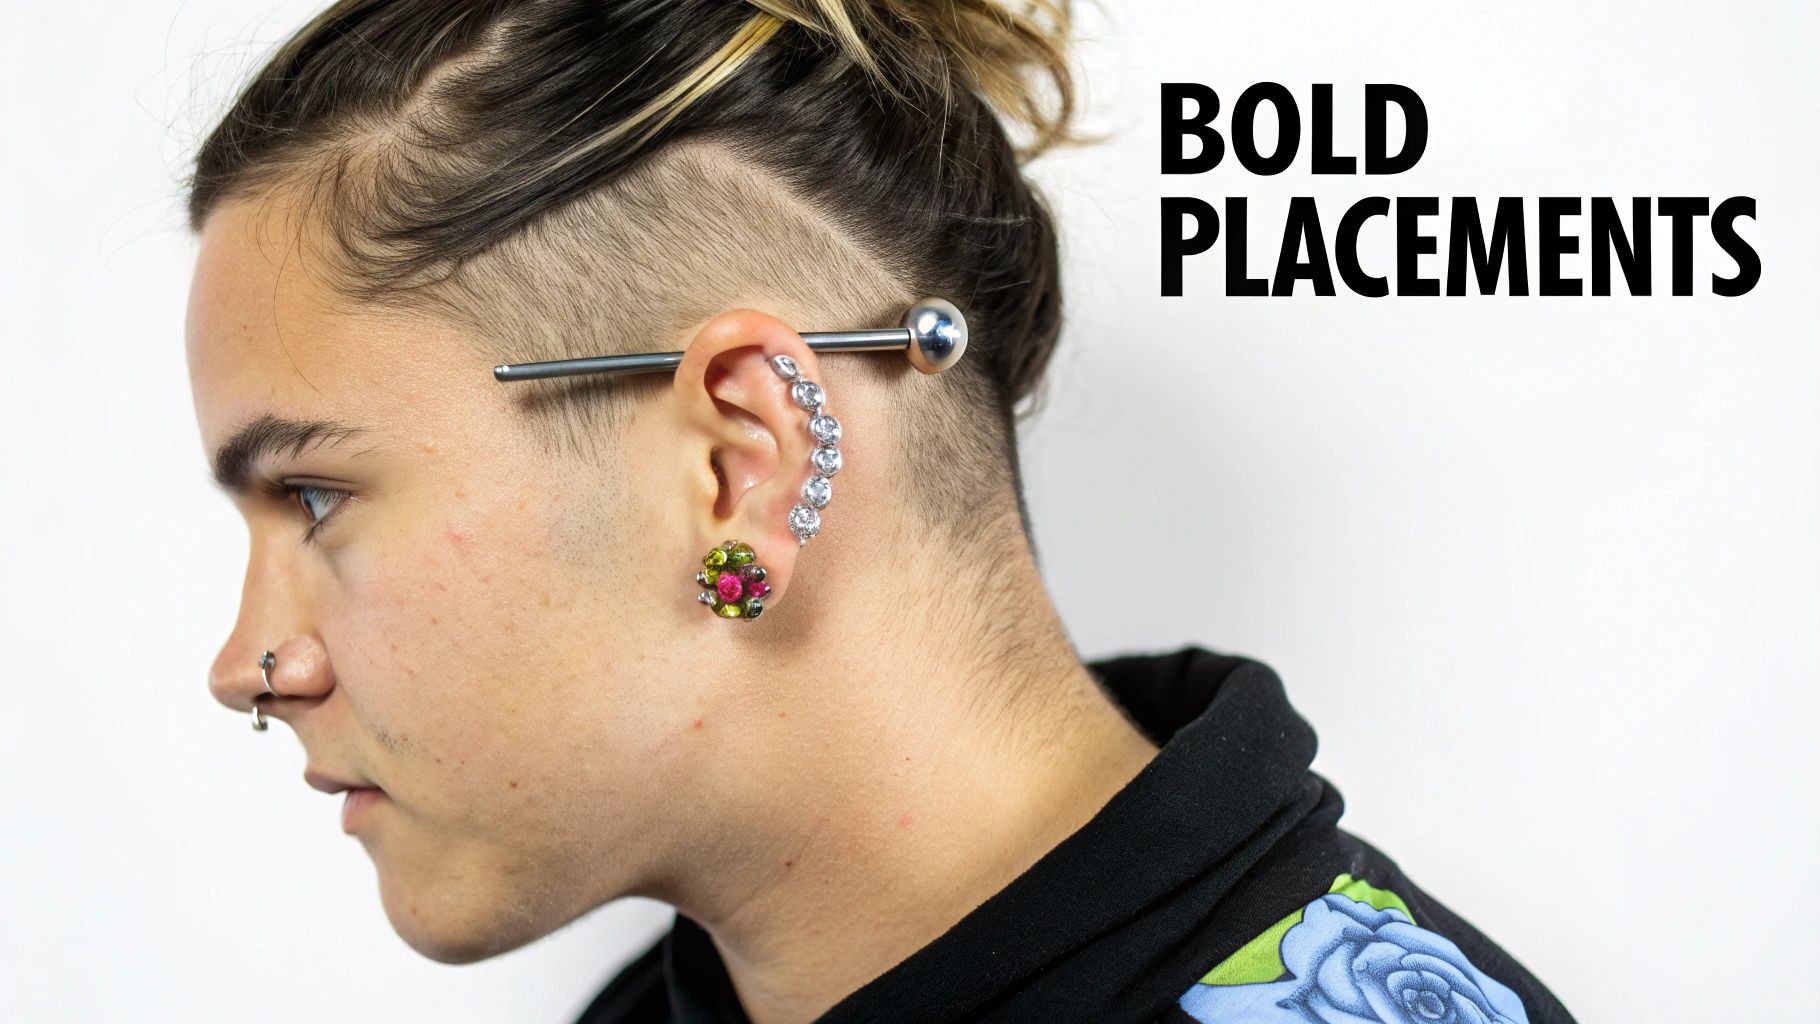
Showstopping Placements for the Bold
Ready to go big? If you're looking to make a serious statement and turn some heads, it's time to explore the more advanced cartilage piercings. These aren't your run-of-the-mill placements; they're for the confident and the committed, offering a unique look that sets you apart from the crowd. Let's dive into the piercings guaranteed to make an impact.
First up is the undisputed king of statement piercings: the industrial. This isn't just one piercing; it's two for the price of one. It connects two separate holes in your upper cartilage—usually a forward-helix and a standard helix—with a single, striking barbell. It’s an unforgettable, architectural look that just screams confidence.
But here's the deal: the industrial is one of the most anatomy-dependent piercings out there. You absolutely need a well-defined outer cartilage rim with enough of a curve to support the barbell without it pressing into the flat of your ear. This is non-negotiable, and any good piercer will be honest about whether your ear shape can safely rock it.
The Iconic Industrial Piercing
Because you’re healing two piercings at once, the industrial demands extra attention and a much longer healing time, typically 9 to 12 months or even more. The pain is also a bit more intense, usually ranking as a 7 or 8 out of 10 since you’re getting two pokes in one sitting.
Here’s what you need to know before you commit:
- Aftercare is Crucial: You'll have to be super diligent about cleaning both piercing sites and avoid sleeping on that side at all costs. Any pressure can mess with the angle of the piercings, leading to nasty irritation bumps and major healing problems.
- Jewelry Matters: You’ll start with a long, straight industrial barbell. We've got an incredible collection of industrial barbells at Bodycandy that let you show off your personality, from simple titanium to jeweled showstoppers.
Expert Tip: Finding a highly experienced piercer is absolutely essential for an industrial. They have to perfectly align both holes so the barbell sits straight without putting any tension on the cartilage. A poorly placed industrial is a recipe for disaster.
Other Unique and Daring Piercings
Beyond the industrial, a few other placements are reserved for the truly dedicated. You don't see these as often, which honestly just makes them cooler. They require very specific anatomy and a serious commitment to aftercare.
The fascination with unique body art like these piercings is part of a huge trend. In fact, the global body piercing jewelry market is exploding, projected to hit around $13 billion by 2032. This boom is powered by individuals like you who see piercings as a powerful form of self-expression. You can learn more about the growth of the body piercing market and see just how popular this art form has become.
Let's break down two more advanced options that really stand out:
- The Snug Piercing: This is a horizontal piercing through the anti-helix, which is that inner ridge of cartilage running parallel to your outer rim. It creates a "bar" of jewelry that sits, well, snugly in the middle of your ear. It’s notoriously tricky to heal and packs a punch on the pain scale—think an 8 or 9 out of 10—due to the super thick cartilage.
- The Anti-Tragus Piercing: Located on the little nub of cartilage just above your earlobe and opposite your tragus, this piercing is another one that completely depends on your anatomy. You need a prominent anti-tragus for it to even be possible. Healing can take a while, and your starter jewelry will usually be a small curved barbell or a captive bead ring.
For these bold and beautiful piercings, patience is everything. They are a true commitment, but the payoff is a unique, eye-catching look that really showcases your dedication to the art of ear curation.
Your Essential Aftercare Playbook
You did it! Your new piercing is perfect, and you're probably already obsessed. But now comes the most important part of the journey: keeping it happy and healthy while it heals. Honestly, proper aftercare is the single biggest factor in how your new piercing will turn out, and we’ve got your back.
Think of this as your go-to playbook for a happy, healthy piercing. Forget all the myths you've heard about twisting the jewelry or using harsh alcohols. We're sticking to the simple, piercer-approved methods that actually work. The goal here is to get you healed up beautifully so you can start showing off that amazing Bodycandy jewelry.
Your Simple Step-By-Step Cleaning Routine
At its core, your new piercing is a puncture wound that just needs a gentle, clean environment to heal. The absolute best way to do that is with a sterile saline solution. That’s it! It’s the only thing you should be using to clean your piercing.
Here’s the routine you’ll want to follow twice a day:
- Wash Your Hands: Before you even think about touching your new piercing, wash your hands thoroughly with soap and water. This is a non-negotiable step to keep bacteria far, far away.
- Spray and Soak: Generously spray your sterile saline solution directly onto the front and back of the piercing. For a deeper clean, you can soak a piece of non-woven gauze in the saline and hold it gently against the piercing for a few minutes.
- Gently Pat Dry: Grab a clean paper towel or a fresh piece of non-woven gauze and gently pat the area dry. Definitely avoid using cloth towels, since they can harbor bacteria and snag on your jewelry.
That’s literally all there is to it. No twisting, turning, or fiddling with the jewelry is necessary. Your body knows exactly what to do, and your only job is to keep the area clean and let it work its magic.
The Golden Rule of Aftercare: Less is more. Your body is doing all the heavy lifting to heal the piercing. Your job is simply to provide a clean, irritation-free environment for it to happen. Over-cleaning or using harsh products will only make things worse.
Demystifying Healing Bumps
Sooner or later, you might notice a small, pesky bump forming near your piercing. Don’t panic! This is incredibly common with different cartilage piercings. These are usually just irritation bumps, not infections, and they’re your body’s way of saying something is bothering it.
Common culprits for these bumps include:
- Sleeping on the piercing: This consistent pressure is the number one enemy of a happy cartilage piercing.
- Snagging the jewelry: Catching it on your hair, clothes, or a towel can cause immediate irritation.
- Improper jewelry: Jewelry that's too tight, too loose, or made of a low-quality material can cause all sorts of issues.
- Moisture: Not drying your piercing properly after cleaning or showering can create a breeding ground for bacteria.
If a bump appears, just take a step back and revisit your aftercare routine. Are you keeping it clean and dry? Have you been accidentally sleeping on it? Usually, identifying and removing the source of irritation is all it takes for the bump to go away.
Cartilage Piercing Aftercare Dos and Don'ts
To make things super simple, here’s a quick cheat sheet for keeping your new piercing happy. Stick to the "Do" column and you’ll be golden.
| Do | Don't |
|---|---|
| Clean 2x daily with sterile saline. | Never use alcohol, peroxide, or ointments. |
| Pat dry with a clean paper towel. | Don't twist or turn your jewelry. |
| Use a travel pillow to avoid sleeping on it. | Avoid swimming in pools, lakes, and oceans. |
| Be patient—healing takes a full year or more! | Don't change the jewelry until fully healed. |
Following these simple rules is the key to a smooth, drama-free healing process. For an even more detailed look at aftercare products, you can check out our guide on why H2Ocean aftercare is a piercer favorite and what makes it so effective for new piercings.
Finding Your Perfect Jewelry at Bodycandy
Okay, let's get to the best part of getting any new piercing—the bling! This is where your personality really gets to shine, turning that cool ear curation idea into a stunning reality. But it’s not just about what looks good; picking high-quality, body-safe jewelry is the most important thing you can do for a happy and healthy piercing.
This is where understanding your materials becomes a huge deal. You need jewelry that not only looks amazing but won’t tick off your sensitive new piercing. At Bodycandy, we've got you covered with options that are both safe and stylish, making sure your healing journey is as smooth as possible.
Let’s break down what you should be looking for.
Choosing Your Metal Wisely
The metal your jewelry is made from can literally make or break your healing experience. Seriously. Low-quality metals often contain nickel, which is a super common allergen that can cause redness, itching, and those dreaded irritation bumps. To dodge all that drama, you'll want to stick with body-safe, hypoallergenic options from the get-go.
Here are the top-tier materials you should be hunting for:
- Implant-Grade Titanium: This is the gold standard, especially for initial piercings. It's completely nickel-free, incredibly lightweight, and the same stuff used for medical implants. Your body just gets along with it, which means a way lower chance of a bad reaction.
- 316L Surgical Steel: A classic for a reason! This durable choice is a fantastic option for lots of people, especially once their piercing is fully healed. We have tons of amazing 316L surgical steel cartilage earrings that are both affordable and ridiculously stylish.
Bodycandy Tip: For a brand-new piercing or if you know you have sensitive skin, always, always start with implant-grade titanium. Once you're fully healed up, you can dive into the wider world of materials like 316L surgical steel and really grow your collection.
Decoding Jewelry Sizing
Ever see terms like "16g" or "8mm" and feel like you're trying to crack a code? Don't worry, you're not alone. Understanding jewelry sizing is actually pretty simple once you know the lingo, and it’s critical for finding a comfortable, perfect fit.
There are two key measurements you need to get familiar with:
- Gauge (g): This is all about the thickness of the post that goes through your piercing. For most cartilage piercings like the helix, tragus, and conch, 16g is the standard size.
- Length/Diameter: This one depends on the style. For studs, it’s the length of the post in millimeters (mm). For hoops, it's the internal diameter. The right length is what keeps your jewelry from being too tight (ouch!) or too loose.
Your piercer will start you off with a slightly longer post to make room for that initial swelling—totally normal! Once the swelling has chilled out, you'll go back to get it "downsized" to a snugger, more permanent fit. Nailing your perfect size opens up a universe of options, from stunning flat-back labret studs to gorgeous hoops that complete your entire look.
Your Cartilage Piercing Questions Answered
Still have a few questions buzzing around in your head? You're definitely not alone! We get asked about the ins and outs of getting new cartilage piercings all the time.
To help you feel totally confident and ready for your appointment, we’ve put together a quick rundown of the most common questions our customers ask. Think of this as your final checklist before taking the plunge.
How Much Will My Cartilage Piercing Cost?
This is a big one, and the honest answer is: it varies. The price tag is really a combination of two things: the piercer's fee for their time and skill, and the cost of the starter jewelry itself. It makes sense that a highly experienced piercer in a big city will charge more than someone in a smaller town.
As a general ballpark, you can expect the piercing fee to land somewhere between $40 to $80+. The initial implant-grade titanium jewelry will likely add another $30 to $50+ on top of that.
Can I Get Multiple Piercings In One Session?
While the dream of walking out with a fully curated ear is tempting, patience is your best friend here. Most professional piercers will strongly recommend getting no more than 2-3 piercings in a single sitting.
Remember, your body has to work hard to heal each new piercing. Overloading it with too many at once can seriously overwhelm your immune system and make the healing process a lot tougher for all of them.
Pro Tip: If you do decide to get a couple of piercings at once, try to stick to just one ear! This is a game-changer because it leaves you with a comfortable side to sleep on, which is absolutely critical for a smooth healing journey and avoiding those dreaded irritation bumps.
When Can I Finally Change My Jewelry?
Ugh, the wait can feel like an eternity, we know! But swapping out that starter jewelry too soon is a recipe for disaster. A fresh piercing is a puncture wound, and it needs a full 6 to 12 months (sometimes even longer!) to completely heal from the inside out.
Your piercer will have you come back for a "downsize" appointment, usually around the 4-8 week mark, once the initial swelling has subsided. They'll swap the long starter post for a shorter one to prevent snagging. But changing it just for fun and fashion? You'll want to wait until it's 100% healed to avoid causing trauma and major healing setbacks.
What Is The Least Painful Cartilage Piercing?
Pain is totally subjective, but there's a general consensus in the piercing world. Piercings that go through thinner, softer bits of cartilage tend to be less intense. For most people, a standard helix or a tragus piercing ranks lower on the pain scale, often feeling like a quick, sharp pinch that's over in a second.
On the flip side, piercings that have to go through thick, dense cartilage—like a rook or a conch—are usually reported as being more painful. This is simply because more pressure is needed to get the needle through that tougher tissue.
Ready to bring your dream ear curation to life? From classic helix studs to bold industrial barbells, Bodycandy has the perfect high-quality jewelry to complete your look. Shop our full collection of cartilage earrings today!


