So, you took the plunge and got that super cool daith piercing you've been dreaming about! Welcome to the club. Just a heads-up: the daith piercing healing journey is a bit of a marathon, not a sprint. You're looking at a full 6 to 12 months for it to completely heal, mostly because of its unique spot in that thick fold of cartilage.
Your Daith Healing Journey Begins
Alright, let's get into what happens next. Getting pierced is the exciting part, but the real work starts now! For the next several months, think of it as a partnership between you and your new piercing. Its awesome spot, tucked away inside your ear, is what makes it look so amazing, but it also makes the healing process a little tricky.
Unlike a lobe piercing that heals up in a flash, cartilage doesn't get a ton of blood flow. This just means the whole process is slower and requires a big dose of patience from you.
Nailing your aftercare from the very beginning sets you up for a smooth ride. Those first few weeks are the most critical. You’ll definitely notice some swelling, redness, and tenderness—this is totally normal! It's just your body doing its thing, sending healing cells to the area to start building new tissue. The key is to not freak out and to lock down a simple, consistent aftercare routine.
What to Expect Right Away
This initial phase is all about being gentle and just letting your body adapt. This isn't the time to be twisting your new jewelry or trying out a bunch of different cleaning products. When it comes to a happy, healing piercing, less is definitely more.
Your piercer gave you a specific piece of starter jewelry for a reason; it's designed to give swelling some room and help the healing process along. For a peek into what the piercing experience itself is like, you can check out the story of Jen's daith ear cartilage piercing to see how it all goes down.
To kickstart your daith piercing healing, just focus on these core pillars:
- Patience is Your Best Friend: Seriously. Don't rush it. Cartilage heals from the outside in, so it might look fine long before it's truly stable on the inside.
- A Simple Cleaning Routine: All you really need is a sterile saline solution. Over-cleaning or using harsh chemicals will only irritate your piercing and drag things out.
- Hands Off!: Try your best to avoid touching, twisting, or sleeping directly on your new piercing. This is one of the biggest reasons people get those dreaded irritation bumps and healing setbacks.
- Listen to Your Body: Your body will give you signals. If it feels extra sore, looks more swollen, or just feels "off," it's telling you something. Pay attention and adjust your care if you need to.
Think of this guide as your roadmap for the months ahead. We're here to walk you through every stage, from the initial tenderness to the day you can finally swap in some dazzling new Bodycandy jewelry. Let’s get you healed up!
The Complete Daith Healing Timeline
So, you're officially part of the daith club! Welcome. Now comes the part that requires a little (okay, maybe a lot of) patience—the healing process. If you're wondering whether that bit of redness is normal or if your healing is on track, don't sweat it. We've got you.
Healing a daith piercing is a journey with a few distinct stages. Knowing what to expect makes the whole process way less stressful and helps you understand when your body is just doing its thing. Let's break down what's happening inside that cool little fold of your cartilage, month by month.
This timeline gives a great bird's-eye view of your daith's healing journey, from the day you get it pierced to when it's fully healed and ready for some new bling.
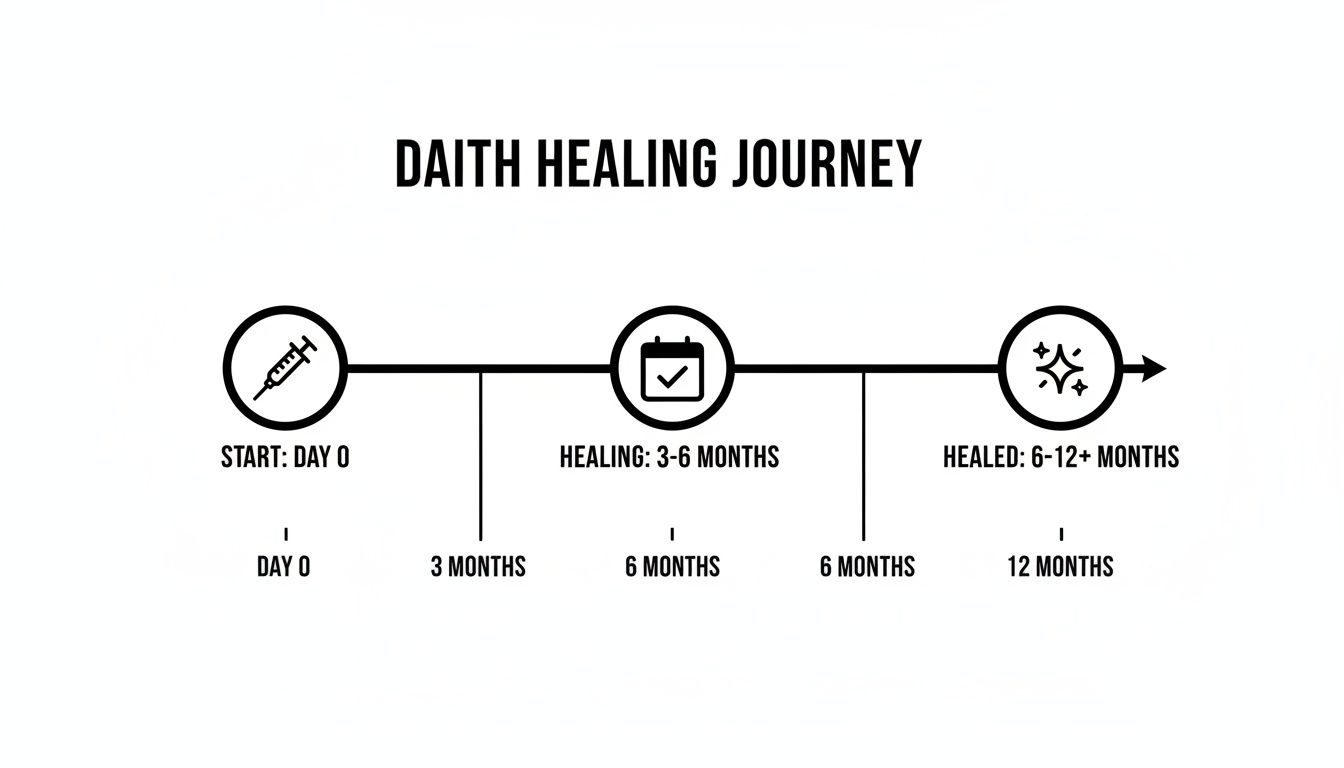
As you can see, the path to a fully healed daith is a long-term commitment. The most important internal healing happens long after the initial soreness has faded.
Daith Piercing Healing Stages at a Glance
This table breaks down what to expect during each phase of your daith's healing journey. It's a quick reference for the typical symptoms you'll see and what your main focus should be.
| Healing Stage | Typical Timeline | What You'll See and Feel | Main Aftercare Focus |
|---|---|---|---|
| Initial Stage | Weeks 1-4 | Redness, swelling, mild tenderness, clear/yellowish "crusties." | Gentle, consistent cleaning. Avoid all touching and pressure. |
| Healing Stage | Months 2-6 | Looks and feels better, but still healing internally. Occasional flare-ups. | Don't stop your aftercare! Avoid changing jewelry. Stay patient. |
| Maturation Stage | Months 6-12+ | No pain, swelling, or discharge. Jewelry moves freely. Fully healed fistula. | Continue good hygiene. Safe to consider changing your jewelry. |
Remember, this is a general guide. Your personal healing journey might be a little different, and that’s perfectly fine!
Phase 1: The Initial Stage (Weeks 1-4)
Think of this as the "getting acquainted" phase. Your body has just met your new jewelry and is kicking its healing response into high gear. During these first few weeks, it's completely normal to experience a few key signs.
You'll almost certainly see:
- Redness and Swelling: This is the most common reaction. Your ear might look a bit puffy and feel warm to the touch.
- Mild Tenderness: It’s a fresh wound, after all! Expect it to be sore, especially if it gets accidentally bumped.
- Clear or Yellowish Crusties: Don't panic, this isn't pus! It's just lymph fluid, a totally normal part of the process that dries around the jewelry.
Your main job right now is to be incredibly gentle. Stick to your aftercare routine like glue (we’ll dive into that next), avoid touching the piercing, and whatever you do, don't sleep on it.
Phase 2: The Long Haul (Months 2-6)
Welcome to the trickiest part of the healing timeline. During this period, your piercing might start to look and feel a whole lot better. The initial swelling and tenderness will likely have calmed down, and you’ll be tempted to think you're all healed up.
Spoiler alert: you're not!
This is where the real work is happening on the inside. Your body is busy building a new channel of skin, called a fistula, all the way through the cartilage. It’s a slow and steady process that you can't see from the outside.
Healer's Tip: Don't get fooled by a good-looking piercing at the three-month mark. This is when so many people slack on aftercare or try to change their jewelry way too soon, which can lead to major setbacks like nasty irritation bumps. Stay consistent!
During this phase, you might still get occasional flare-ups where it feels a little tender or produces more crusties, especially if it gets snagged or you accidentally sleep on it. This is normal. Just get back to your strict aftercare routine for a few days until it calms down.
Phase 3: The Maturation Stage (Months 6-12+)
You've made it to the final stretch! During these last few months, that fistula your body has been working so hard on is finally strengthening and maturing. The new tissue is becoming more robust and stable.
By this point, all those initial symptoms should be a distant memory. Your piercing should feel completely normal, with no pain, swelling, or discharge. The jewelry might even move a bit more freely (but still, no unnecessary twisting!). It’s only when you reach this fully healed stage that it's safe to start dreaming about swapping your initial jewelry for something new.
Daith piercings are notorious for their marathon healing times, typically taking anywhere from 6 to 12 months. This long timeline is because cartilage is dense tissue with limited blood flow, which slows down cellular repair compared to something like an earlobe. In fact, data from piercing communities shows that around 70% of daith wearers are fully healed by the 9-month mark, but only if they successfully avoid common mistakes like sleeping on the piercing.
To learn more about what to expect with different placements, check out our guide on healing times for popular piercings.
Ultimately, everyone's body is different. Your personal timeline might vary, and the key is to listen to your body, stick with your aftercare, and give your awesome new daith all the time it needs to heal beautifully.
A Simple Daily Aftercare Routine
So, you've got your awesome new daith piercing. Now what? Let's talk about the day-to-day care that’s going to make or break your healing journey. The absolute golden rule for daith piercing healing is simple: less is more. Seriously. Trying to do too much—over-cleaning, messing with it, using harsh chemicals—is the fastest way to an angry, irritated piercing.
Think of your job as creating a clean, safe space for your body to work its magic. You're just there to gently clear away the debris, not to scrub it into submission. Your body handles the heavy lifting of healing all on its own.
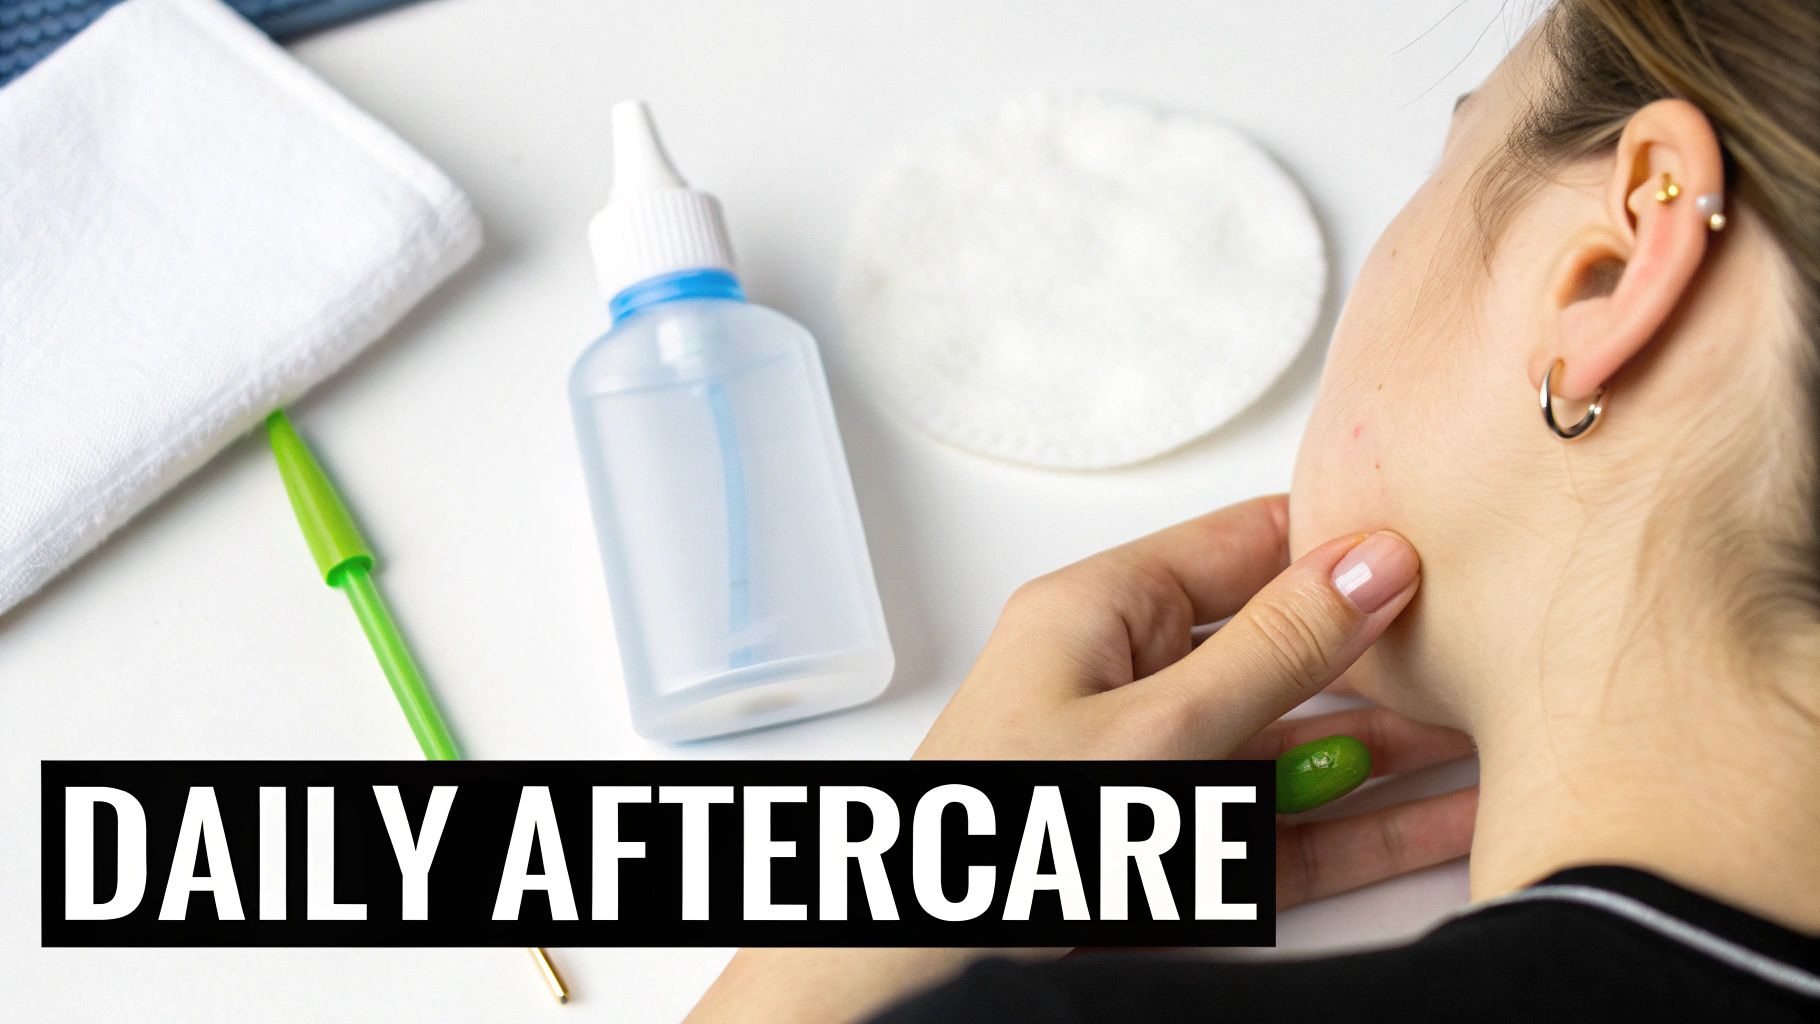
Your New Best Friend: Sterile Saline Solution
First things first: forget everything you’ve heard about using rubbing alcohol, hydrogen peroxide, or antibacterial soaps on a new piercing. Those products are way too aggressive for healing skin. They'll just cause irritation, dryness, and actually slow down the whole process.
The only thing you need is a sterile saline solution. You can grab this at any pharmacy, often labeled as "wound wash." Check the ingredients—it should only list sterile water and sodium chloride. That's it. No weird additives or preservatives.
Here’s the ridiculously simple routine:
- Wash your hands! Never touch your piercing or the area around it without scrubbing your hands with soap and water first.
- Spray it down. Give the front and back of your daith piercing a good misting with the saline spray. Let it sit for 30-60 seconds to soften up any "crusties" (that dried fluid that's totally normal).
- Gently pat dry. Use a fresh piece of non-woven gauze or a paper towel to very gently pat the area dry. Steer clear of cotton balls and Q-tips—their little fibers love to get tangled in jewelry and cause a world of trouble. A hairdryer on the cool setting, held at a distance, also works great.
That’s all there is to it. Do this just twice a day, once in the morning and once at night. Any more than that and you risk drying out your skin, which leads to... you guessed it, more irritation.
Navigating Real-World Challenges
Cleaning is one piece of the puzzle, but what about the other 23 hours of the day? A daith's cozy spot inside your ear means you have to be a little more mindful of some everyday stuff.
Showering Smartly
Hopping in the shower is perfectly fine, and the warm water can feel really nice on a new piercing. Just let the water run over it indirectly—don't aim the showerhead right at it like a firehose.
When you’re washing your hair, try to tilt your head so shampoo and conditioner don't run directly into the piercing. After you're all done, give it a quick spray with your saline and make sure you pat it completely dry. Trapped moisture is a recipe for bacterial issues.
The Art of Sleeping
This one is a big deal and absolutely non-negotiable: do not sleep on your new daith piercing. The constant pressure is one of the top causes of irritation bumps, migration (when the piercing starts to shift), and a much longer healing time.
Pro Tip: If you're a die-hard side sleeper, a travel pillow is your new hero. Sleep with your ear nestled in the donut hole. This keeps all pressure off the piercing, letting you get your rest without wrecking your daith.
It sounds a bit silly, but this trick can single-handedly save your piercing from a lot of drama.
The Ultimate Hands-Off Policy
We know it's tempting. That shiny new jewelry is just sitting there. But you have to fight the urge to touch, twist, or turn your daith ring. Every time you fiddle with it, you're not only introducing bacteria but also tearing up the delicate new tissue your body is working so hard to build.
Your jewelry isn't going to get stuck, we promise. The fistula (the little tunnel of skin) will form just fine around it. Twisting it just causes trauma and sets you back. The best mantra to adopt is LITHA: "Leave It The Heck Alone."
Here’s a quick list of what to avoid while you're healing:
- Touching, twisting, or playing with your jewelry. Period.
- Using earbuds or headphones that press on the daith. Over-ear headphones that don't touch it are your best bet for now.
- Swimming. Pools, hot tubs, lakes, and oceans are basically bacteria-filled parties you don't want your new piercing attending. Wait until it's fully healed.
- Wearing hats, headbands, or anything else that might snag or put pressure on the area.
- Using harsh cleansers like alcohol, peroxide, or ointments. Stick to saline!
By keeping things simple and being mindful of these potential pitfalls, you're setting yourself up for a smooth and successful daith piercing healing process. A little patience now means you'll have a stunning, healthy piercing to show off for years to come.
How to Choose the Right Initial Jewelry
Picking out your first piece of jewelry for a new daith piercing is a huge deal. It’s not just about what looks cool—it's honestly one of the most critical decisions you'll make for a smooth, drama-free healing journey. The right material and style can be the difference between a happy piercing and months of frustration.
Think of it this way: your body will be in constant contact with this metal for up to a year. You need to choose a material your immune system will just accept and leave alone. This is all about biocompatibility, and it's non-negotiable for a fresh piercing.
The Best Materials for a Fresh Daith
When you're just starting out, not all metals are created equal. Some are notorious for causing allergic reactions and irritation, which can seriously throw your daith piercing healing off track. Let's talk about the absolute best options out there.
Implant-Grade Titanium (ASTM F-136)
This is the undisputed champion, and for good reason. It's the same material used in surgical implants, so you know it’s designed to live inside the human body without causing a fuss.
Titanium is completely nickel-free, super lightweight, and won't tarnish. If your piercer pushes you toward titanium, they know what they're doing. It's the safest bet, especially if you have sensitive skin.
14k or 18k Solid Gold
There's nothing wrong with wanting a little bit of luxury from day one! Solid gold is a fantastic, biocompatible option. The key word here is solid. Never, ever start with gold-plated jewelry. The plating can chip away, exposing whatever mystery metal is underneath and leading to a world of irritation.
Stick to 14k or 18k gold that's specifically alloyed to be nickel-free. Be extra cautious with white gold, as it often contains nickel, so always confirm the specific alloy with your piercer before you commit.
Heads Up! Steer clear of surgical steel for a fresh daith. While it's a common material, many grades contain enough nickel to trigger a reaction in a sensitive, healing piercing. It's usually a safer choice after you're fully healed. Also, put sterling silver on the "no" list—it tarnishes, and that tarnish can permanently stain your skin.
Starter Jewelry Styles Compared
The unique, tucked-away anatomy of the daith means some jewelry styles are just better suited for healing. Your piercer is the expert here and will help you choose the best fit for your ear, but you'll most likely be choosing between a ring or a curved barbell.
| Jewelry Style | Pros | Cons |
|---|---|---|
| Captive Bead Ring (CBR) or Seam Ring | Leaves plenty of room for swelling and is easy to clean all the way around. Less likely to snag on hair or clothes. | The bead or seam can sometimes rotate into the piercing channel itself, which can cause irritation. |
| Curved Barbell | Stays pretty stationary, which is great for minimizing movement and irritation during those early weeks. | Can be a bit trickier to clean thoroughly around the entry and exit holes. Might not be a comfortable fit for every daith. |
No matter which style you choose, your piercer will select a piece that's slightly larger in diameter or length than what you'll wear once you're healed. This extra space is essential to accommodate initial swelling. Don't worry—this isn't your forever size!
When to Downsize Your Jewelry
After about 4 to 8 weeks, you'll notice that initial swelling has gone down quite a bit. Your starter jewelry might suddenly look a little too big and feel like it's moving around more than it did at first. That's your cue to schedule a check-in with your piercer for a "downsize."
Downsizing is just swapping out that initial, longer jewelry for a more snug-fitting piece. This step is super important! Properly fitted jewelry is far less likely to get caught on things, shift around, or cause those dreaded irritation bumps. It really helps the rest of your healing journey go much more smoothly. Please, never try to do this yourself—always let a pro handle it.
Troubleshooting Common Healing Problems
Even when you follow your aftercare instructions to the letter, the daith piercing healing process can sometimes throw you a curveball. First thing's first: don't panic! Most issues are just minor flare-ups that you can manage with a bit of extra care and a whole lot of patience.
Think of this as your first-aid guide for an angry daith. Knowing the difference between "normal healing weirdness" and a genuine problem is the key to keeping your stress levels down and your piercing happy.

Normal Irritation vs. Actual Infection
Let's clear this up right away. It’s super easy to mistake a cranky piercing for an infected one, but the signs are actually quite different once you know what to look for.
Normal irritation is just your piercing’s way of saying, "Hey, something bothered me!" It’s usually temporary and you can often trace it back to a specific cause, like accidentally snagging your jewelry or rolling over in your sleep.
Signs of Irritation:
- Localized Redness: The skin right around the piercing might look a bit pink or red.
- Mild Swelling: A little puffiness that might come and go throughout the day.
- Clear or White Fluid: You might see some clearish fluid or those normal yellowish "crusties."
- Tenderness: It could be sore to the touch, but the pain isn't throbbing or spreading.
An infection, on the other hand, is a much bigger deal. This is a bacterial issue, and it will not clear up on its own—it requires a trip to the doctor.
Signs of Infection:
- Intense, Spreading Redness: The redness goes far beyond the immediate piercing site.
- Significant Swelling: Your ear feels hot to the touch and is visibly swollen.
- Thick, Opaque Discharge: You'll see green or dark yellow pus, which is often smelly.
- Throbbing Pain: The pain is persistent, severe, and doesn't get better. You might even feel feverish or generally unwell.
Crucial Takeaway: If you suspect an infection, do not take the jewelry out. Removing it can trap the infection inside, leading to a much more serious abscess. See a doctor right away for a proper diagnosis and antibiotics.
The Infamous Piercing Bump
Ah, the dreaded piercing bump. If you've spent any time on piercing forums, you've definitely seen them. These little bumps are incredibly common with cartilage piercings, and the daith is no exception. Let's be clear: they are almost always a sign of irritation, not infection.
There are two main types you might run into:
- Irritation Bumps (Granulomas): These are the most common. They look like small, reddish pimples right next to the piercing hole. They're basically just trapped fluid—your body's dramatic healing response to something that's constantly bothering it.
- Keloids: This is a type of raised scar tissue that grows well beyond the original wound. Keloids are genetic and are much, much rarer than simple irritation bumps. If you or your close family members have a history of keloids, you should definitely discuss this with your piercer beforehand.
So what's the number one cause of those annoying bumps? You guessed it—irritation! Things like sleeping on the piercing, using harsh chemicals, snagging the jewelry, or wearing cheap, low-quality metal are the usual suspects.
How to Calm Down an Angry Bump
The secret to getting rid of an irritation bump is deceptively simple: remove the source of irritation and be patient. Seriously, that's it. There are no magic overnight cures.
Please, do not use harsh products like tea tree oil, aspirin paste, or alcohol. These will only dry out and further irritate the delicate new tissue, which just makes the problem worse.
Instead, go back to basics with a gentle, consistent approach:
- Stick to Saline: Recommit to your strict twice-a-day sterile saline soaks. This is the only thing you should be cleaning your piercing with.
- Hands Off: Be extra vigilant about not touching, twisting, or sleeping on your piercing. That travel pillow is your best friend right now!
- Check Your Jewelry: Is your jewelry implant-grade titanium? Is it the right size and style for a healing daith? Sometimes, a quick trip back to your piercer for a jewelry check-up can make all the difference. For instance, if you have a ring with a seam, that seam rotating into the piercing channel could be the culprit.
- Give It Time: Bumps don't pop up overnight, and they won't disappear overnight either. With consistent, gentle care, they will slowly shrink and fade away. This could take a few weeks or even a couple of months, so hang in there.
If the bump doesn't start to improve or gets worse after a few weeks of diligent care, book a follow-up with your professional piercer. They've seen it all and are your absolute best resource for troubleshooting your unique daith piercing healing journey.
Your Daith Healing Questions Answered
So, you've got your gorgeous new daith piercing, and now the questions are starting to pop up. Can I use my earbuds? When can I finally swap out this jewelry? Don't worry, we've heard them all before.
Let's clear the air and bust some common myths so you can navigate the rest of your daith piercing healing journey like a pro.
Can I Wear Earbuds with a Healing Daith Piercing?
This is going to be a hard no. Honestly, it's one of the biggest (but most important) sacrifices you'll make for a happy, healthy daith piercing. Think about it: earbuds sit exactly where your new piercing is trying to heal.
They're a triple threat—they introduce bacteria, put constant pressure on the fragile tissue, and are notorious for snagging jewelry. To keep your healing on track and avoid a world of irritation, you’ll have to make a temporary switch.
- Go for over-ear headphones. Find a comfy pair that sits completely around your ear, not on it. This avoids all contact and pressure.
- Be patient. Don't even think about popping an earbud back in until you've cleared the entire 6-12 month healing window. Waiting now prevents major setbacks later.
Will a Daith Piercing Actually Help My Migraines?
Ah, the most famous question of them all! The daith piercing blew up around 2015, surrounded by claims that it was a miracle cure for migraines. While the stories are compelling, the scientific community is pretty clear: it's most likely a placebo effect. There just aren't any solid clinical trials to back it up, even though some clinics anecdotally reported up to a 60% reduction in migraine frequency for certain patients. For a deeper look, check out the full story on whether a daith piercing can cure migraine headaches.
From a piercer's perspective, this myth really shows why aftercare is so critical. An infected daith can cause throbbing pain that easily mimics a migraine flare-up. Interestingly, polls on piercing forums show that while 20-30% of people initially get the piercing hoping for migraine relief, a whopping 85% end up keeping it purely for the aesthetic.
Our Advice: Get a daith piercing because you love the way it looks and want to express your unique style. A gorgeous, well-healed piercing is a guaranteed win—a medical cure, not so much!
When Can I Finally Change My Jewelry?
We know, we know. You're dying to swap your starter jewelry for some of the amazing pieces you've been eyeing. But you absolutely have to pump the brakes until you are fully healed. Changing jewelry too early is one of the worst things you can do.
It can easily tear the delicate fistula (the skin tunnel your body has worked so hard to create), which basically sends you right back to day one of healing. Nobody wants that.
The only exception is if your professional piercer downsizes the post for you after the initial swelling has gone down, which is usually around the 4-8 week mark. Otherwise, that starter jewelry needs to stay put for the full 6-12 month healing period. Once you're officially healed, the real fun can begin!
Is It Normal for My Daith to Feel Healed Early?
Yes! And this is the trap so many people fall into. It's incredibly common for cartilage piercings, including the daith, to look and feel perfectly fine on the outside after just a few months. The initial soreness and redness disappear, and it's super tempting to think you're in the clear.
But the real work is still happening on the inside. That fistula is still maturing, toughening up, and getting stronger. This is precisely why you have to stay disciplined with your aftercare routine for the full recommended time, even when your piercing seems like it's already healed.
Ready to celebrate your fully healed daith or just dreaming of the possibilities? Shop the entire collection of stunning daith jewelry at Bodycandy.com! We have an incredible collection of daith rings and clickers just waiting for you.